


Step-by-step guide for setting up the Telegram integration in Requiply. After completing the setup, you can send automated booking notifications to clients in Telegram — with formatting, PDF attachments, and buttons — directly from workflows.
Telegram works differently from SMS and Viber. There is no aggregator and no sender name: your business creates its own Telegram bot, and messages come from that bot. Because a bot cannot write to a phone number, each client opens the bot once, and after that Requiply can message them for free, as often as your workflows require.
Inside Requiply, the integration works like this: you paste your bot token once, write a message template, connect your clients to the bot, and pick that template in a workflow action. When the trigger fires, Requiply sends the message to the client's Telegram chat automatically.
| What Telegram adds | Compared to SMS / Viber |
|---|---|
| No per-message cost | You pay nothing per notification — no aggregator, no packages |
| Rich formatting | Bold, italic, links and code inside the message |
| PDF attachments | The booking invoice and your document templates go with the message |
| Link buttons | A Pay or View booking button under the message |
| Requires a connection | The client must open your bot once before they can be reached |
Step 1: Create Your Telegram Bot
Open Telegram, type botfather into the search field, and open the verified @BotFather account — the official bot that creates every other bot. Press Start to begin the chat.
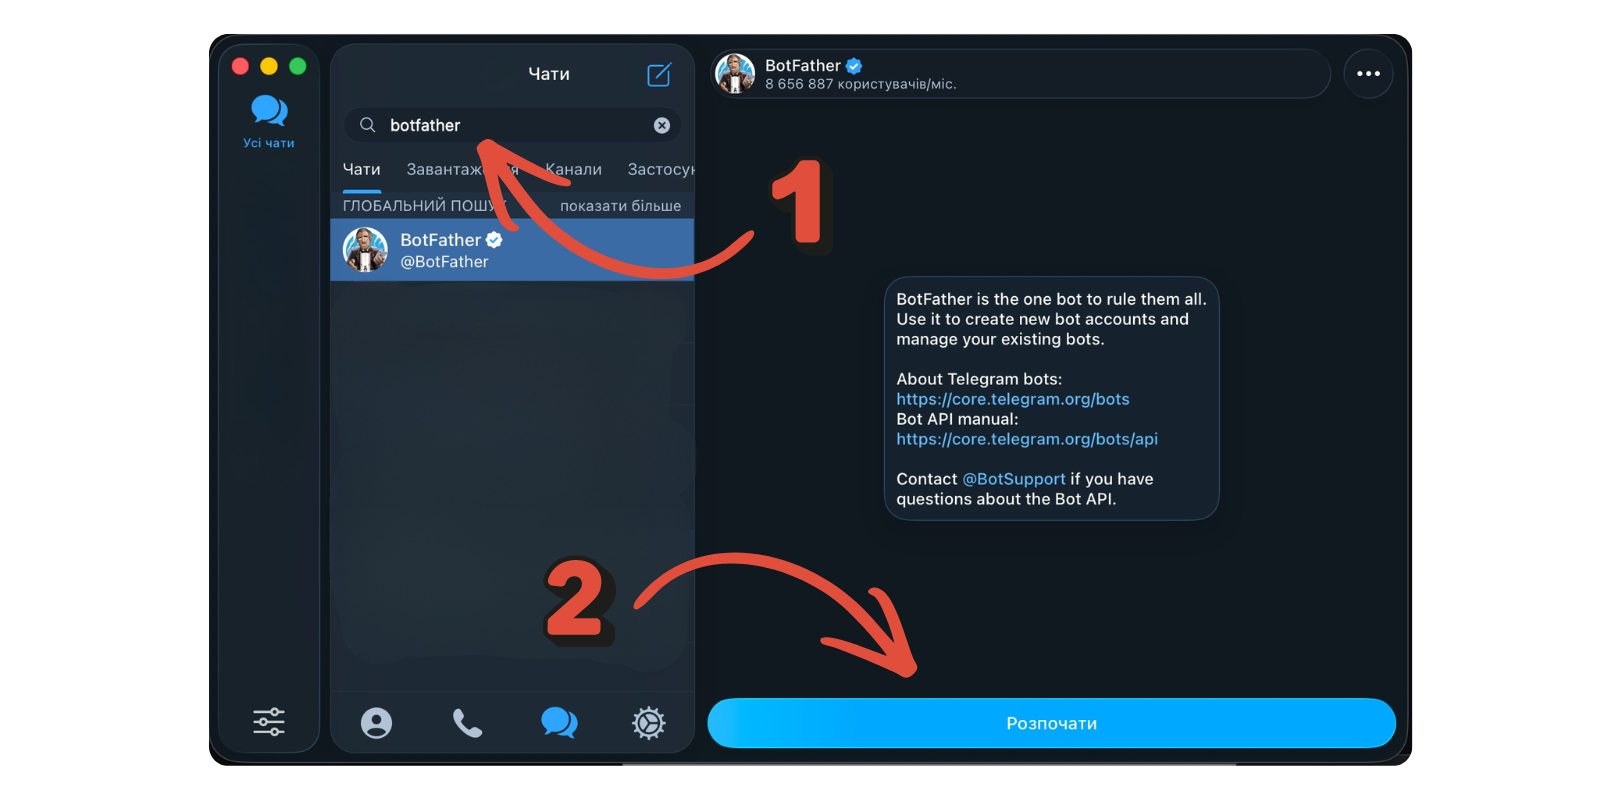
Then send the following commands:
1. Send /newbot
BotFather asks for a display name — this is the name your clients will see at the top of the chat. Use your business name, for example Requiply Rental.
2. Choose a username
The username must be unique across Telegram and end with bot, for example requiply_rental_bot. This is what forms your clients' invite link: https://t.me/requiply_rental_bot.
3. Copy the token
BotFather replies with an API token that looks like 123456789:AAF.... Copy it — you will paste it into Requiply in the next step.
Keep this token private. Anyone who has it can send messages as your bot. If it leaks, send
/revoketo BotFather and paste the new token into Requiply.
Optionally, still in BotFather, set a profile photo (/setuserpic) and a description (/setdescription). Clients see both before they press Start, so a logo and one sentence about what the bot does noticeably improves how many of them connect.
Step 2: Connect the Bot in Requiply
Log in to your Requiply profile:
After logging in, open the Telegram setup directly:
This link opens the Communications integrations page with the Telegram dialog already open. To get there manually, open Communications integrations settings and click Setup on the Telegram card.
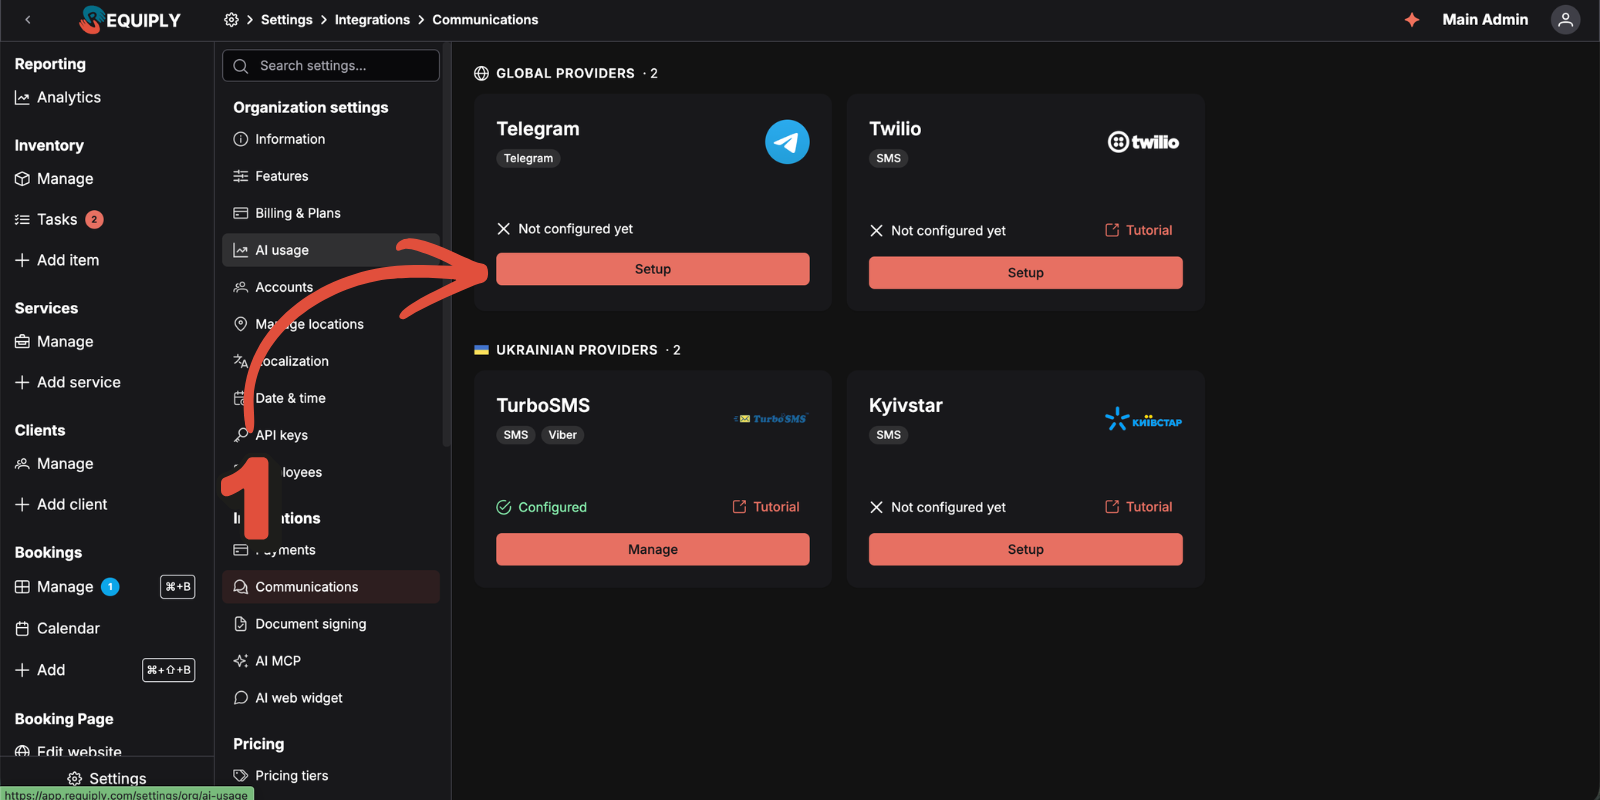
Then complete these steps:
1. Open the Telegram setup dialog
The link above opens it for you. On the page itself, Telegram is the first card under Global providers, next to Twilio. It reads Not configured yet until you connect it — click Setup.
2. Paste the bot token
The dialog has a single field — Bot token. Paste the value from BotFather and click Save. The note under the field is a reminder of the same flow: create the bot with @BotFather, paste the token, and clients connect by pressing Start.
Requiply checks the token with Telegram before storing anything. If the token is valid, Requiply reads the bot's identity, stores its username, and registers the webhook that lets clients connect. Nothing else needs to be configured on the Telegram side.
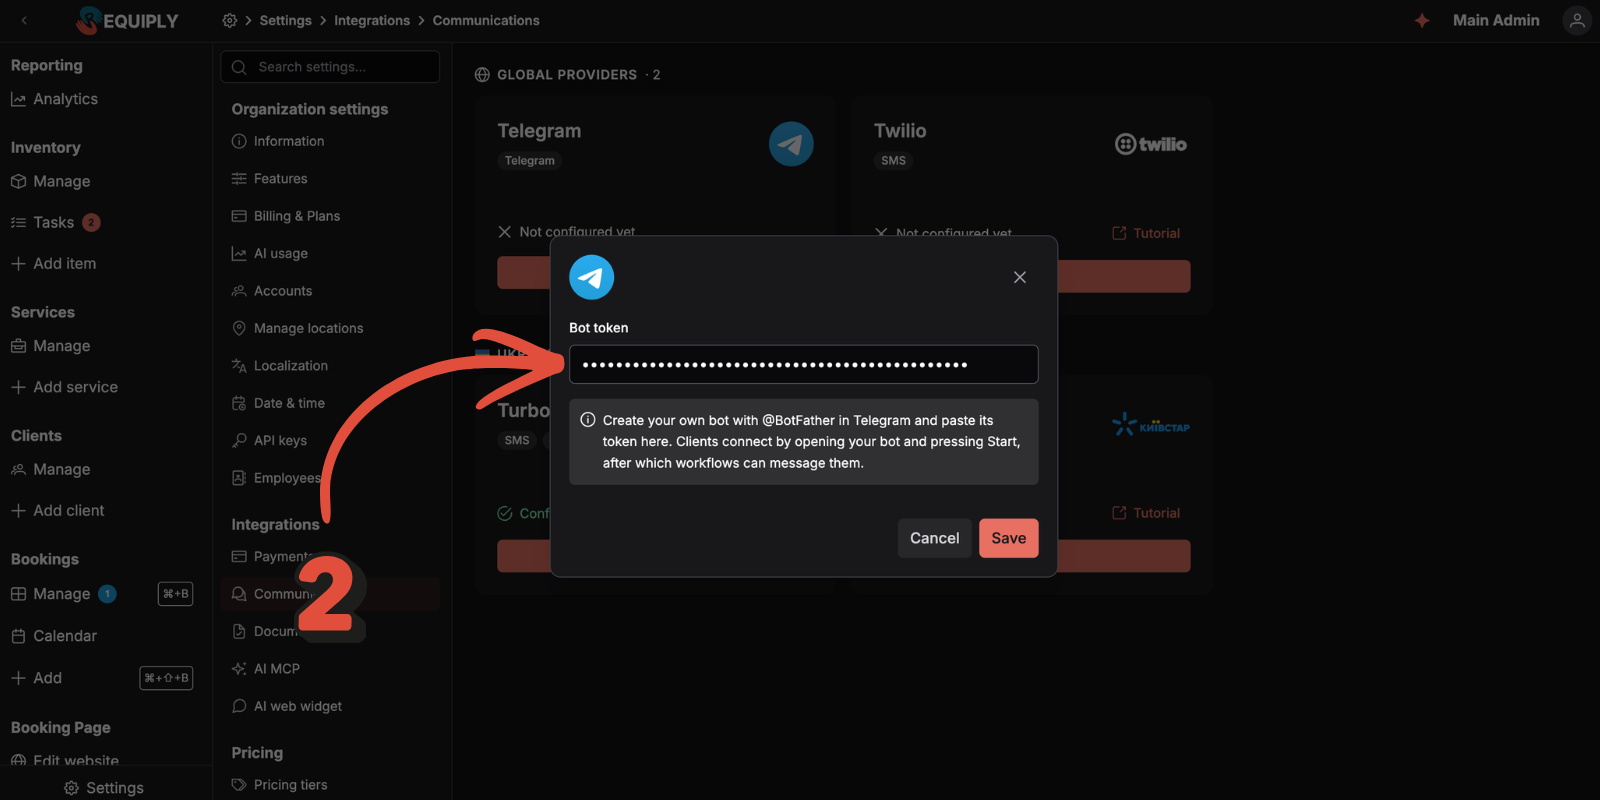
3. Check that the integration is saved
The card switches to Configured, its button becomes Manage, and Telegram becomes available as a provider in workflow actions.
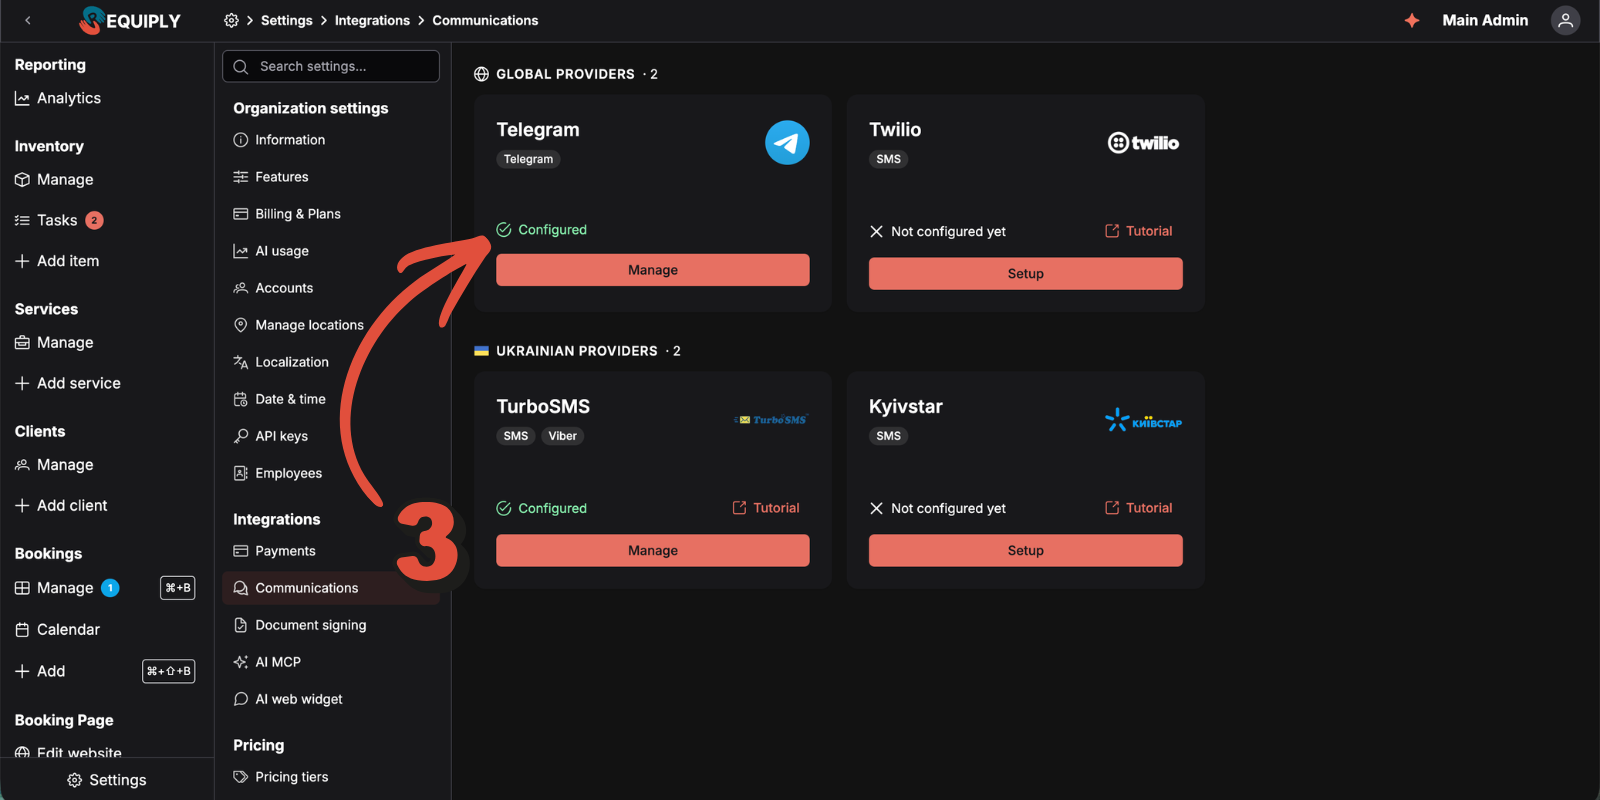
Only admins can connect or replace a messaging provider. The token is stored encrypted and is never shown again — use Replace when you need to rotate it.
Step 3: Write a Message Template
The text your clients receive lives in a message template, not in the workflow. Open:
Click Add template and fill in the form:
| Field | What to enter |
|---|---|
| Name | What the message is for, for example Booking confirmation — Payment |
| Format | Telegram — unlocks formatting, attachments, and buttons |
| Message text | The message itself, written in the editor or in Markdown |
| Attach invoice PDF | Turn on to send the booking invoice as a file |
| Attach documents | Select any of your export templates to send them as PDFs |
| Link buttons | Up to six buttons, each with a caption and a link |
Use the Insert variable dropdown to add booking and client data. Example body:
Hi {{clientFirstName}},
Your booking is confirmed — Booking #{{bookingId}}
Dates: {{bookingStartDateTime}} — {{bookingEndDateTime}}
Items: {{bookingItems}}
Amount due: {{bookingTotal}} (Deposit: {{bookingDeposit}})

Questions? Reply here or call {{organizationPhone}}
Add a button with the caption Pay here and the URL {{paymentIntegrationLink}}, turn on Attach invoice PDF, and the client receives the confirmation, the invoice, and a payment button in one Telegram notification.
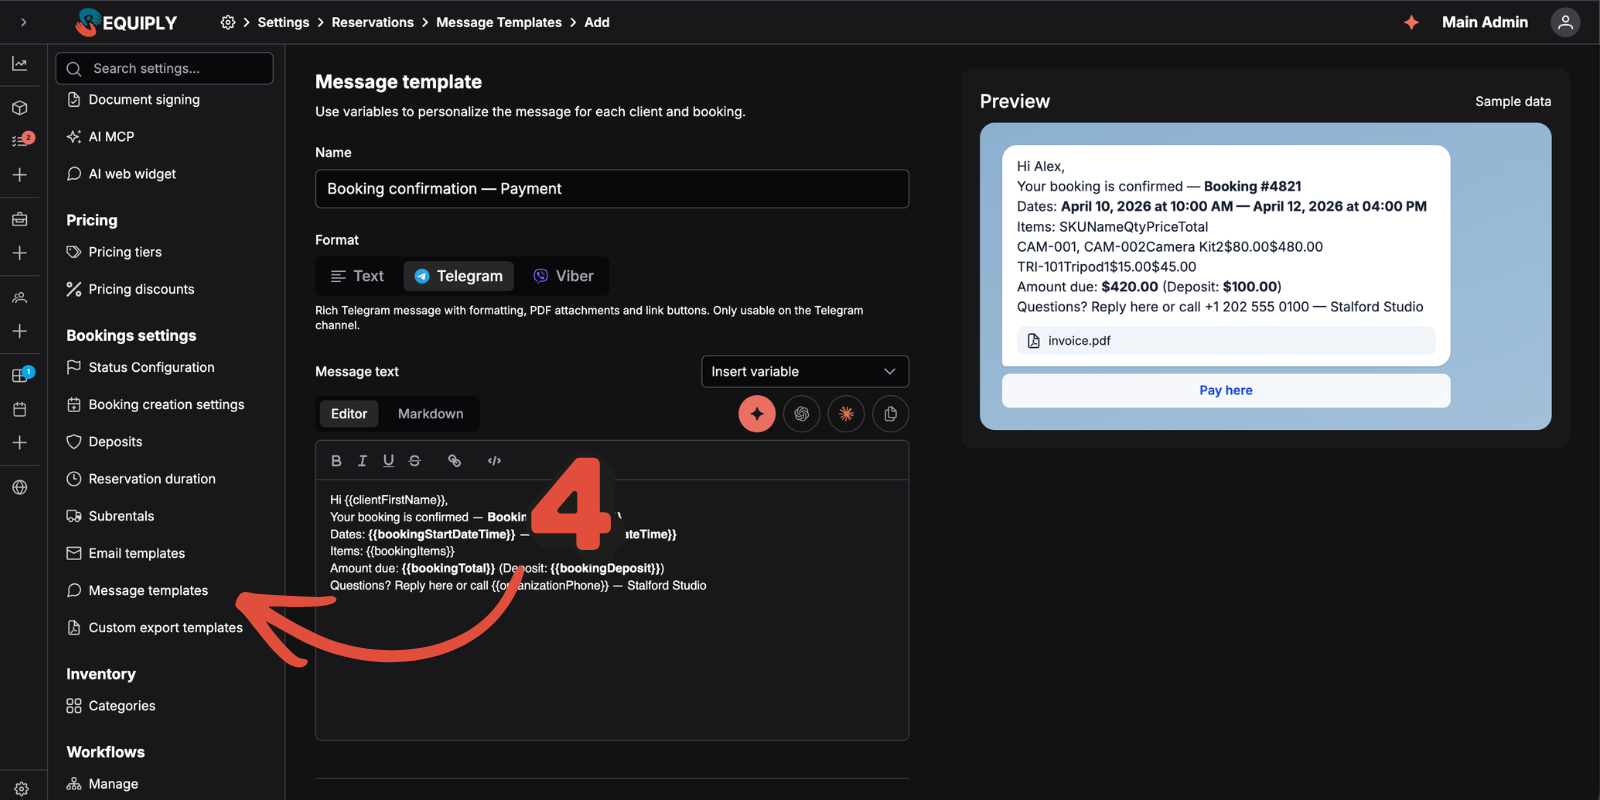
The Preview panel on the right renders the message with sample data exactly as Telegram will show it — the attached invoice.pdf and the button included. The icons above the editor hand the writing to AI: the first one opens the Requiply Assistant, which drafts, improves, or translates the message using the variables available on this page.
Choose the Text format instead if you want one template that works on SMS, Viber, and Telegram alike. Telegram-format templates can only be used on the Telegram channel.
Step 4: Connect Your Clients to the Bot
A Telegram bot cannot message a phone number, so each client connects once. There are two ways to make that happen.
1. Send a personal invite link
Open any client's page from Manage clients and use Copy invite link on the Messaging card. The link looks like https://t.me/your_bot?start=Ab3xY9 and is unique to that client. Until they open it, the card shows Invited.
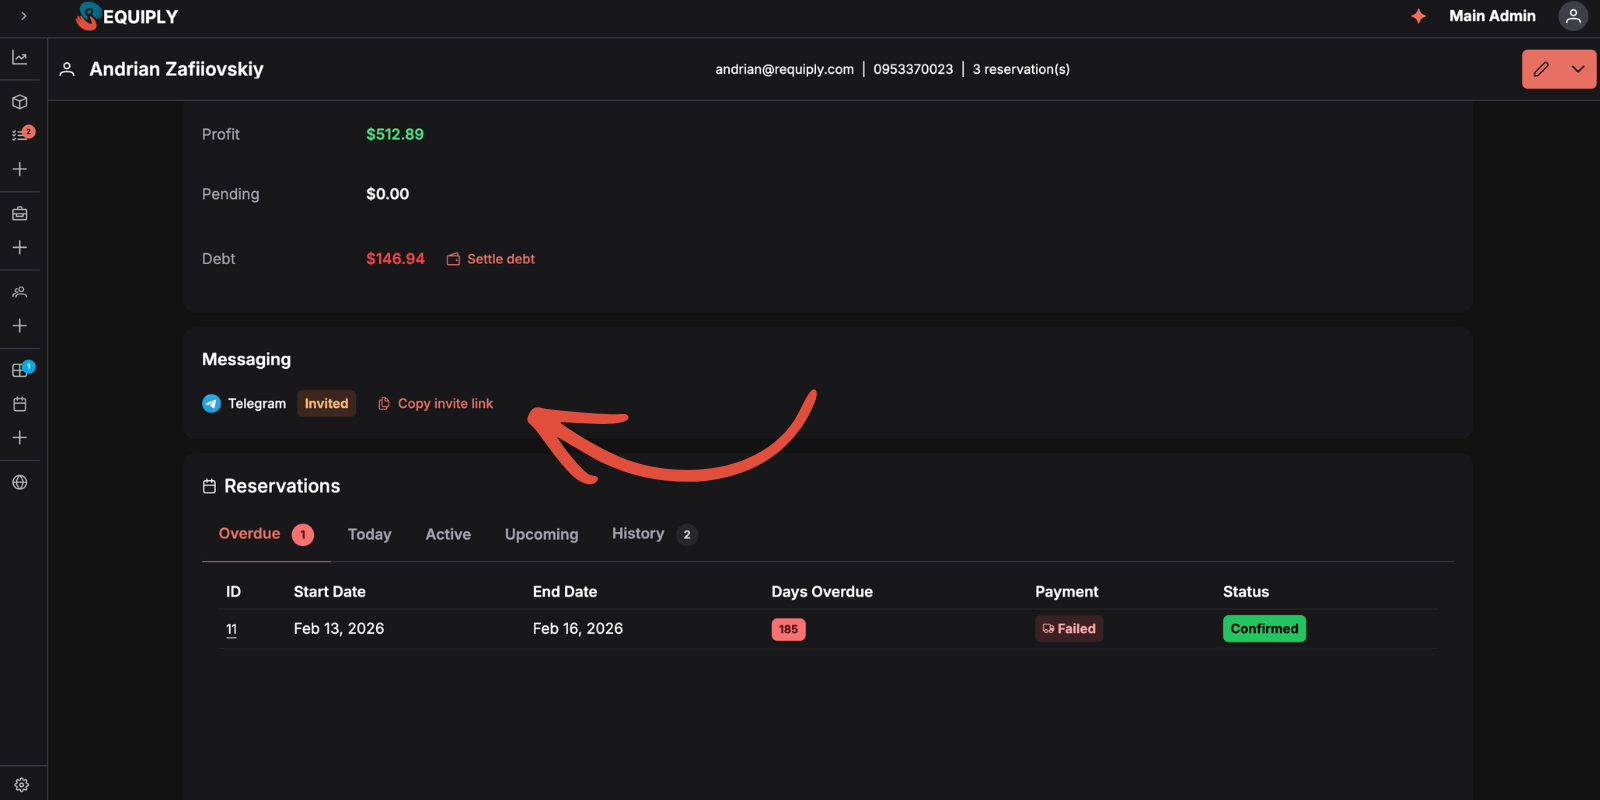
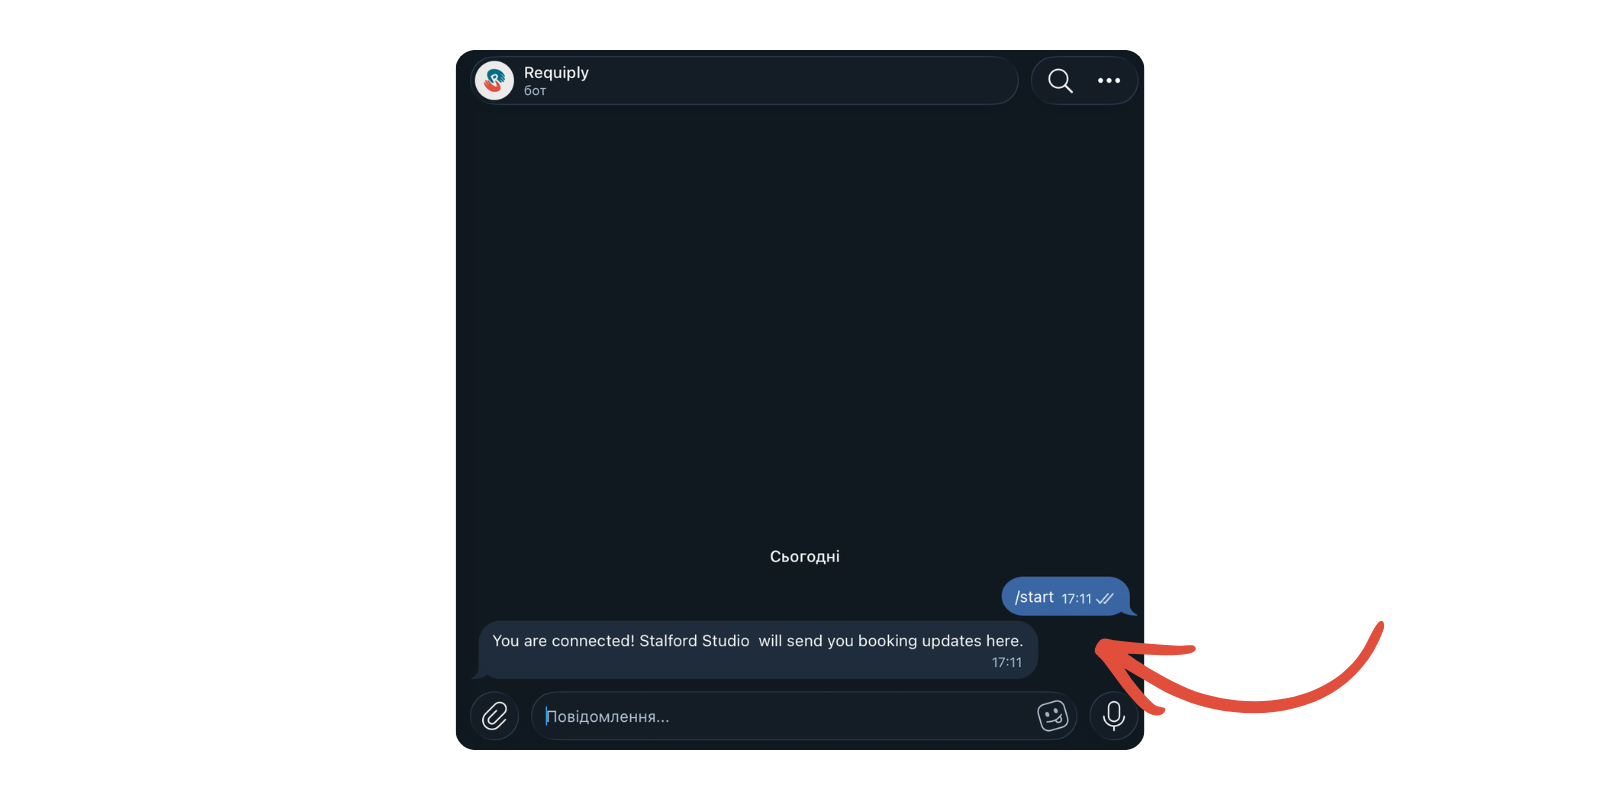
Send that link however you already talk to the client. Opening it and pressing Start connects them instantly, and your bot confirms it in the chat:
2. Put the link in your emails
Insert the {{telegramConnectLink}} variable into an email template — a booking confirmation is the natural place. Requiply generates each client's personal link when the email is sent, so one line in your confirmation email quietly onboards every new client:
Get booking updates in Telegram: {{telegramConnectLink}}
If a client finds the bot on their own and presses Start without a link, the bot asks them to share their phone number with a single button, and Requiply matches it against your client records.
The Messaging card shows where every client stands:
| Status | Meaning |
|---|---|
| Connected | The client opened the bot — workflows can reach them |
| Invited | A link was created, but the client has not opened the bot yet |
| Blocked | The client blocked or removed the bot |
| Not connected | No link has been created for this client yet |
Step 5: Use Telegram in Workflows
Open the Workflows settings page:
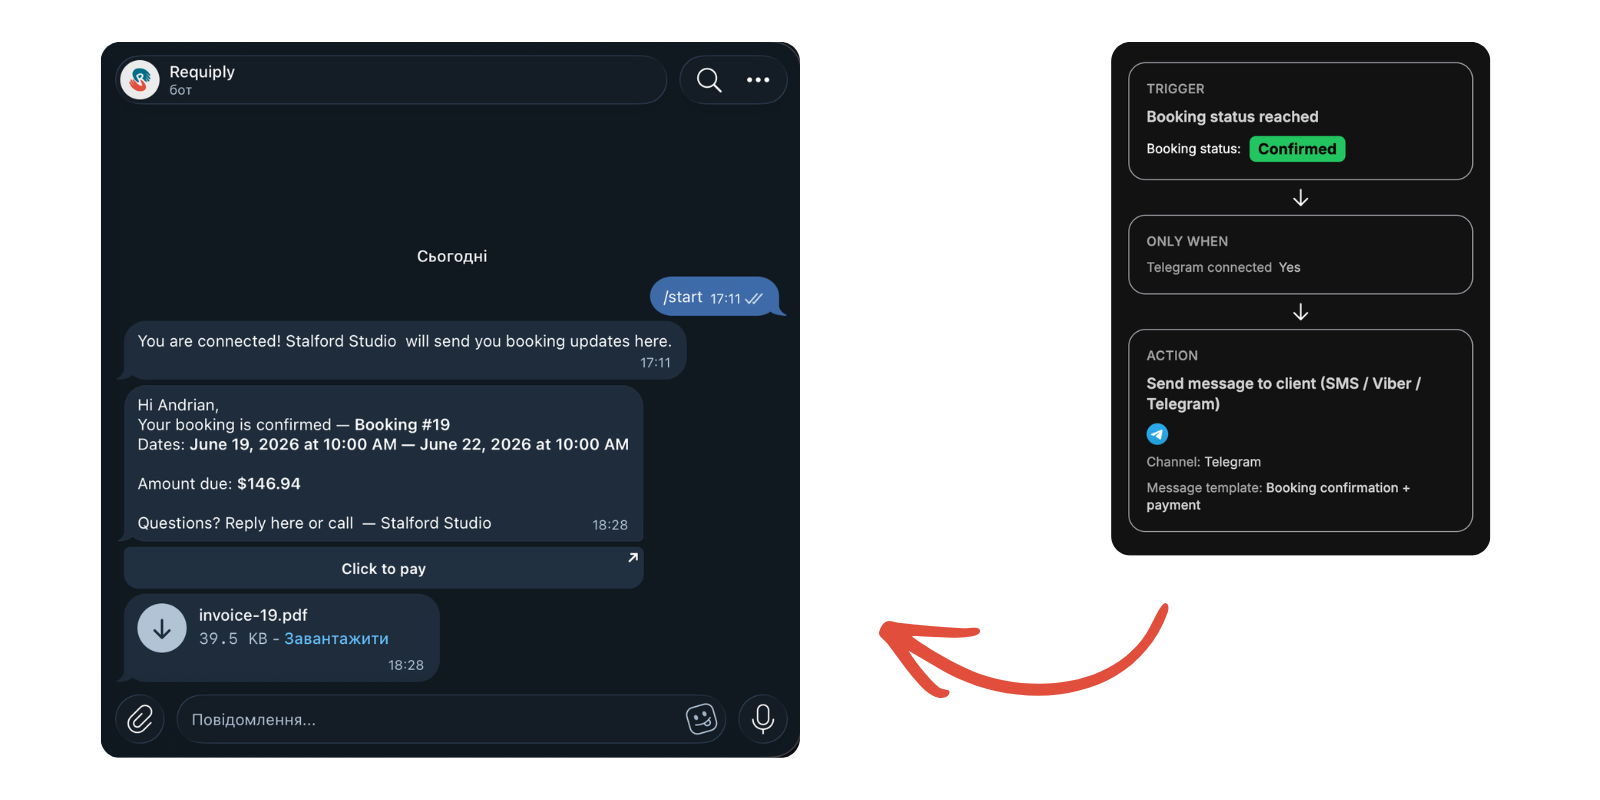
Create a workflow or edit an existing one. A typical booking confirmation workflow looks like this:
| Field | Value |
|---|---|
| Trigger type | Booking status reached |
| Booking status | Confirmed |
| Action type | Send message to client (SMS / Viber / Telegram) |
| Provider | Telegram |
| Channel | Telegram |
| Message template | Booking confirmation — Payment |
The template picker only lists templates that fit the selected channel, so a Telegram template appears only when the channel is Telegram.
Tip: add a filter on Client · Telegram connected — Yes so the workflow only runs for clients who can actually receive it, and build a second SMS workflow filtered on No for everyone else.
The workflow preview summarises the whole rule — trigger, filters, action — and this is what the client gets when it fires: the message, the Click to pay button, and the invoice as a PDF file.
Step 6: Check What Was Delivered
Every automated message is recorded on the client's page. Once the client has connected, the Messaging card shows Connected together with their Telegram handle, and Recent messages lists what Requiply sent: the template that was used, the channel, the date, a preview of the text, and a Sent or Failed tag with the reason for any failure.
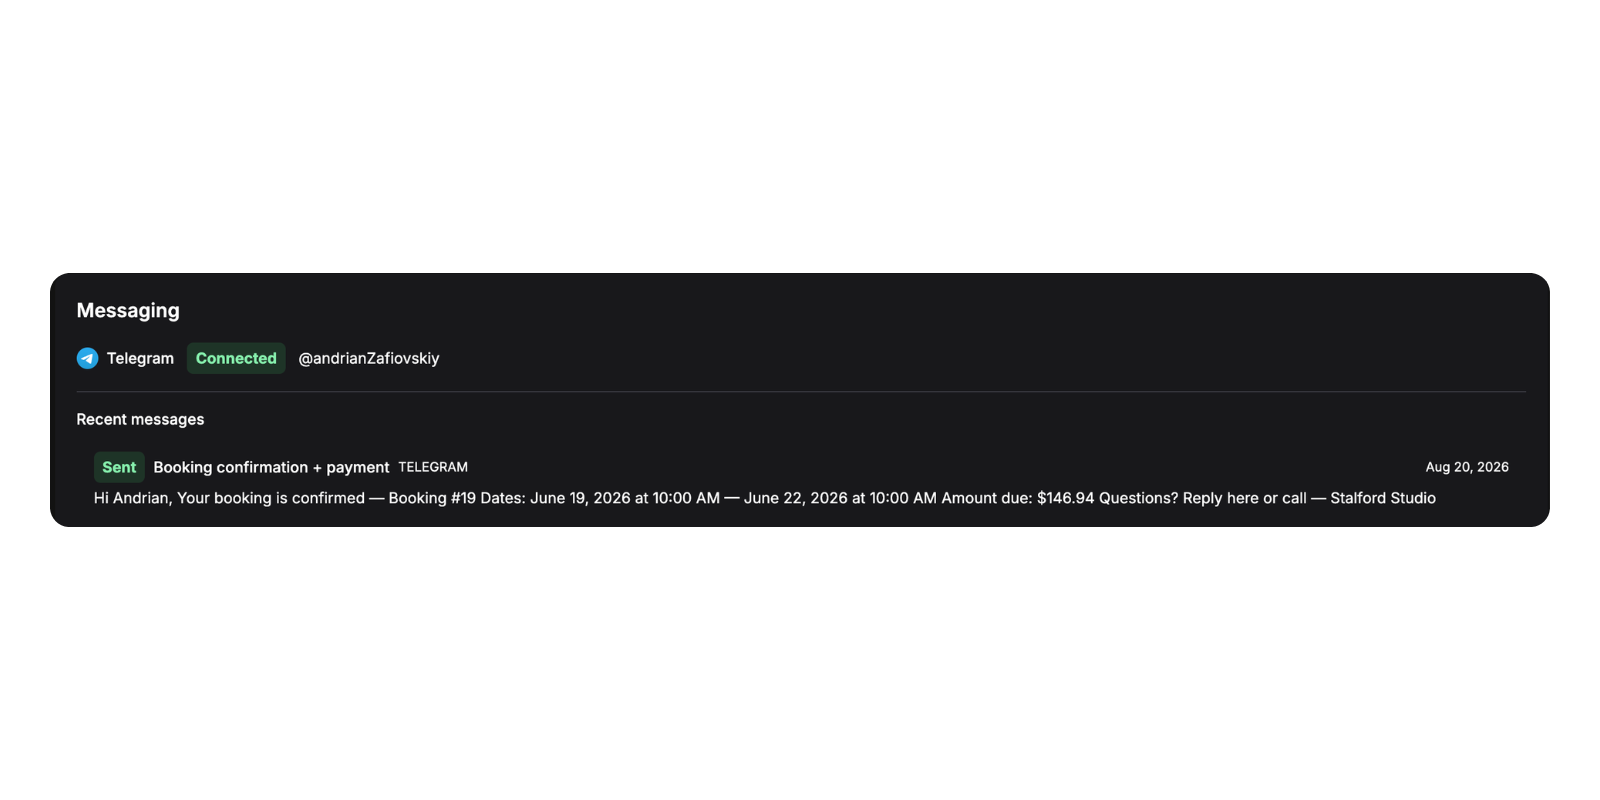
The most common reasons a Telegram message does not arrive:
| Reason shown | What it means |
|---|---|
| The client has not connected Telegram yet | Send them the invite link |
| The client blocked the bot | Use another channel for this client |
| The template format does not match the channel | The workflow points at a Viber template on a Telegram channel |
Congratulations! Telegram is now ready to deliver automated booking notifications from Requiply workflows.
Step 7: Typical Workflow Scenarios
After Telegram is connected, you can use it for:
1. Booking confirmations with the invoice attached
Trigger on the Confirmed status and send a Telegram template with Attach invoice PDF enabled and a Pay button. The client gets the confirmation, the document, and the payment link in a single message.
2. Pickup reminders
Use a relative-time trigger — one day before the booking start — with a short template containing the date, the time, and your address.
3. Contracts before pickup
Attach a rental agreement generated from your export templates so the client can read it before they arrive.
4. Payment follow-ups
Trigger on a payment status and send a message with a button pointing at {{paymentIntegrationLink}}.
Additional Information
- One bot per organization:
Requiply uses a single Telegram bot per organization. Replacing the token with a different bot resets every client connection to Invited, and clients must connect again. Re-pasting a rotated token for the same bot keeps all connections. - Client phone numbers:
Store phone numbers with a country code, for example+380951234567. Requiply matches shared Telegram contacts against these numbers. - Attachments:
Invoices and documents are generated at the moment the message is sent, so they always reflect the current state of the booking. - Message length:
Telegram messages are limited to 4096 characters. Longer bodies are trimmed rather than rejected. - Cost:
Telegram Bot API messages are free. There is no per-message charge from Telegram or Requiply.
Have questions? Write to us at info@requiply.com or contact the Requiply support team.
- telegram
- messaging
- integration
- workflows
- message templates
- client notifications
- requiply