


WooCommerce sells things once, so it cannot tell that a camera is free on Friday and booked on Saturday. You do not have to rebuild the shop to fix that. Keep your catalog in WooCommerce, link each product to the same item in Requiply, and the free Requiply Rental Booking plugin replaces "Add to cart" with a booking button that knows dates, stock and your rental prices. The customer checks out on your Requiply booking page, and the booking lands in Requiply next to your inventory, clients and payments. If you would rather not keep two catalogs, Requiply can also create and update the WooCommerce products for you.
How it works
WooCommerce keeps doing what it does well. Everything with a date on it moves to Requiply. You choose how the two catalogs stay in step:
- Link only. You keep products in both places and link each WooCommerce product to its Requiply twin. WooCommerce data is never changed.
- Sync from Requiply. Requiply creates and updates your WooCommerce products every hour, so a new item is added once, in Requiply. Data flows one way only, from Requiply to your shop.
| Part of the shop | Link only | Sync from Requiply |
|---|---|---|
| Descriptions, URLs, SEO | WooCommerce | WooCommerce |
| Name, photos, category of new products | WooCommerce | Requiply |
| Name, photos, category of existing pages | WooCommerce | WooCommerce, or Requiply if you allow it |
| Price and stock on the page | WooCommerce | Requiply |
| Adding a new product | In both places | In Requiply only |
| Availability, cart, checkout, payment, booking | Requiply | Requiply |
WooCommerce never creates an order for a linked product: your shop stays the storefront and Requiply runs the rental behind it.
What a linked product gets:
Set up at Requiply
Start with the Requiply account: the plugin only shows what the account already knows. The 14-day trial is free with no card, and the website integration costs nothing extra.
Inventory. WooCommerce products are not copied into Requiply. Import your rental items from a CSV file or add them by hand. Each item gets a slug made from its name, and Cyrillic names are transliterated ("Об'єктив" becomes obiektyv). The slug is how a WooCommerce product finds its Requiply twin. You can look up any product's slug on the WooCommerce setup page, shown below.
Then check the settings the booking button depends on:
Before you install the plugin
0 / 5Now open Settings > Integrations > Website embed. There are two cards: WordPress (1) for any WordPress site and WooCommerce (2) for shops.
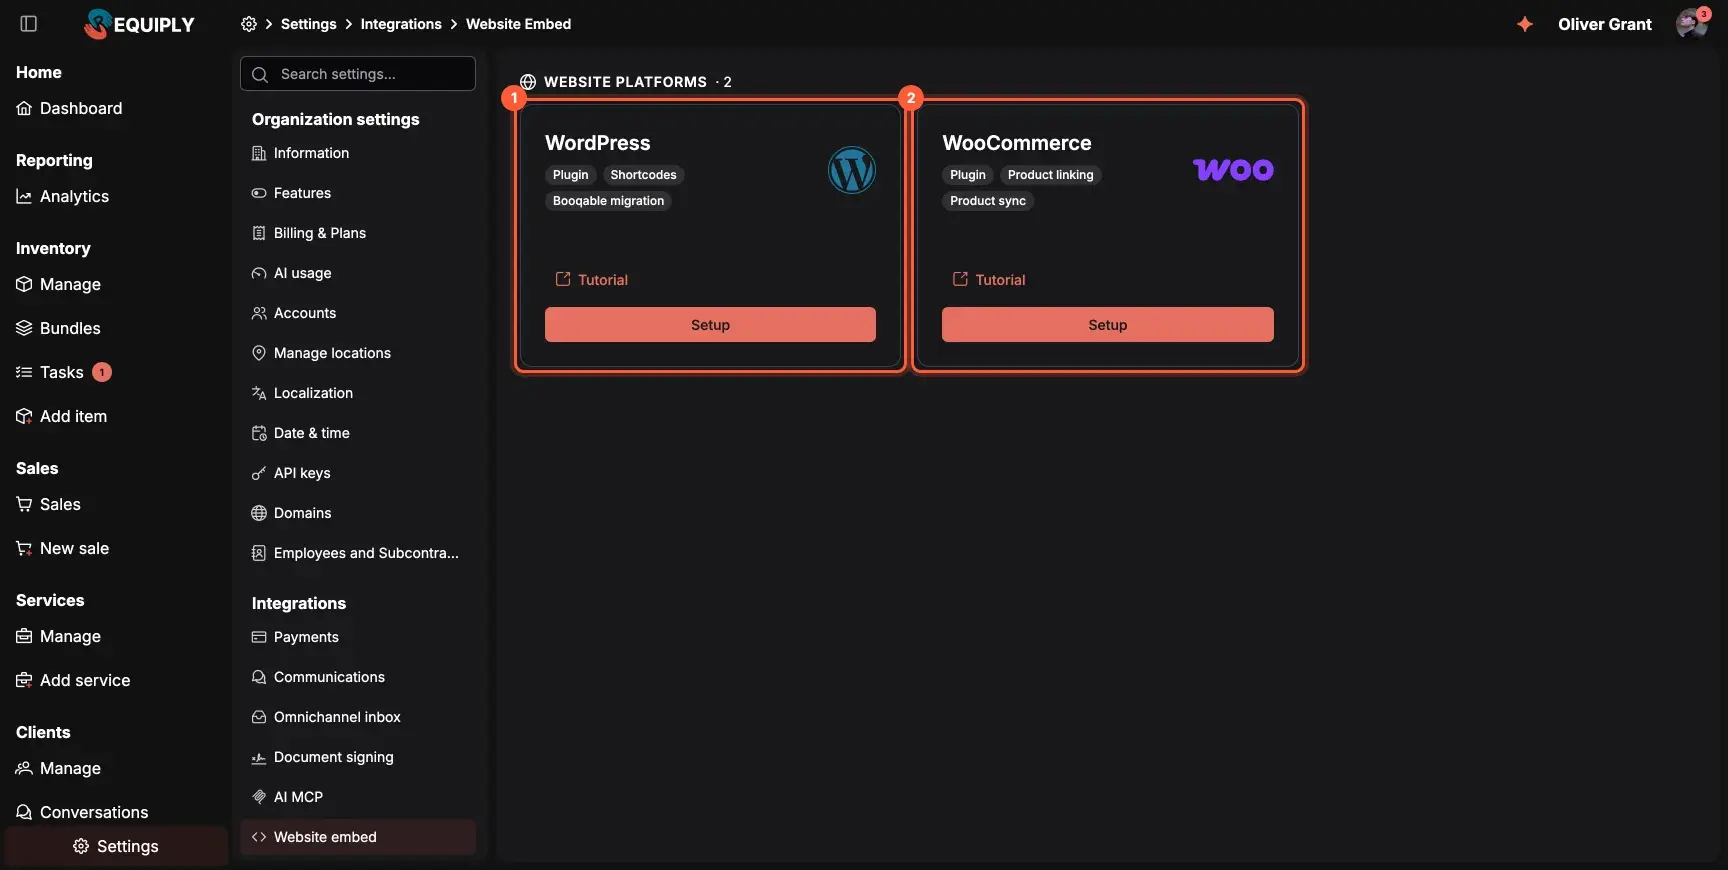 Settings > Integrations > Website embed in Requiply.
The WooCommerce card opens a short guide with the Download plugin button (1), your organization code with a copy button (2) and the two ways to keep products in step (3), explained below. The code is the last part of your booking page address: for portal.requiply.com/my-rental it is my-rental.
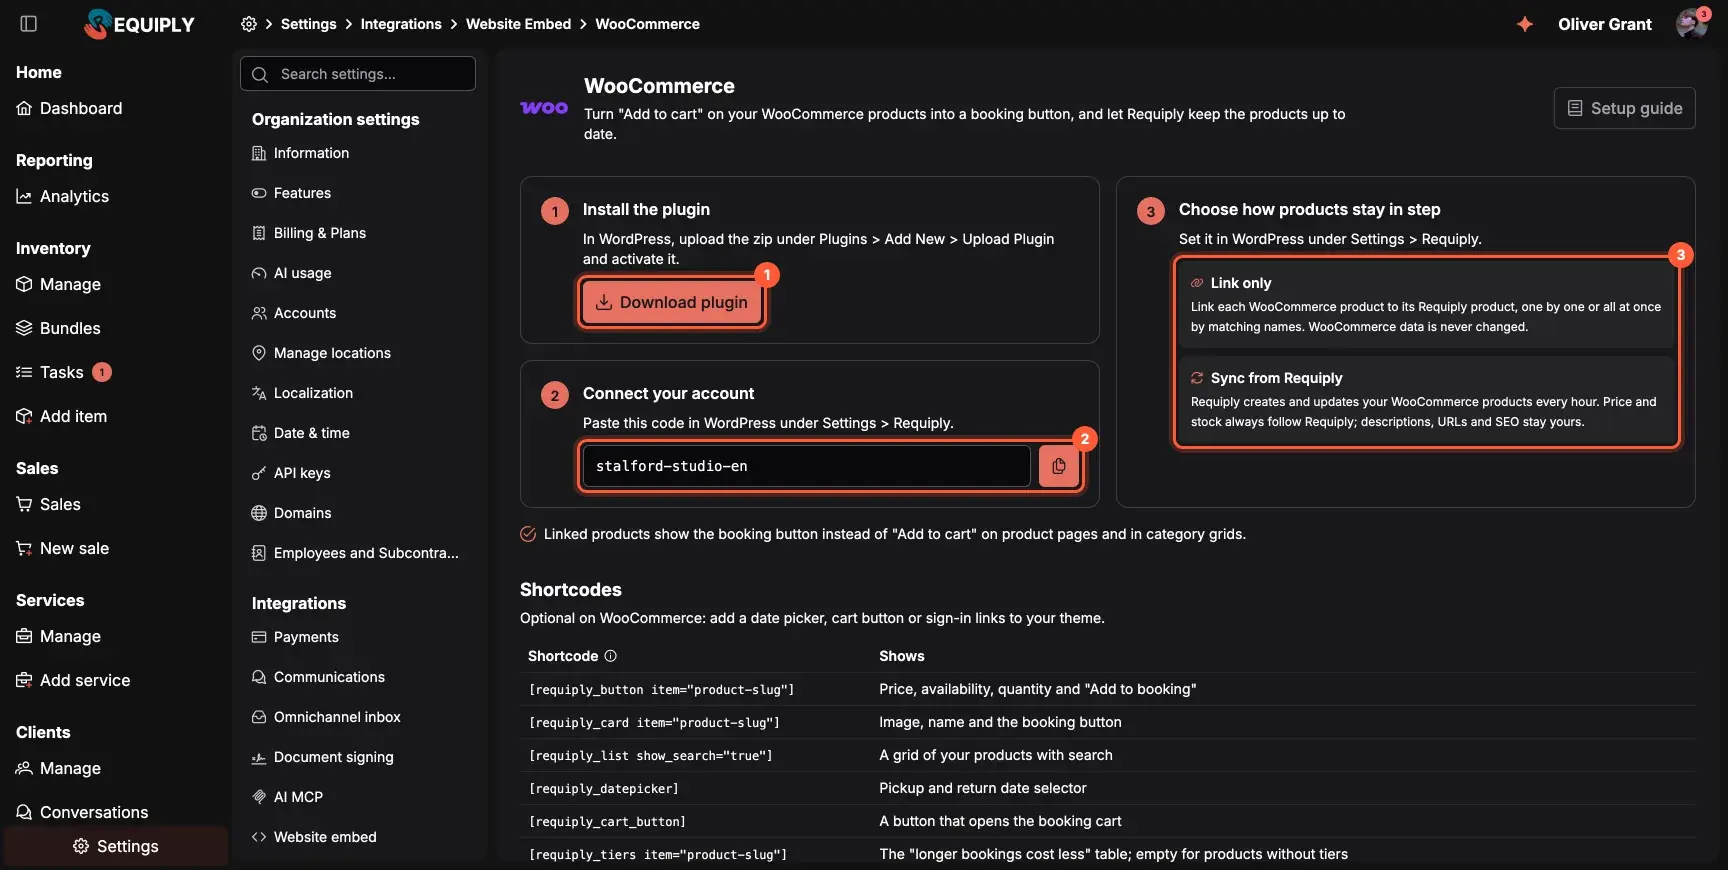 The WooCommerce setup guide in Requiply.
Under the shortcode table on the same page, Find a product slug gives you the slug of any product: search for it (1), pick it and copy the slug (2). You need it when you link a product by hand or place a shortcode in your theme.
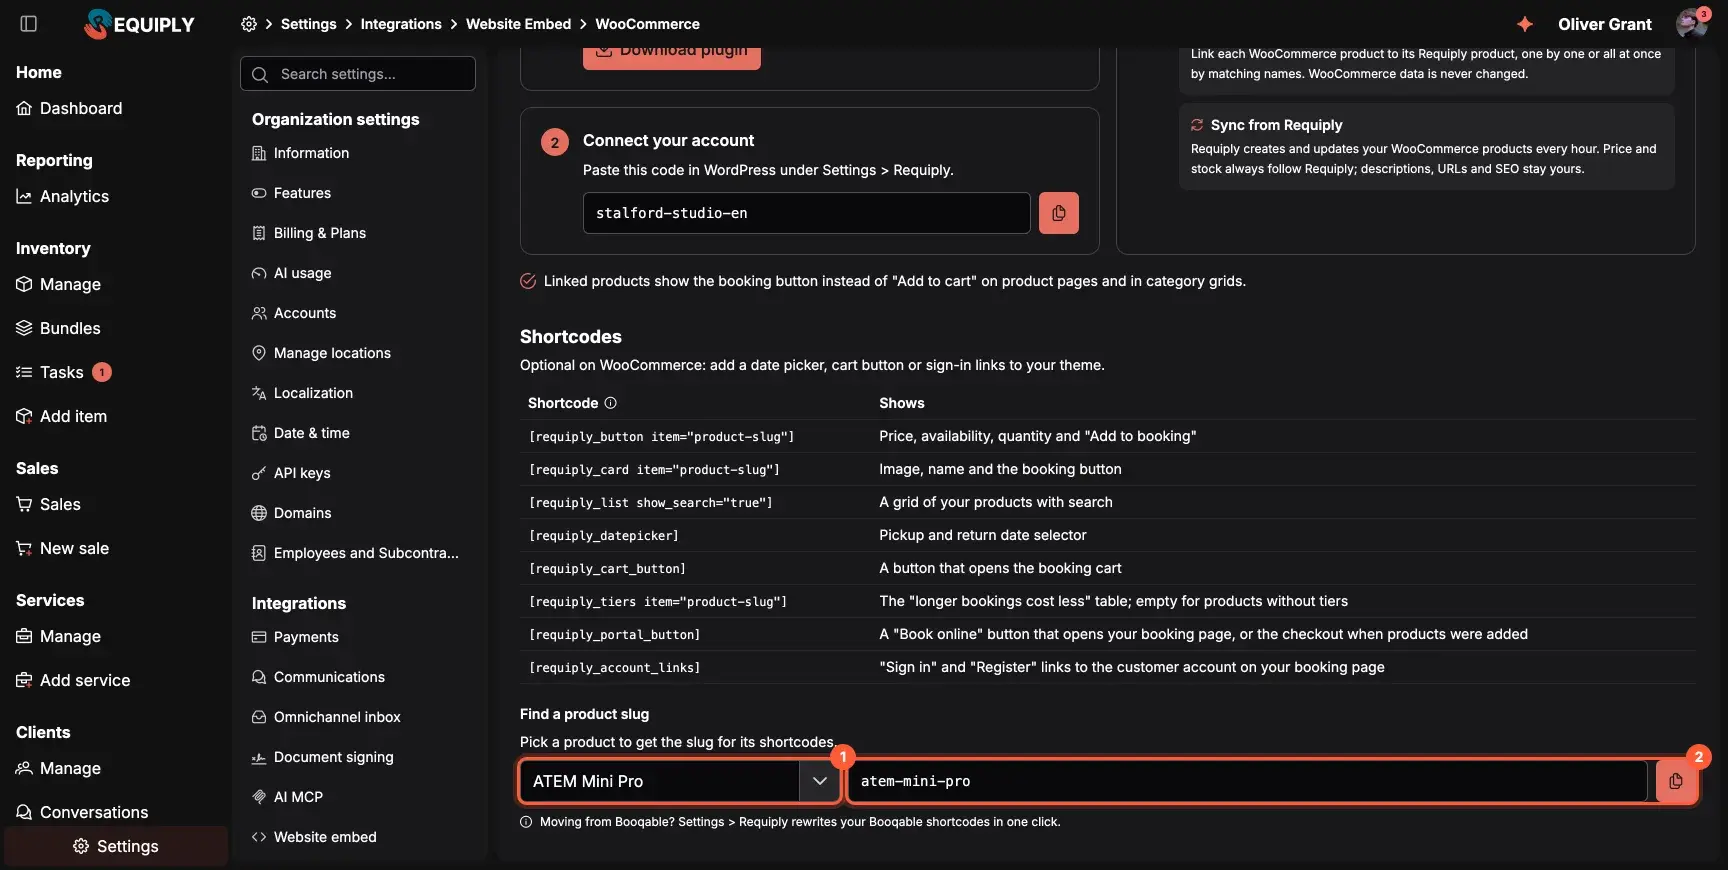 Search for a product (1) and copy its slug (2).
Install the plugin and link your products
In WordPress, go to Plugins > Add New > Upload Plugin, choose the zip you downloaded and click Activate. The plugin needs WordPress 5.8 or later and PHP 7.4 or later. When WooCommerce is active, the plugin turns on its WooCommerce module by itself.
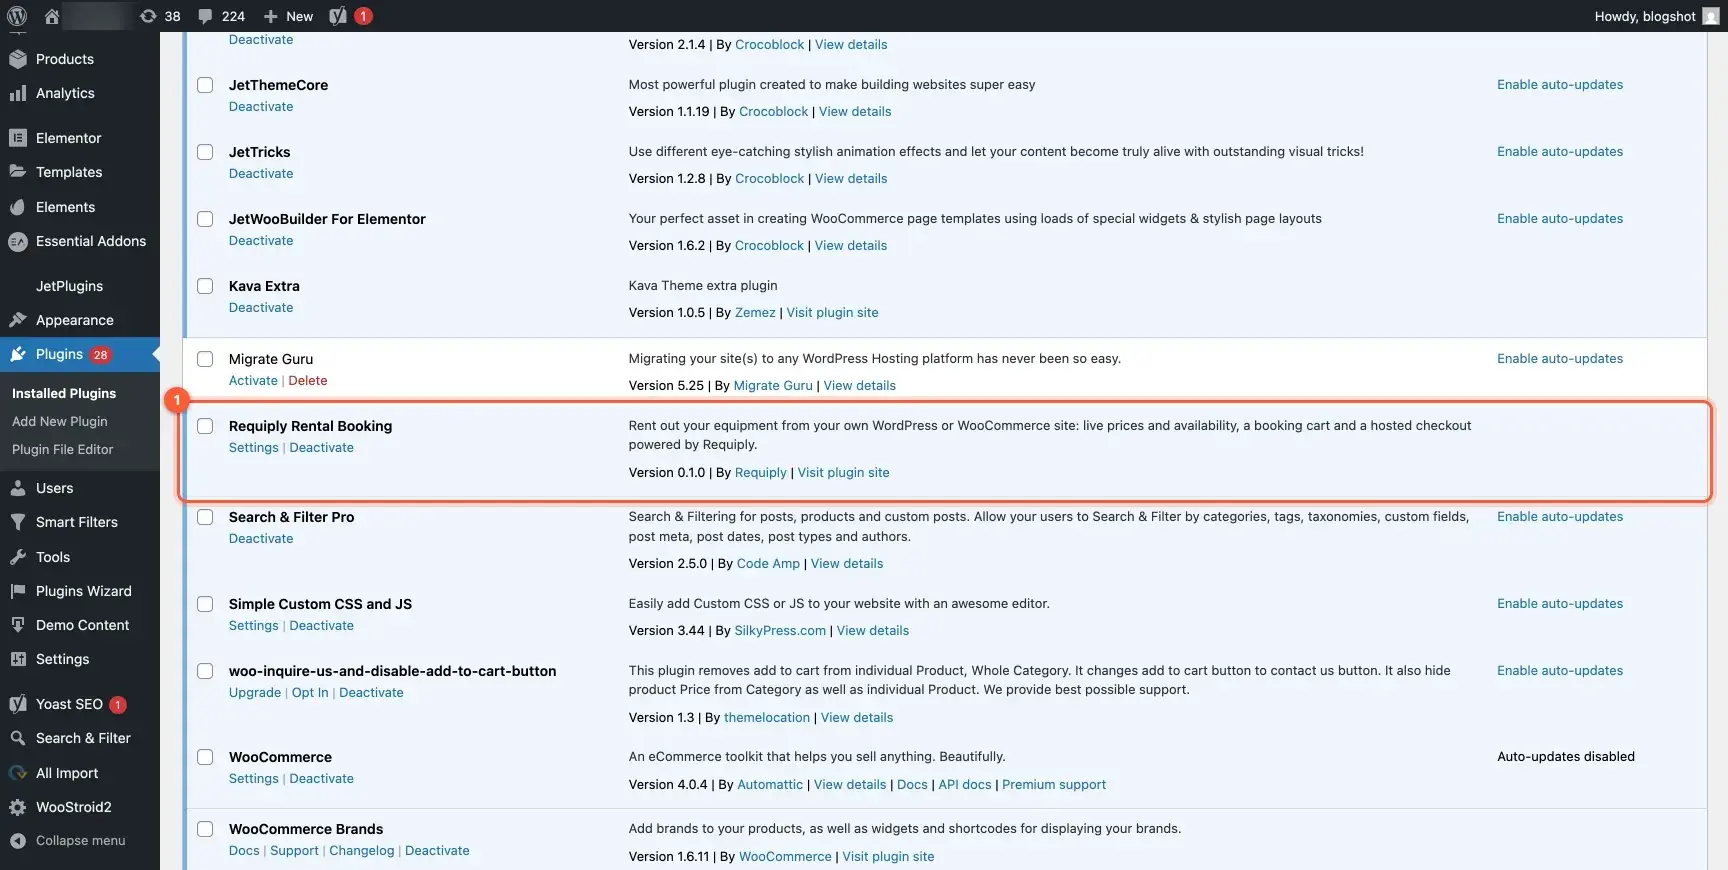 The plugin after activation.
Open Settings > Requiply and paste the organization code (1). After you save, a green line with your organization name and currency confirms the code is right. The account links block (2) adds "Sign in" and "Register" to a menu you choose, or into any element by CSS selector.
The WooCommerce section has two parts:
- Linked products (3). Replace the WooCommerce "Add to cart" with the Requiply booking button; hide the WooCommerce price; show the pricing tiers table on product pages. Hide the price if your WooCommerce prices are empty or outdated, so a page never shows two numbers.
- Link products by matching slug (4). One click links every unlinked WooCommerce product whose slug or title equals a Requiply slug.
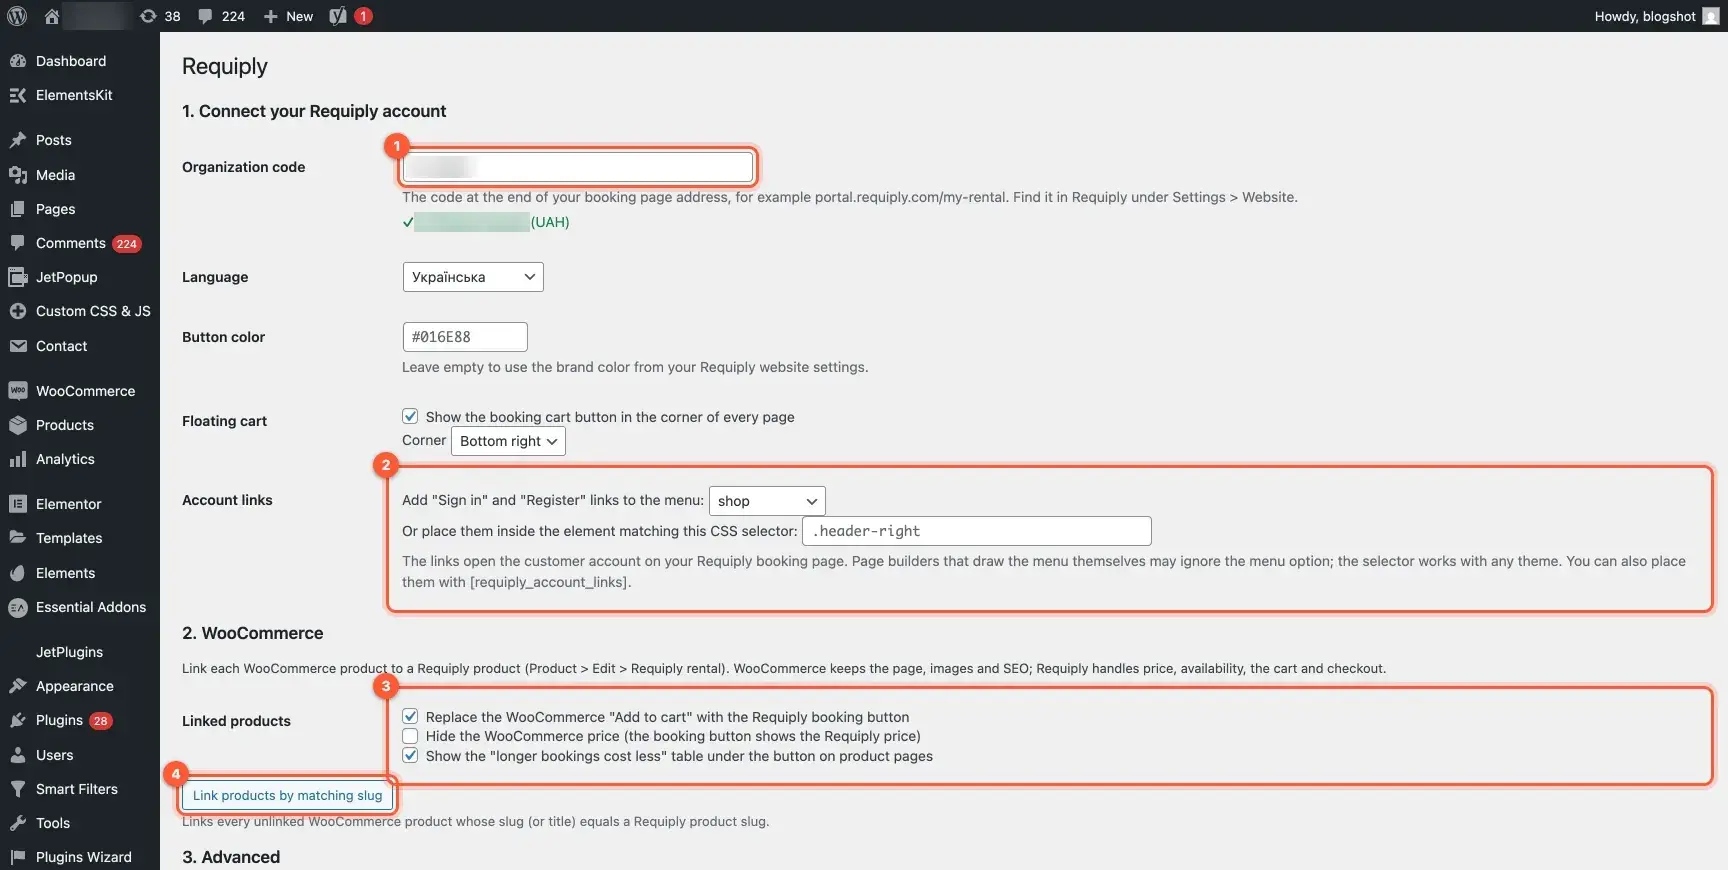 Settings > Requiply in WordPress.
For products that did not match, open the product, stay on the General tab and pick a slug in the Requiply rental field (1). The dropdown suggests every product in your Requiply account. Variable products are linked once, at the product level, not per variation.
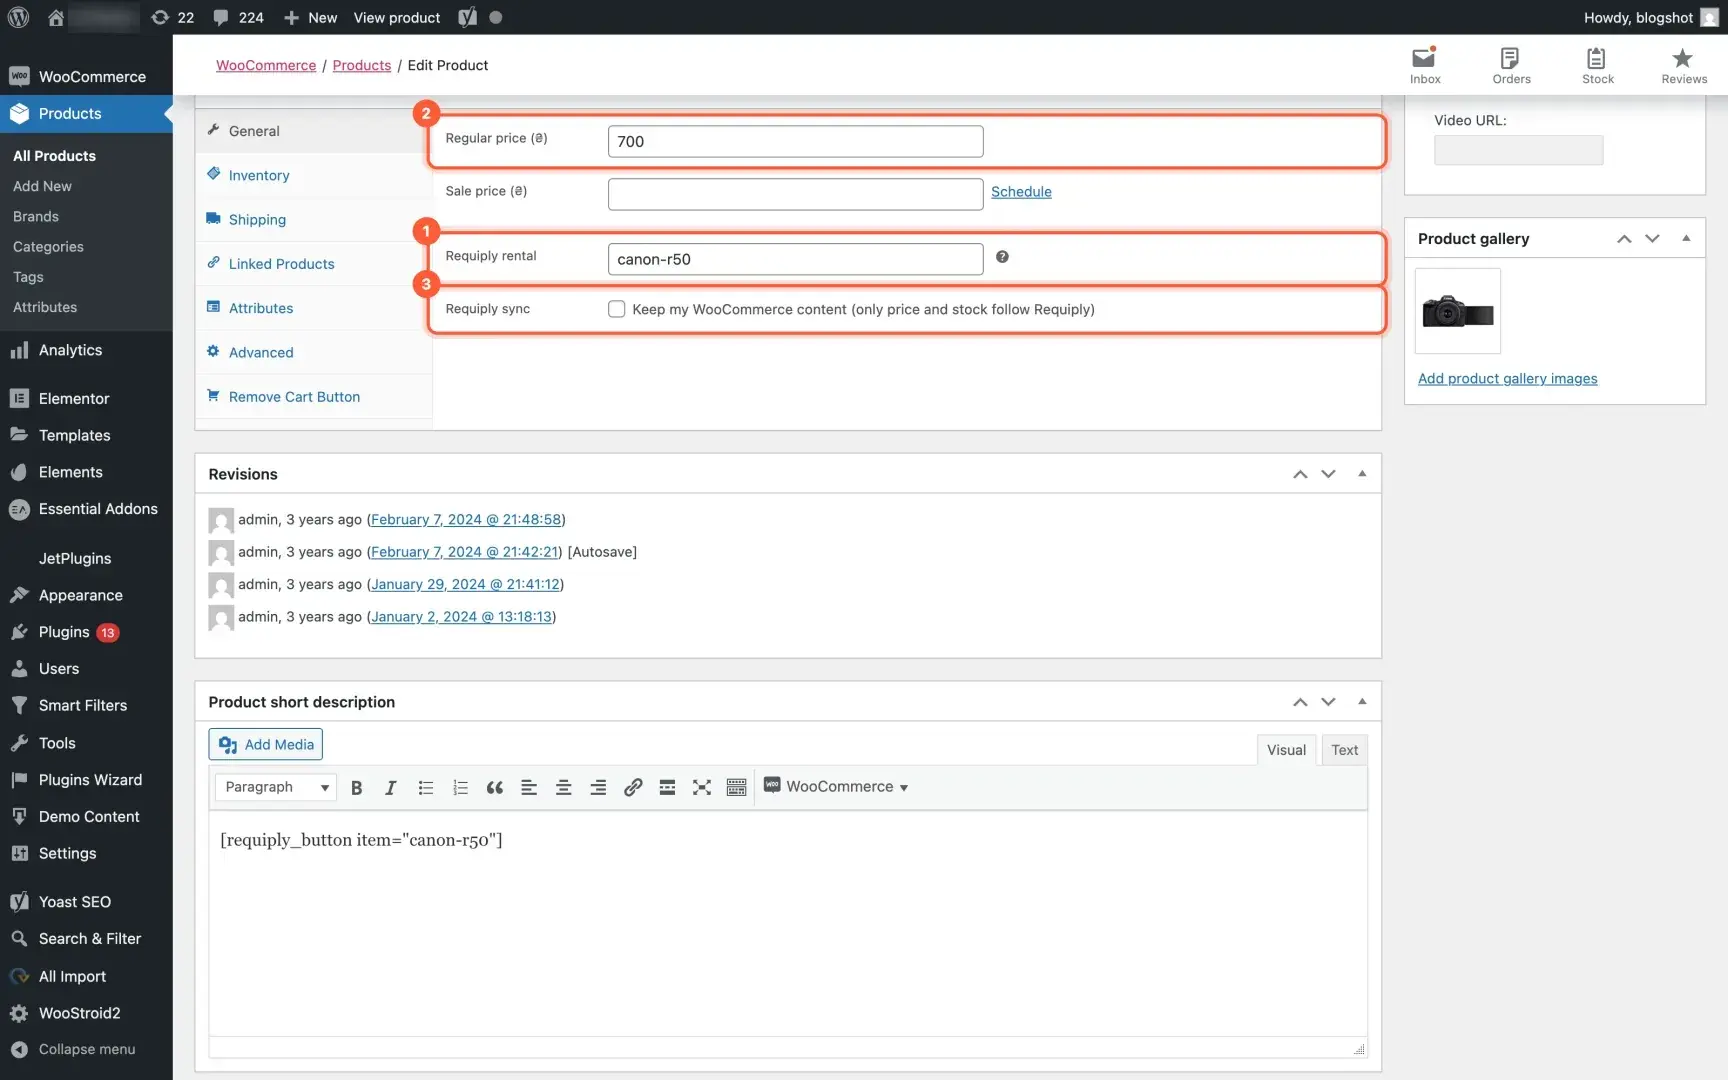 The Requiply rental field (1) on a WooCommerce product.
The Products list gets a Requiply column (1) that shows what is linked and what is not. The same field is in Quick Edit, so you can fix a few products without opening each one.
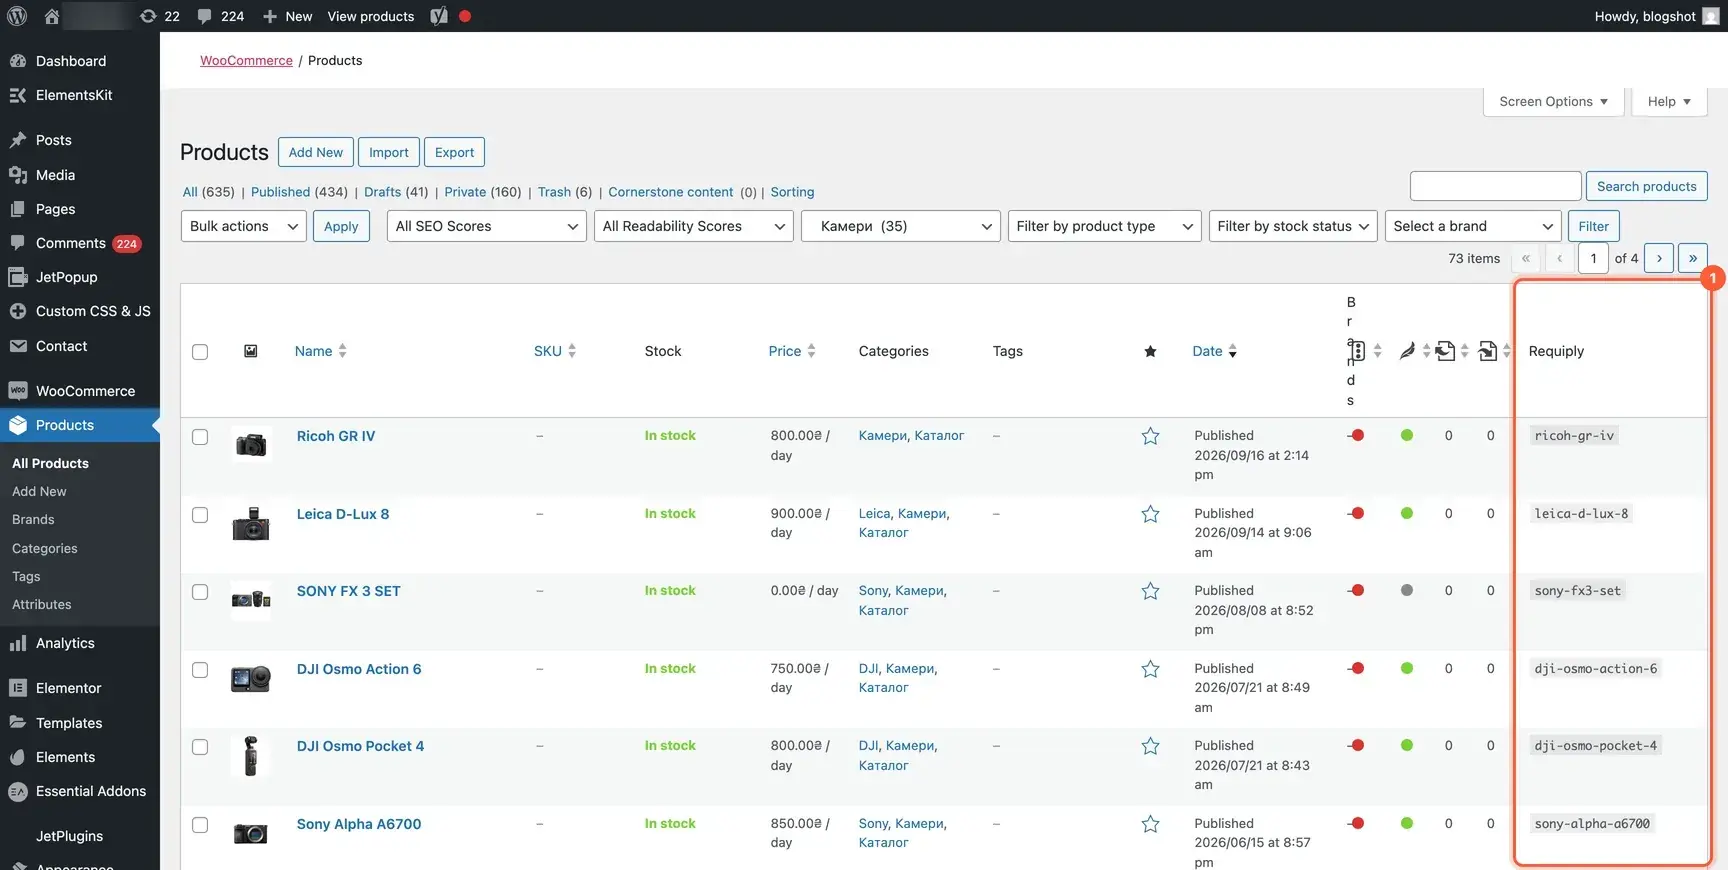 The WooCommerce Products list with the Requiply column.
The plugin also prints the current Requiply price into the page HTML, refreshed every 10 minutes, so search engines and visitors without JavaScript still see it.
Let Requiply create and update your products
With sync on, you can skip most of the linking above. In Settings > Requiply, section 3. Product sync, choose Sync (1). Pick whether new products are published right away or saved as drafts for review, and whether pages that already existed in WooCommerce should also take their name, photos and category from Requiply (2). The last run and the Preview and Sync now buttons sit below (3).
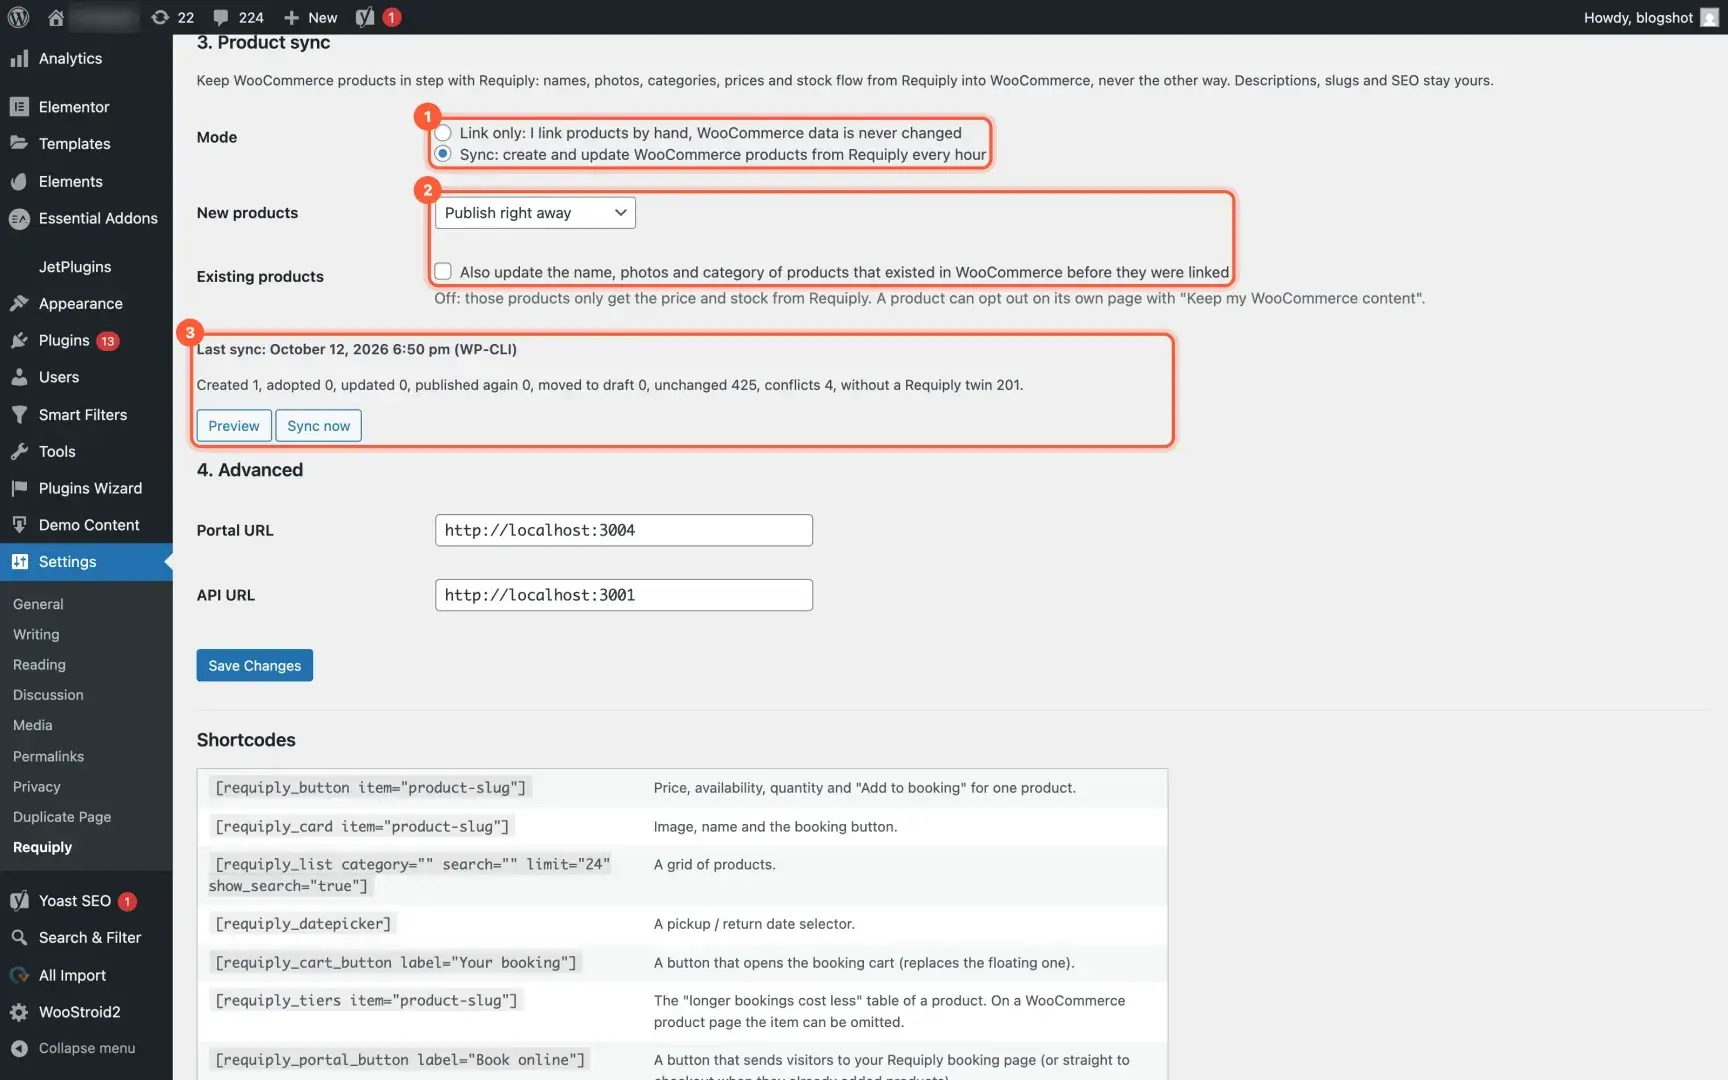 The Product sync section in Settings > Requiply.
Preview shows what the next run will do before anything changes: products it will create, existing pages it will adopt, prices it will update, and products it will move to draft.
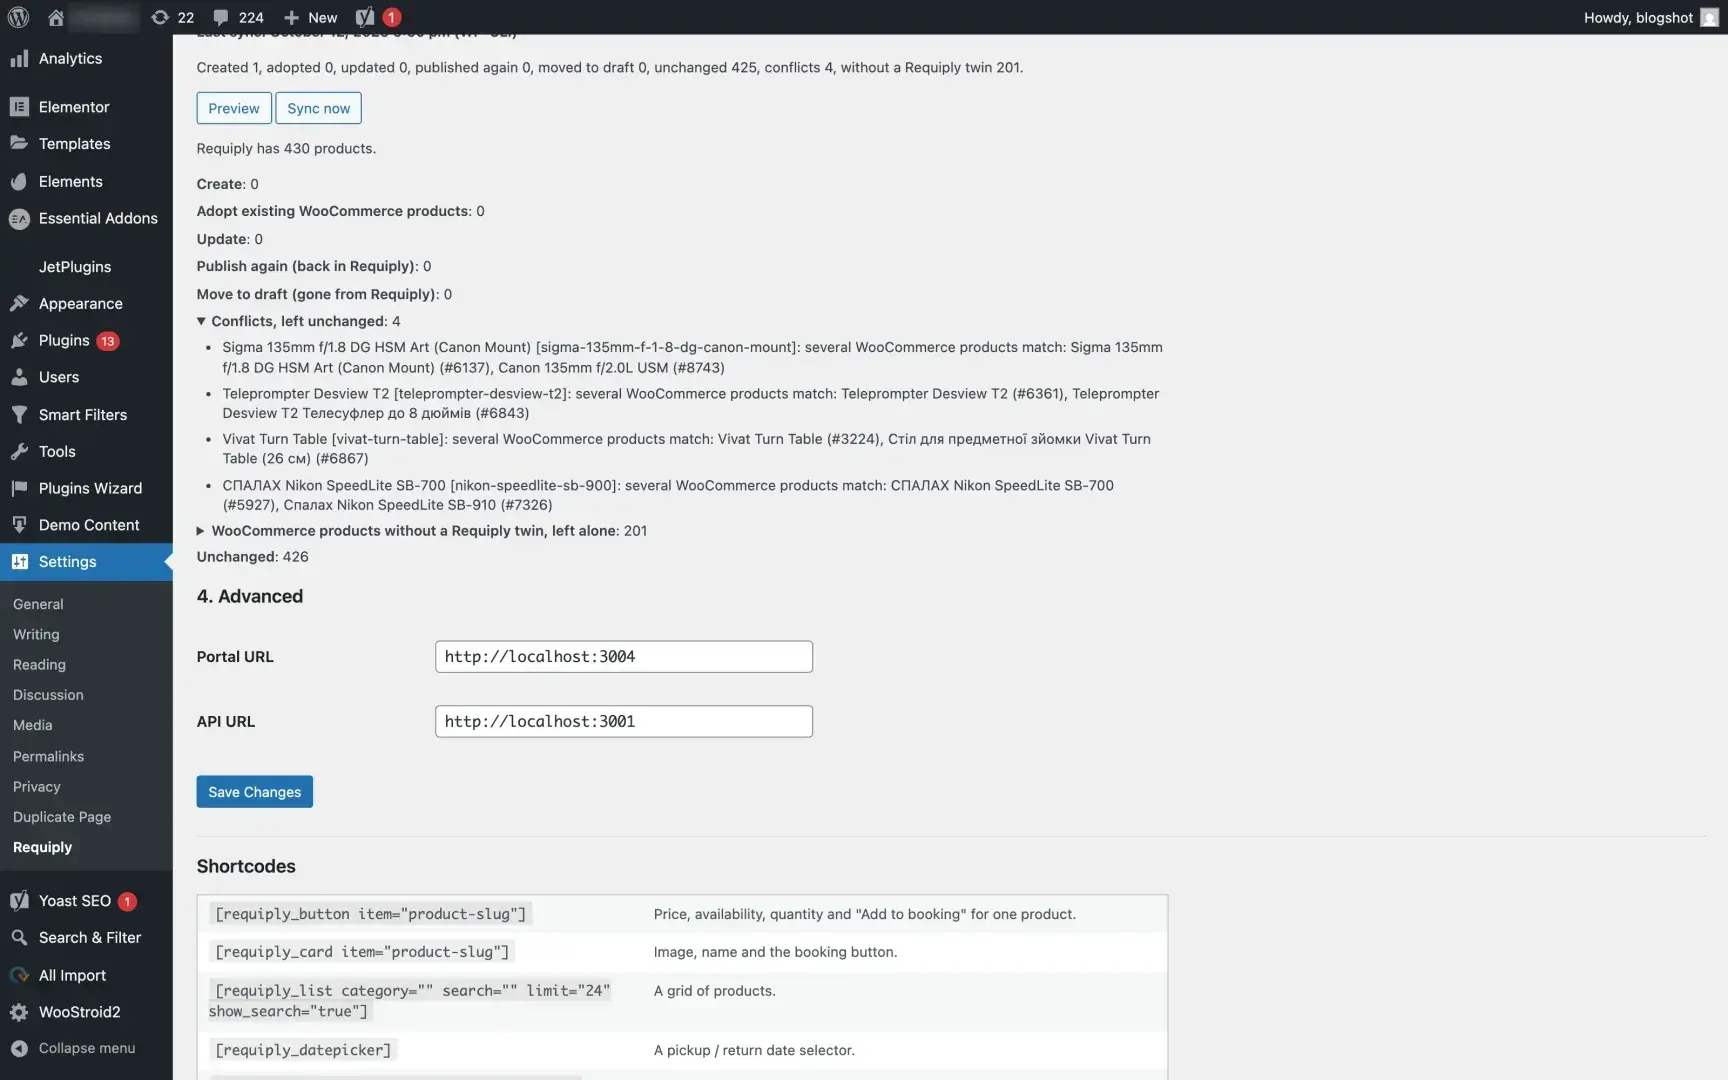 A sync preview. The conflicts are duplicate pages in the shop, left for you to resolve.
How the sync treats your shop:
- Existing pages are adopted, not copied. Each Requiply product is matched to a WooCommerce product by its link, then its slug, then its name, with Ukrainian names transliterated so "Перфоратор Bosch" meets "perforator bosch". Two candidates for one product are listed as a conflict and left alone.
- Price and stock always follow Requiply. On adopted pages that is all that changes unless you allow more. A single product can opt out of the rest with Keep my WooCommerce content (3 in the product screenshot above).
- Descriptions, URLs and SEO are never touched. Pages that already rank keep their address and text.
- Nothing is deleted. A product archived in Requiply becomes a draft in WooCommerce and is published again if it comes back. A failed or suspiciously empty answer from Requiply stops the run before it changes anything.
- It runs every hour in the background, and Sync now runs it on demand.
Add a product in Requiply and it appears in the shop with its name, photo, category, price and tiers table:
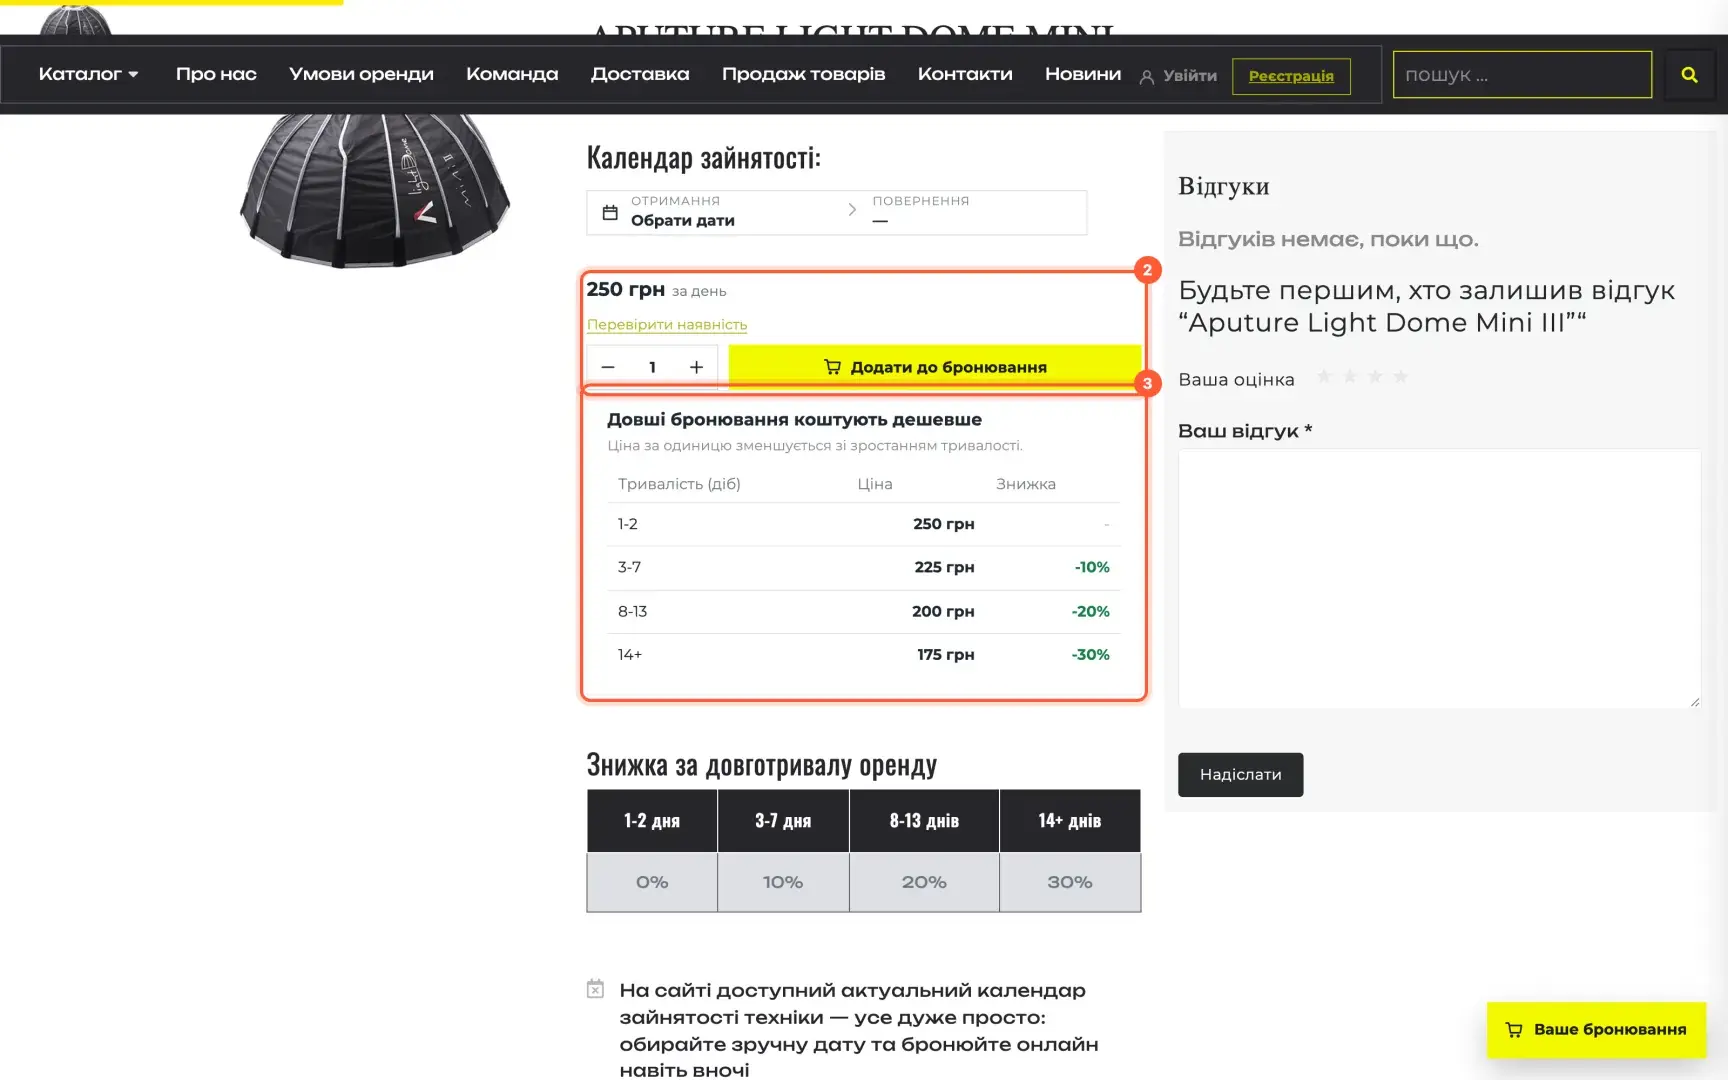 A product added only in Requiply, on the shop after the next sync.
What changes on your shop
The screenshots below come from a camera rental in Lviv that runs on WooCommerce, so the site is in Ukrainian. The booking components come in English and Ukrainian; you pick the language in the plugin.
They render inside shadow DOM, so your theme cannot break them and they cannot break your theme. They use your site's font plus the brand color and corner radius from Requiply. The script is about 18 KB gzipped and makes one request for all products on a page.
On a product page, the booking button (1) shows the price with its unit and a "Check availability" link. The tiers table (2) lists the rate and saving for each booking length.
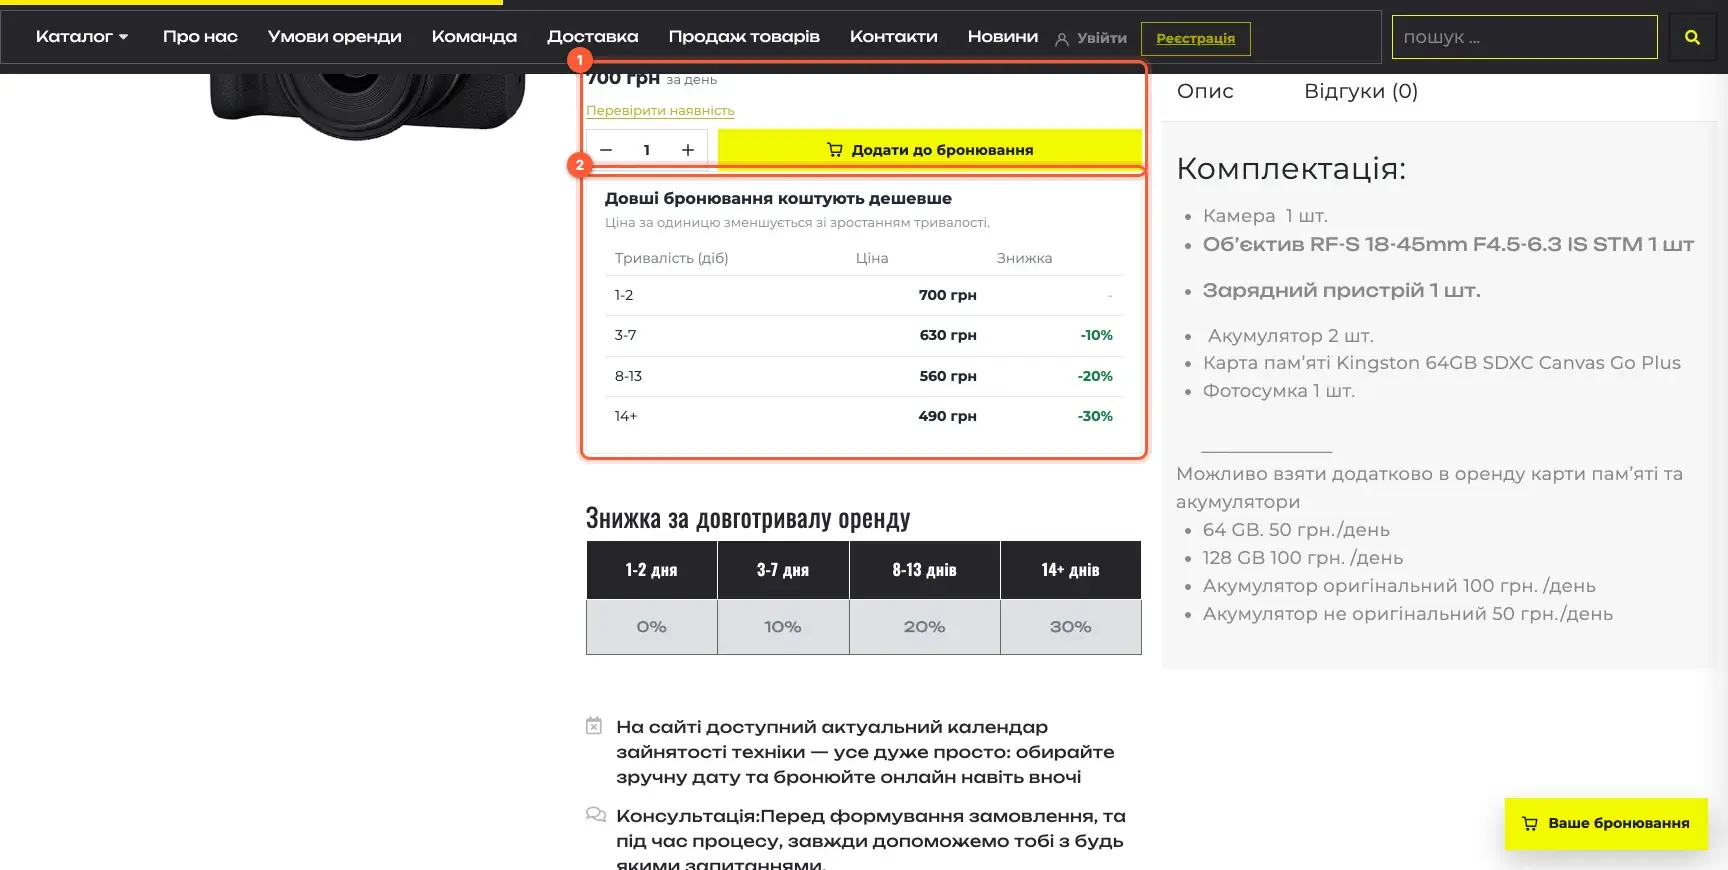 A linked product page.
Once dates are set, the link turns into an availability line (1): how many units are free, or "Not available for these dates". The quantity stepper and "Add to booking" (2) sit under it.
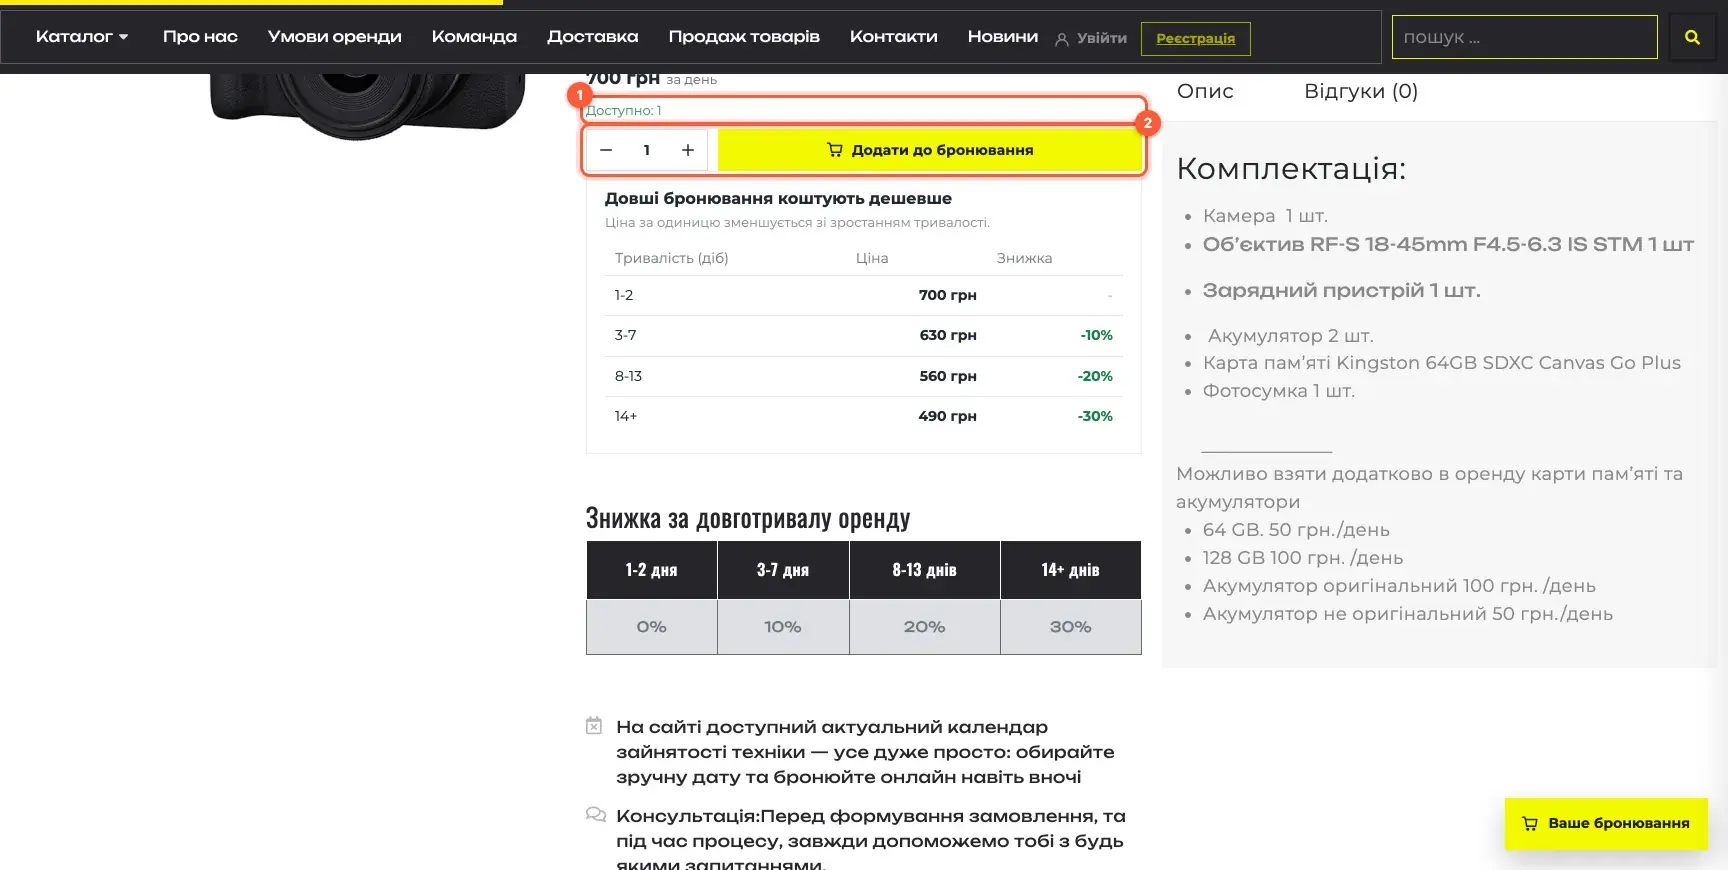 The same product with dates chosen.
Category grids get the same button on every linked product (1), and the floating "Your booking" button (2) stays in a corner of every page.
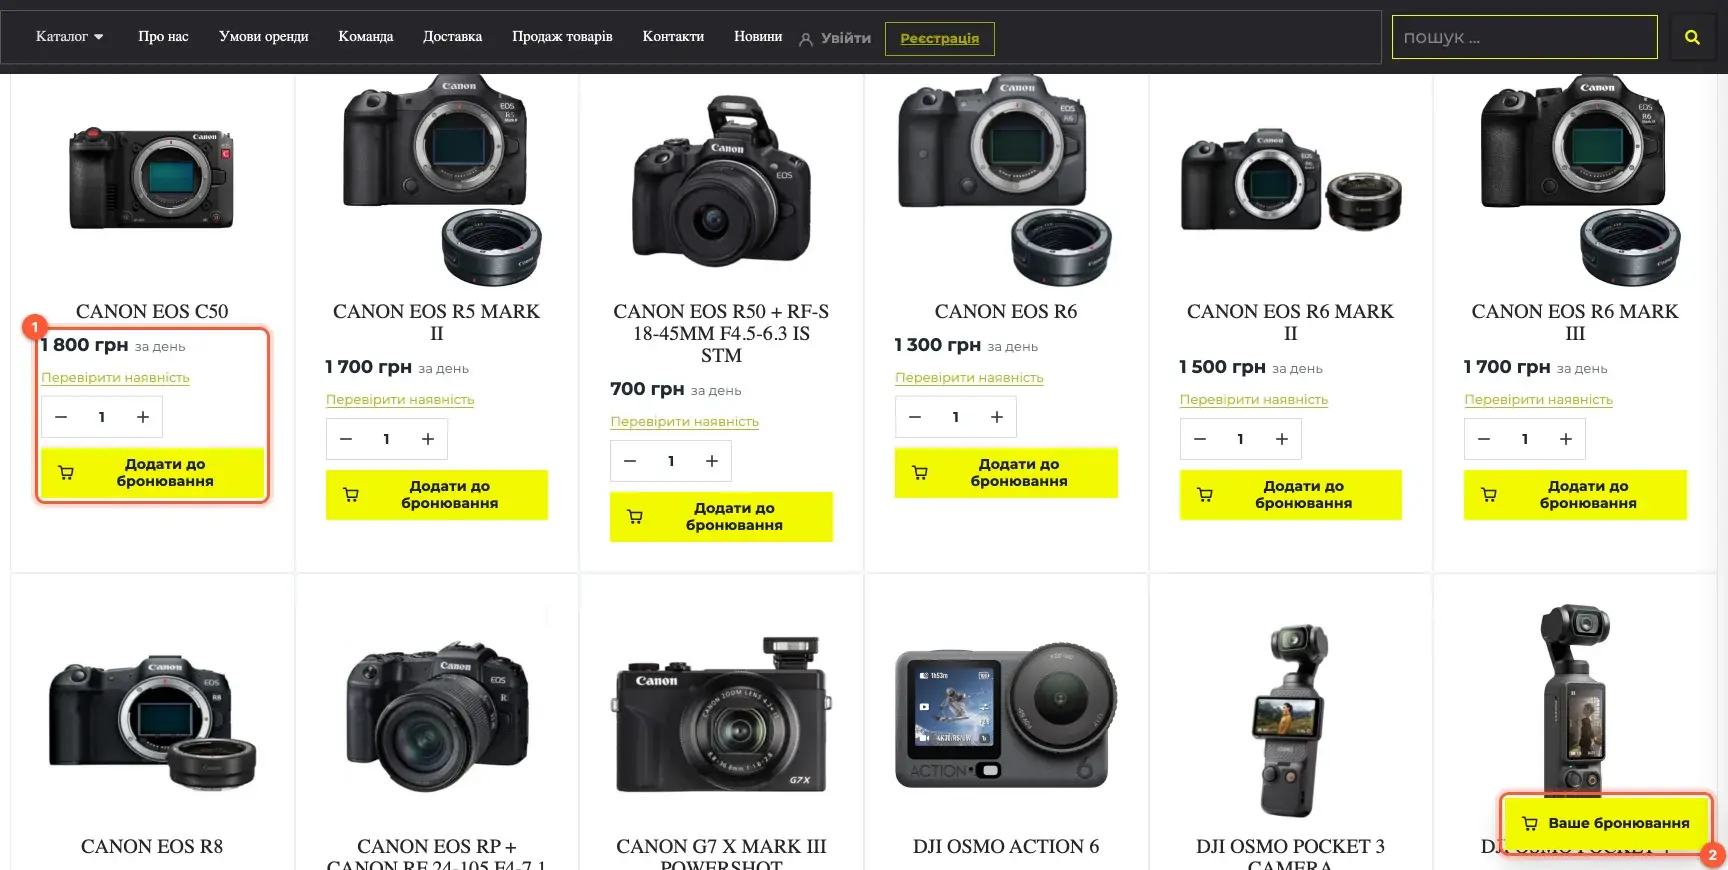
The "Sign in" and "Register" links (1) lead to the customer account on your booking page, where customers see their bookings and status, cancel within your policy and edit their profile.
 Account links in the shop menu.
The date picker shows a calendar (1) and pickup and return time pills (2) that follow your working hours. Apply (3) confirms the choice.
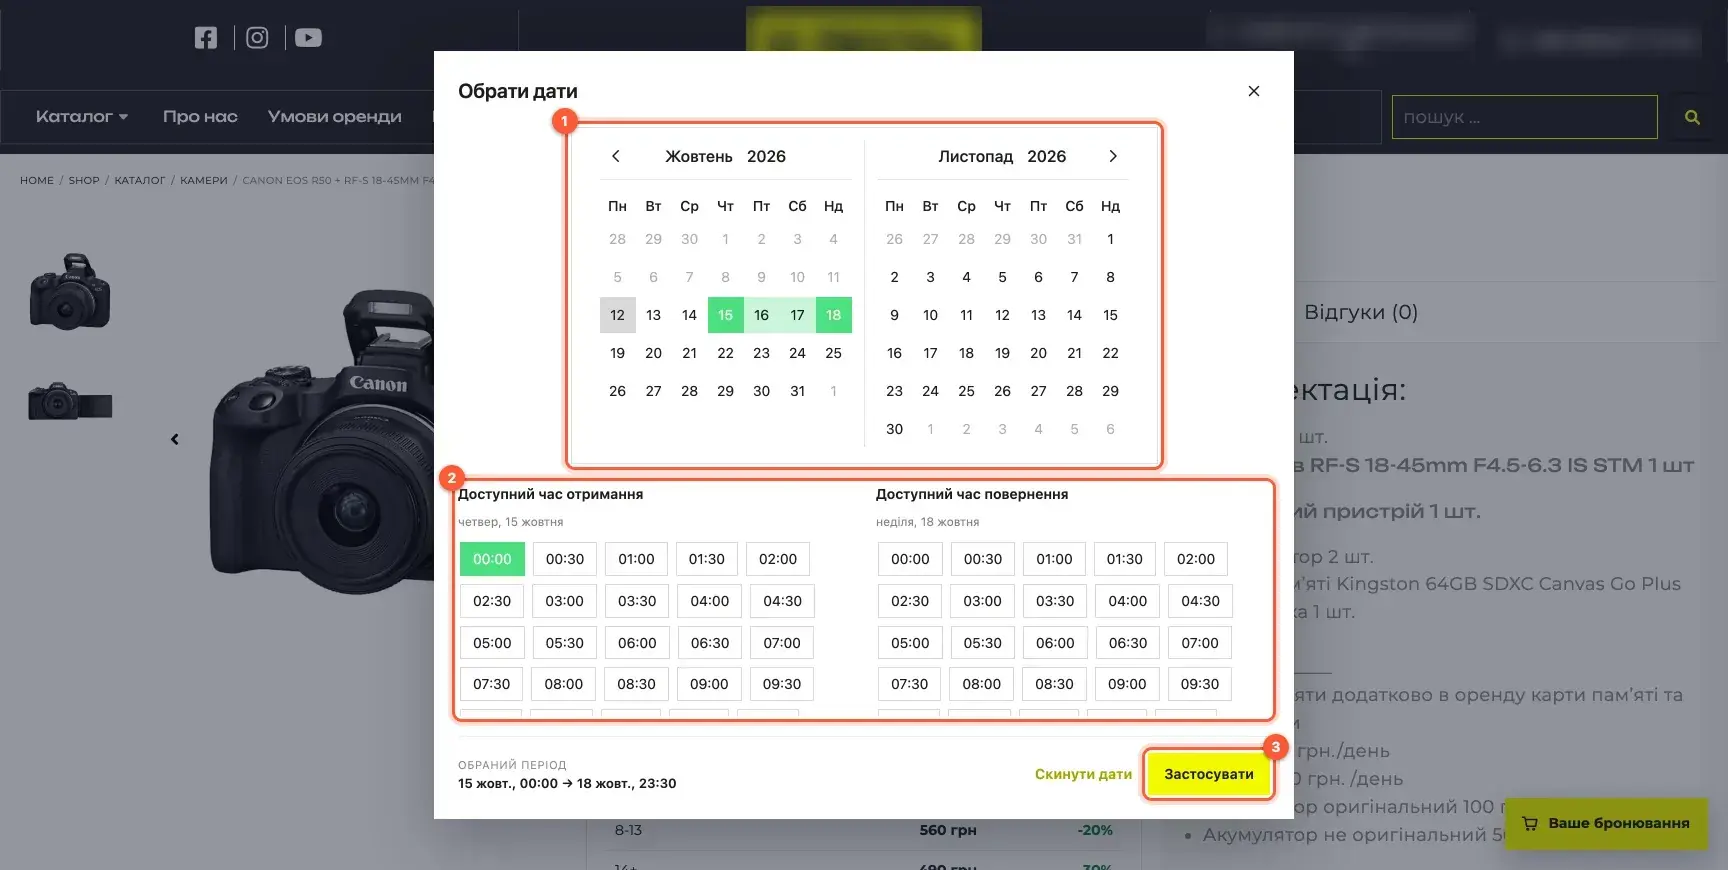 The date picker on the shop.
The cart drawer shows the rental period (1) and lines with quantities and totals (2), then optional services such as delivery as toggles, and the subtotal, discount, deposit and total (3). Continue to checkout (4) opens your booking page.
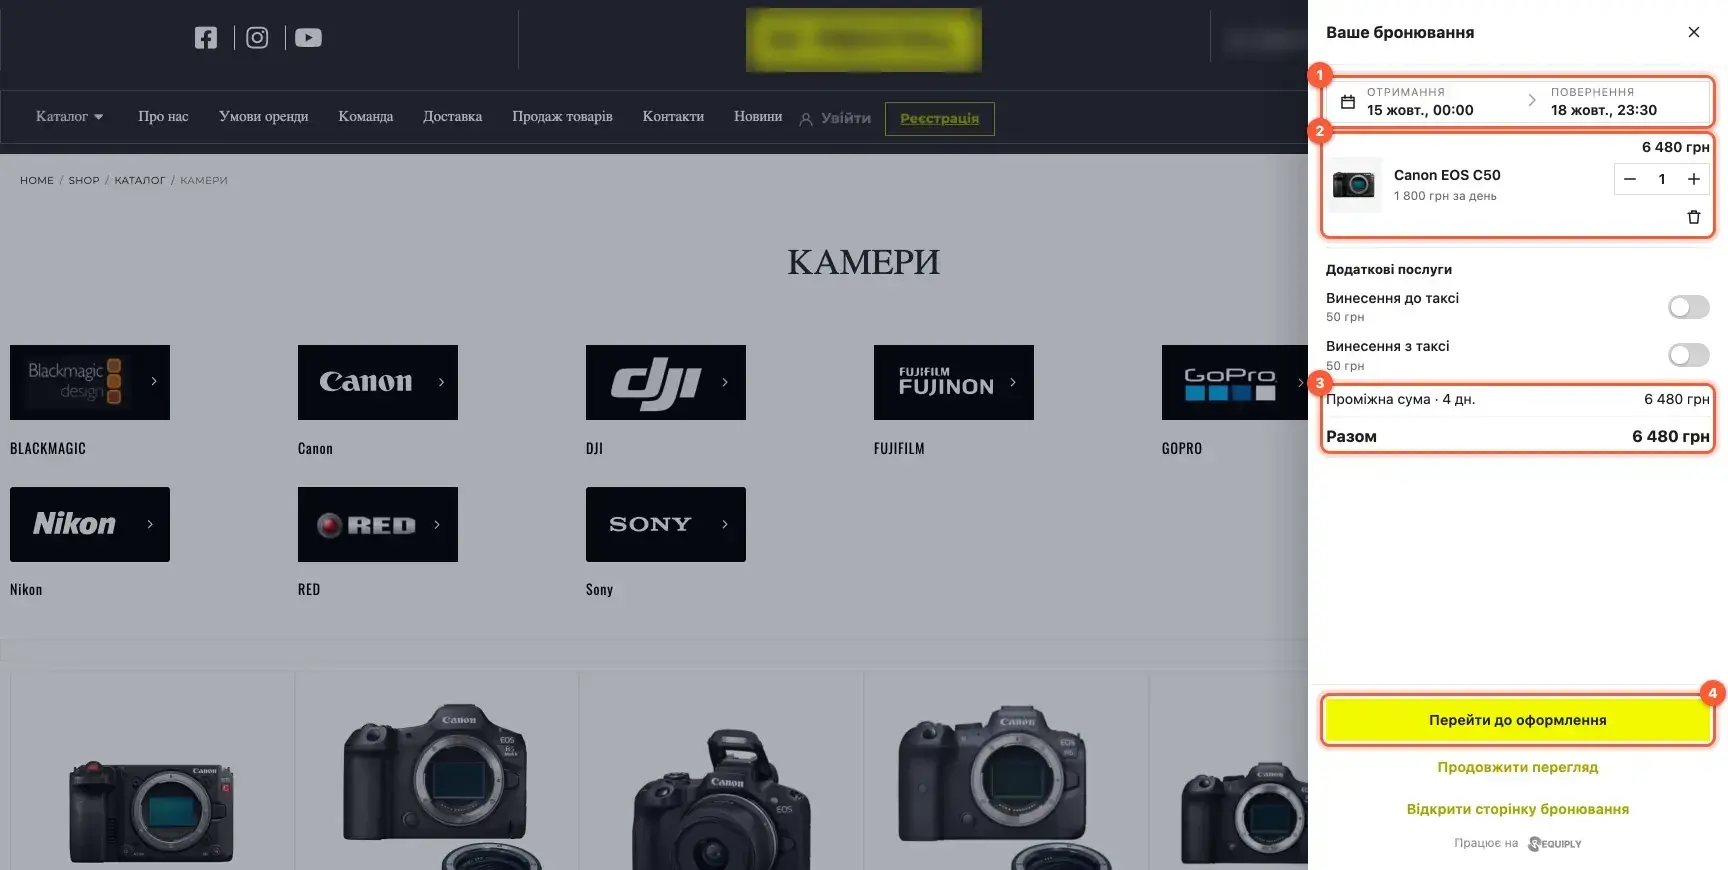 The booking cart drawer.
On the booking page the customer fills in contact details or signs in (1), picks a payment method (2), checks the summary (3) and confirms (4). With online payment they go to the payment provider, and the success page shows the booking number with a "Back to the website" link to the page they came from.
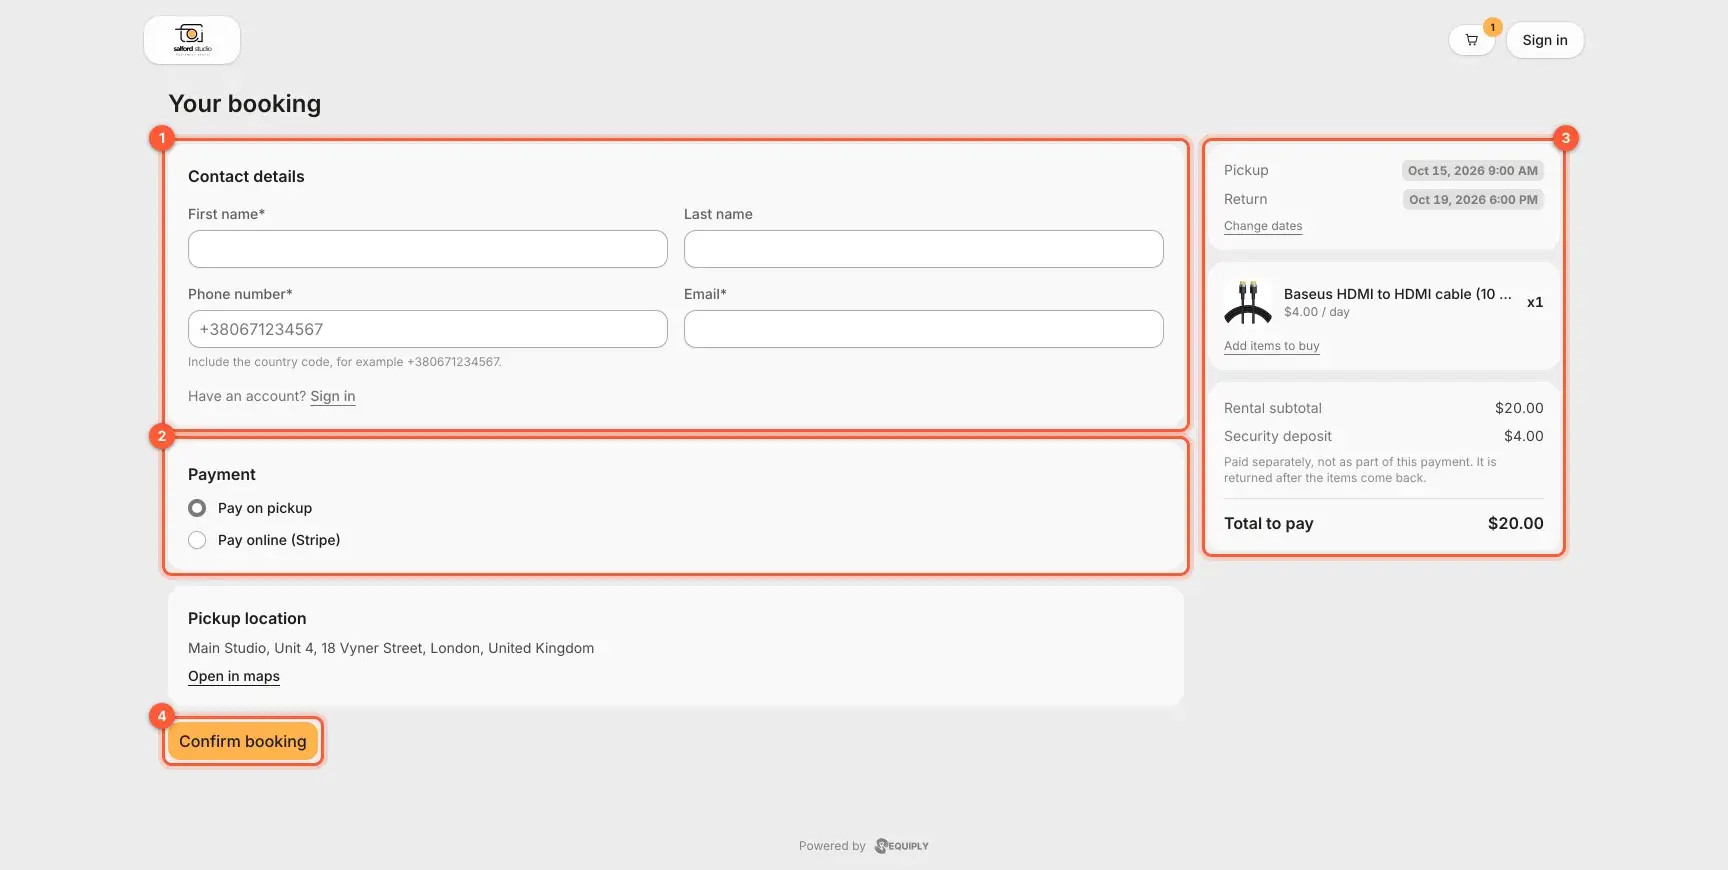 Checkout on the Requiply booking page.
Selling memory cards and consumables
Memory cards, batteries and other small things can sit in the same shop. If your account has the Sales feature (Advanced plan) and "sell online" is on in Website settings, the same button works for products for sale. It shows a "For sale" tag and the stock on hand, and asks for no dates. A cart with only products for sale becomes an order, saved as a standalone sale in Requiply. A cart that mixes rentals and purchases becomes one booking with the sale attached.
Moving from Booqable
If your WooCommerce shop used Booqable, click Migrate from Booqable in Settings > Requiply. It rewrites Booqable shortcodes and HTML placeholders into Requiply shortcodes. Product descriptions that still contain [booqable_button id="slug"] keep working after the migration, because the plugin reads the slug from them. On the command line, wp requiply migrate-booqable --dry-run shows what would change first.
No WooCommerce on your site? The WordPress rental booking guide shows how to add the same components to any page with shortcodes. Plans are on the pricing page.
Frequently asked questions
Want to see it on your own products? Start a free trial and follow the WooCommerce setup in Settings > Integrations > Website embed, or book a short demo and we will help you link your shop.
- WooCommerce rental
- WooCommerce booking
- WooCommerce rental plugin
- equipment rental software
- rental business
- rental website
- equipment hire booking
- rental availability calendar
- WordPress rental plugin
- Booqable migration
- requiply