


If you rent out equipment and already have a WordPress site, you can take bookings on it without phone calls or a contact form: install the free Requiply Rental Booking plugin, paste your organization code and put a shortcode wherever you want a booking button. Visitors choose dates, see what is free and what it costs, and send you a booking instead of a question. The setup starts with your Requiply account.
How it works
- Requiply holds the rental side. Products, prices, availability, working hours and payment methods live in your Requiply account, so the website never shows a stale price.
- The plugin draws booking components on your pages. Buttons, product cards, a date picker and a cart come from one script that reads your account.
- Checkout runs on your Requiply booking page. The booking lands in Requiply with the origin "Website embed", next to everything else you run there.
What your visitors get:
Set up at Requiply
The plugin shows only what your account contains. New to Requiply? Create an account first.
1. Add products and prices
Add your products in Inventory by hand or import them from a CSV file. Each one needs a price per day, hour or month. Add pricing tiers where longer rentals get a lower rate, and a deposit where you take one.
2. Set hours, rules and payments
Set your opening hours and booking rules under Settings > Date & time and Settings > Bookings. Then pick the payment methods customers can use: pay on pickup, or pay online through Stripe, Plata by mono, LiqPay or WayForPay once you connect the provider.
3. Choose how booking looks and starts
In the website settings, pick the brand color and corner style that buttons and the cart will use. The "start from" option sets the order: from items, or from dates, in which case every booking button asks for dates first. If your booking page runs on your own domain, such as book.yourbrand.com (Settings > Domains), every link the embed produces uses it.
4. Open the Website embed page
Go to Settings > Integrations > Website embed. Open the WordPress card (1); the WooCommerce card (2) is for shops.
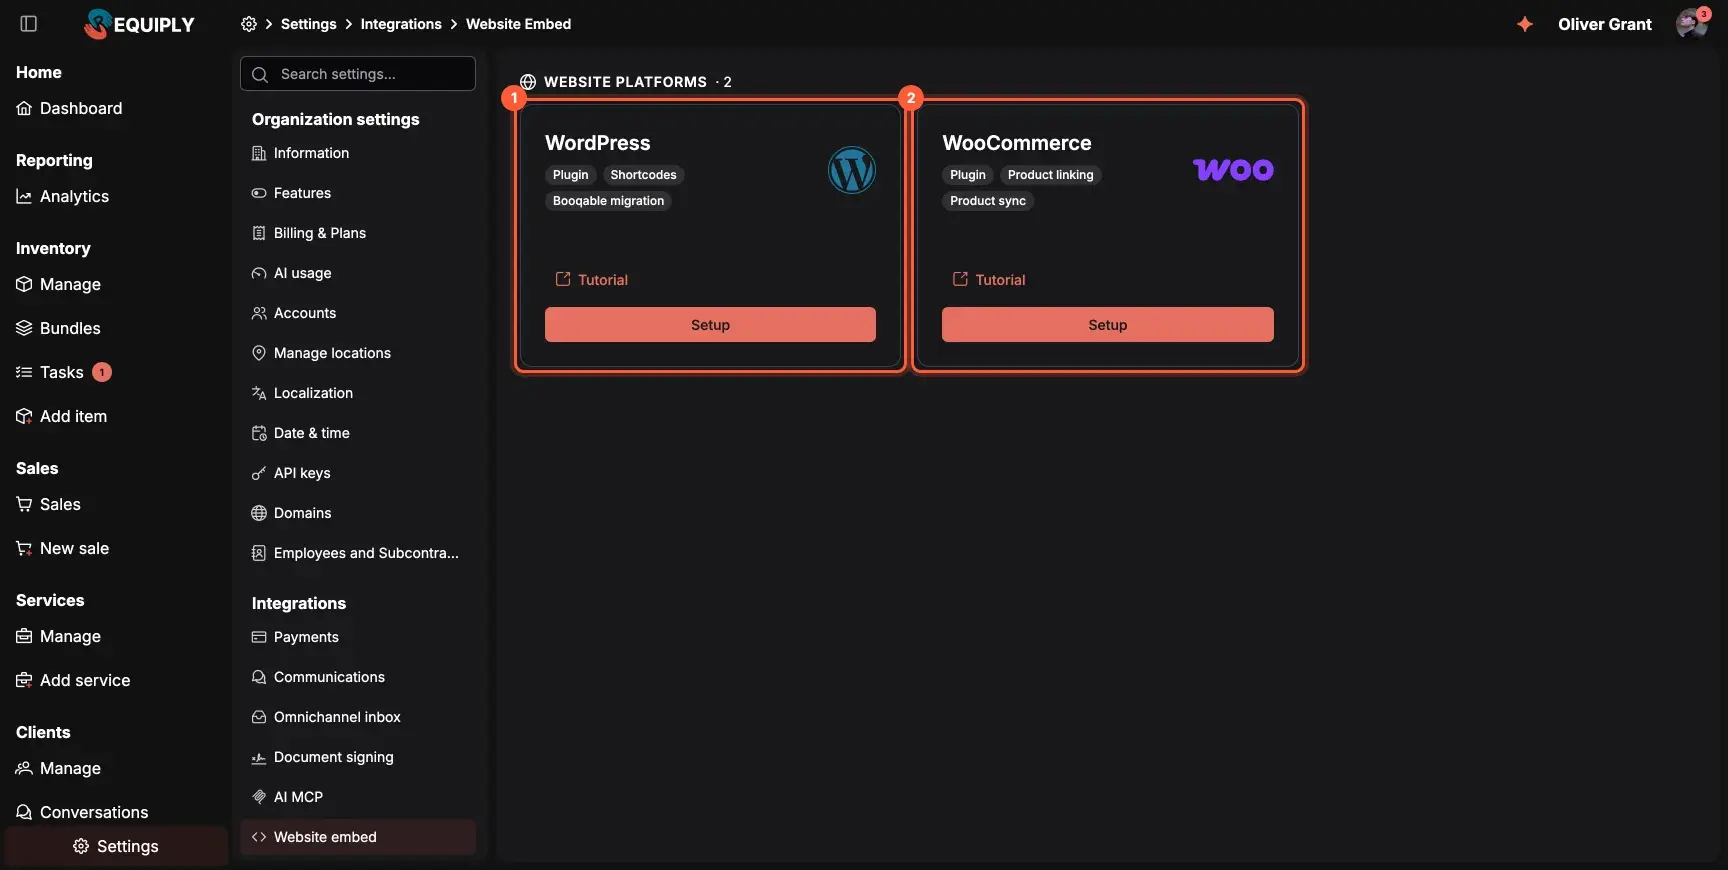
The Website embed page: WordPress (1) and WooCommerce (2).
The WordPress page has the Download plugin button (1), your organization code with a copy button (2) and the shortcode reference (3). The organization code is the last part of your booking page address: for portal.requiply.com/my-rental it is my-rental. If your site runs WooCommerce, the page sends you to the WooCommerce setup instead.
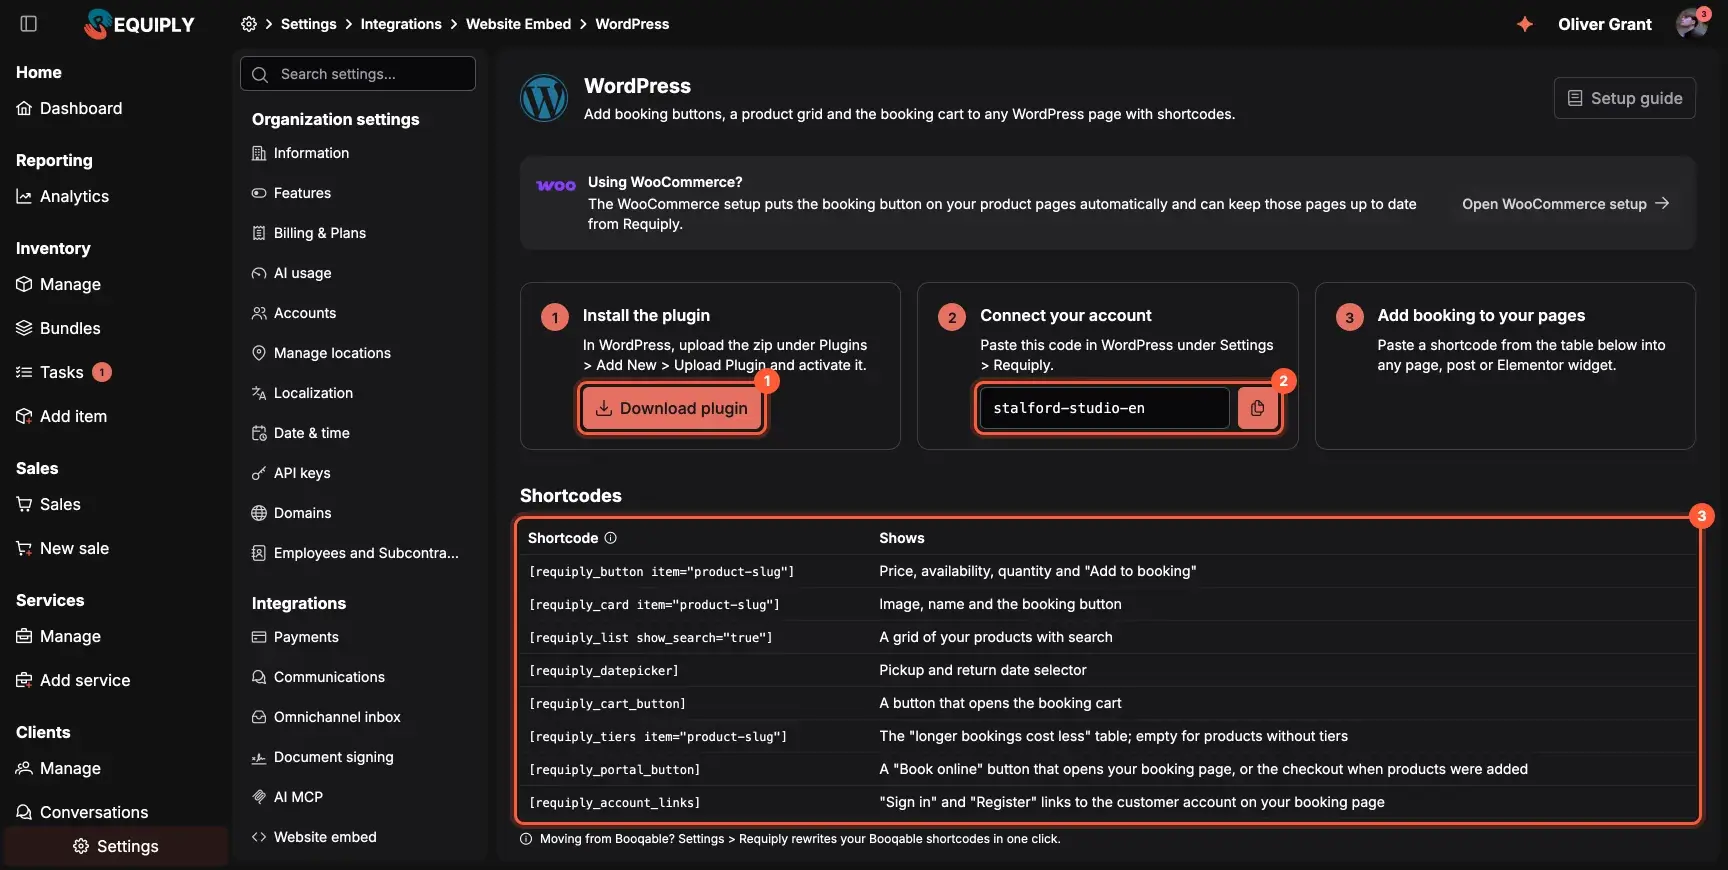
Download the plugin (1), copy the organization code (2), look up shortcodes (3).
5. Copy the product slug
Product shortcodes point to a product by its slug, which Requiply creates from the product name automatically. To get one, stay on the WordPress setup page and scroll to Find a product slug under the shortcode table. Search for the product (1), pick it and copy its slug (2).
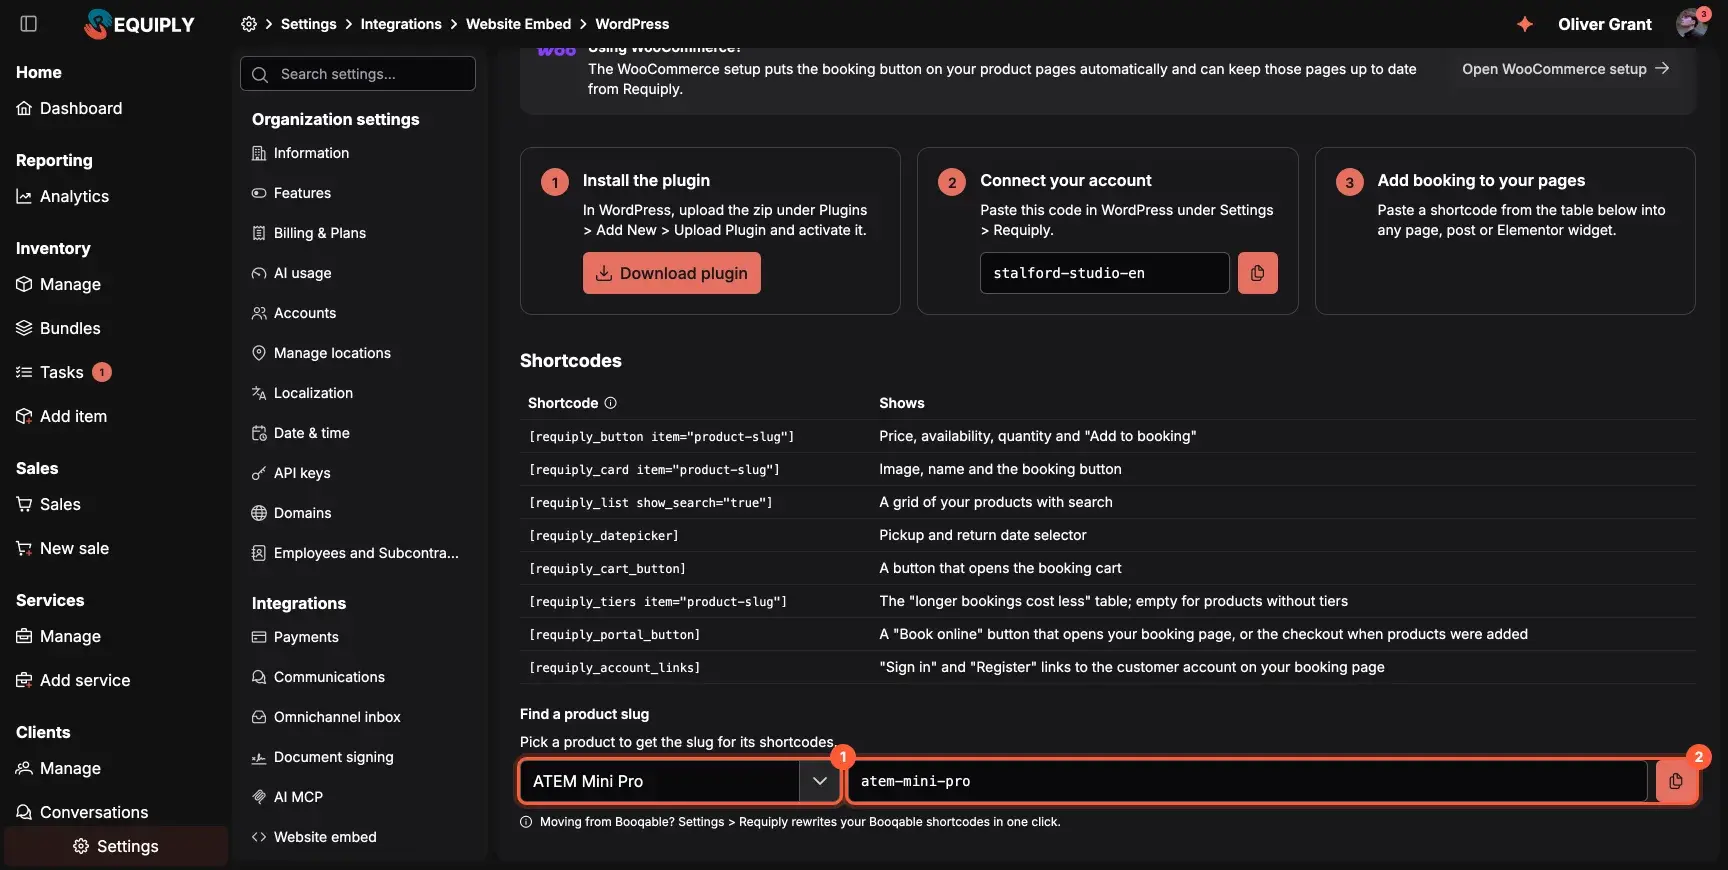
Search for a product (1) and copy its slug (2).
Install the plugin
The plugin needs WordPress 5.8 or newer and PHP 7.4 or newer.
- In WordPress, go to Plugins > Add New > Upload Plugin, choose the zip you downloaded from Requiply and click Activate.
- Open Settings > Requiply, paste the organization code (1) and save. A green line with your organization name and currency confirms the code is right.
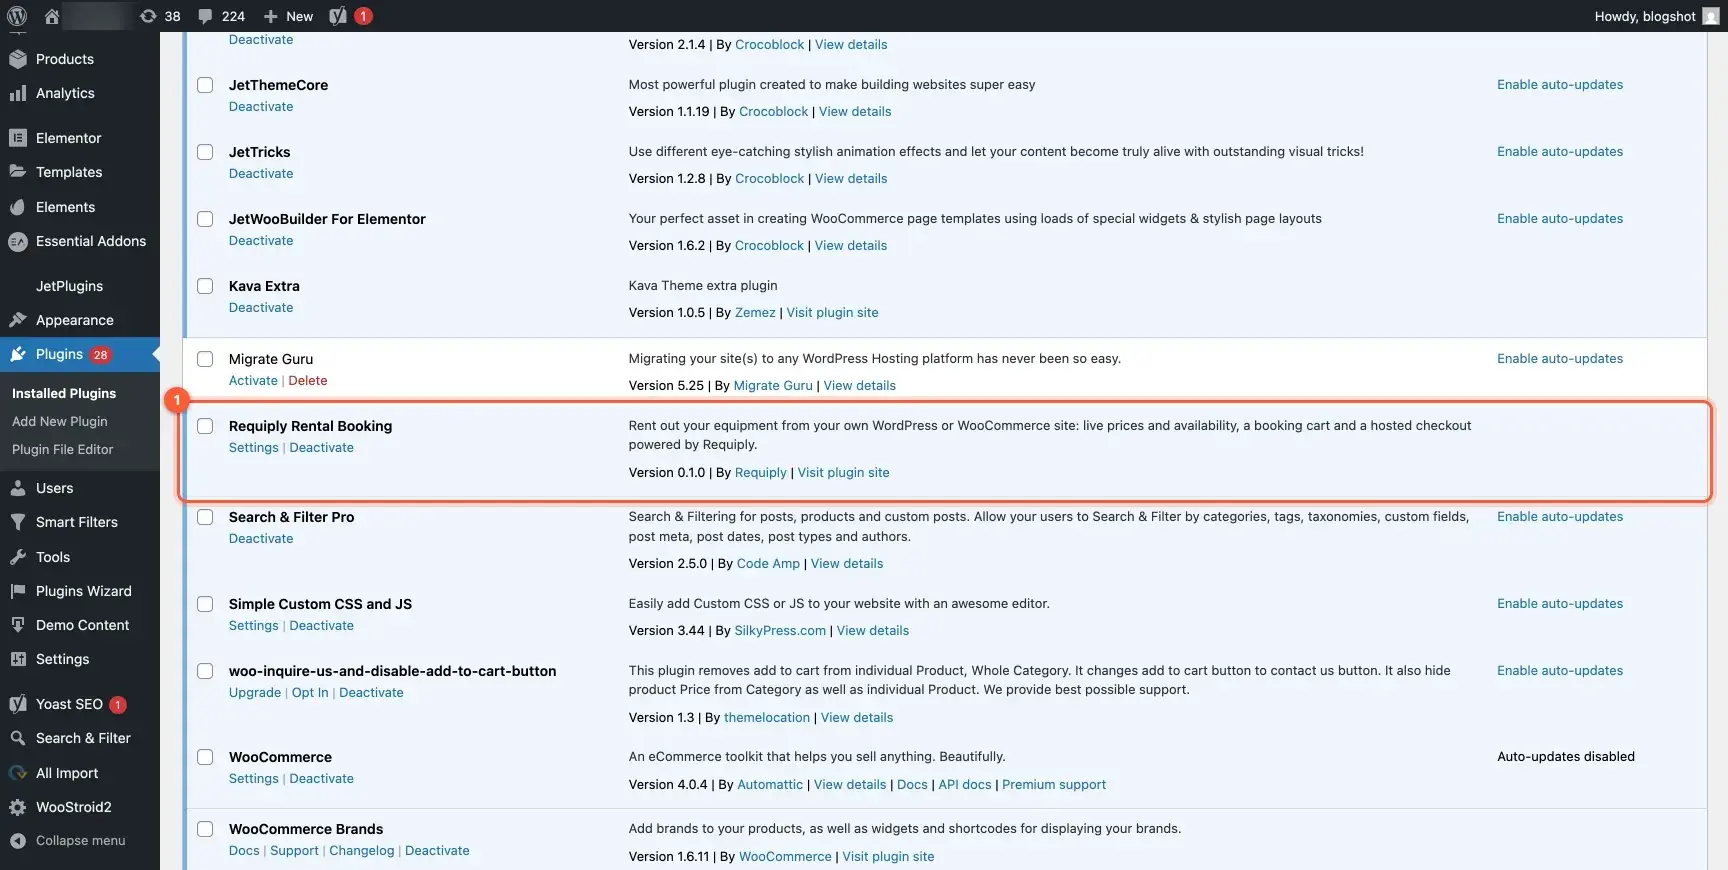
Requiply Rental Booking in the plugin list (1).
Everything else on the settings page is optional:
- Language: the same as the site, English or Ukrainian. The components are translated.
- Button color: leave it empty to use the brand color from Requiply.
- Floating cart: a "Your booking" button in the bottom right or left corner of every page.
- Account links (2): "Sign in" and "Register" links to the customer account, added to a menu you pick or placed inside any element by CSS selector.
- The WooCommerce options (3, 4) only matter if you run WooCommerce.
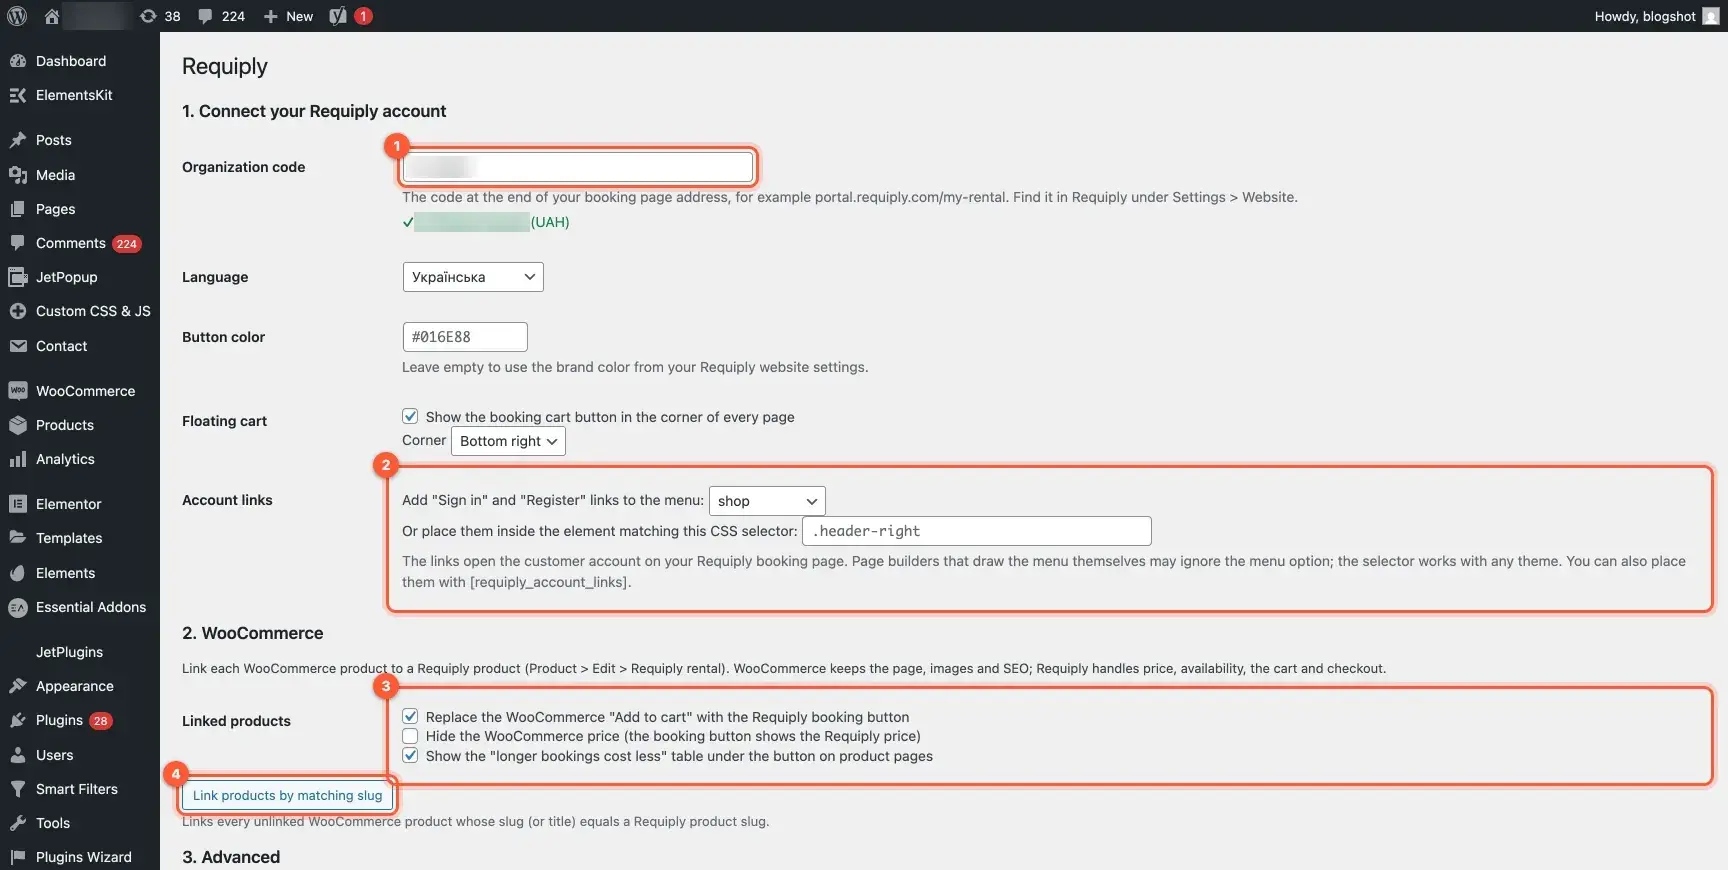
Organization code (1), account links (2), WooCommerce options (3, 4).
Place the components
Paste a shortcode into any page, post, Elementor text widget or product description, and replace product-slug with the slug from step 5.
| Shortcode | What it shows |
|---|---|
[requiply_button item="product-slug"] | Price, availability for the chosen dates, quantity and "Add to booking" |
[requiply_card item="product-slug"] | Image, name and the booking button |
[requiply_list show_search="true" category="…" limit="…"] | A product grid with search |
[requiply_datepicker] | Pickup and return date selector |
[requiply_cart_button label="…"] | A button that opens the cart |
[requiply_portal_button label="…" style="ghost"] | "Book online": opens the booking page, or checkout once the cart has items |
[requiply_tiers item="product-slug"] | The pricing tiers table, empty for products without tiers |
[requiply_account_links] | "Sign in" and "Register" links |
A common layout: the date picker and cart button in the header, [requiply_list] on the catalog page and [requiply_button] beside the description on each product page.
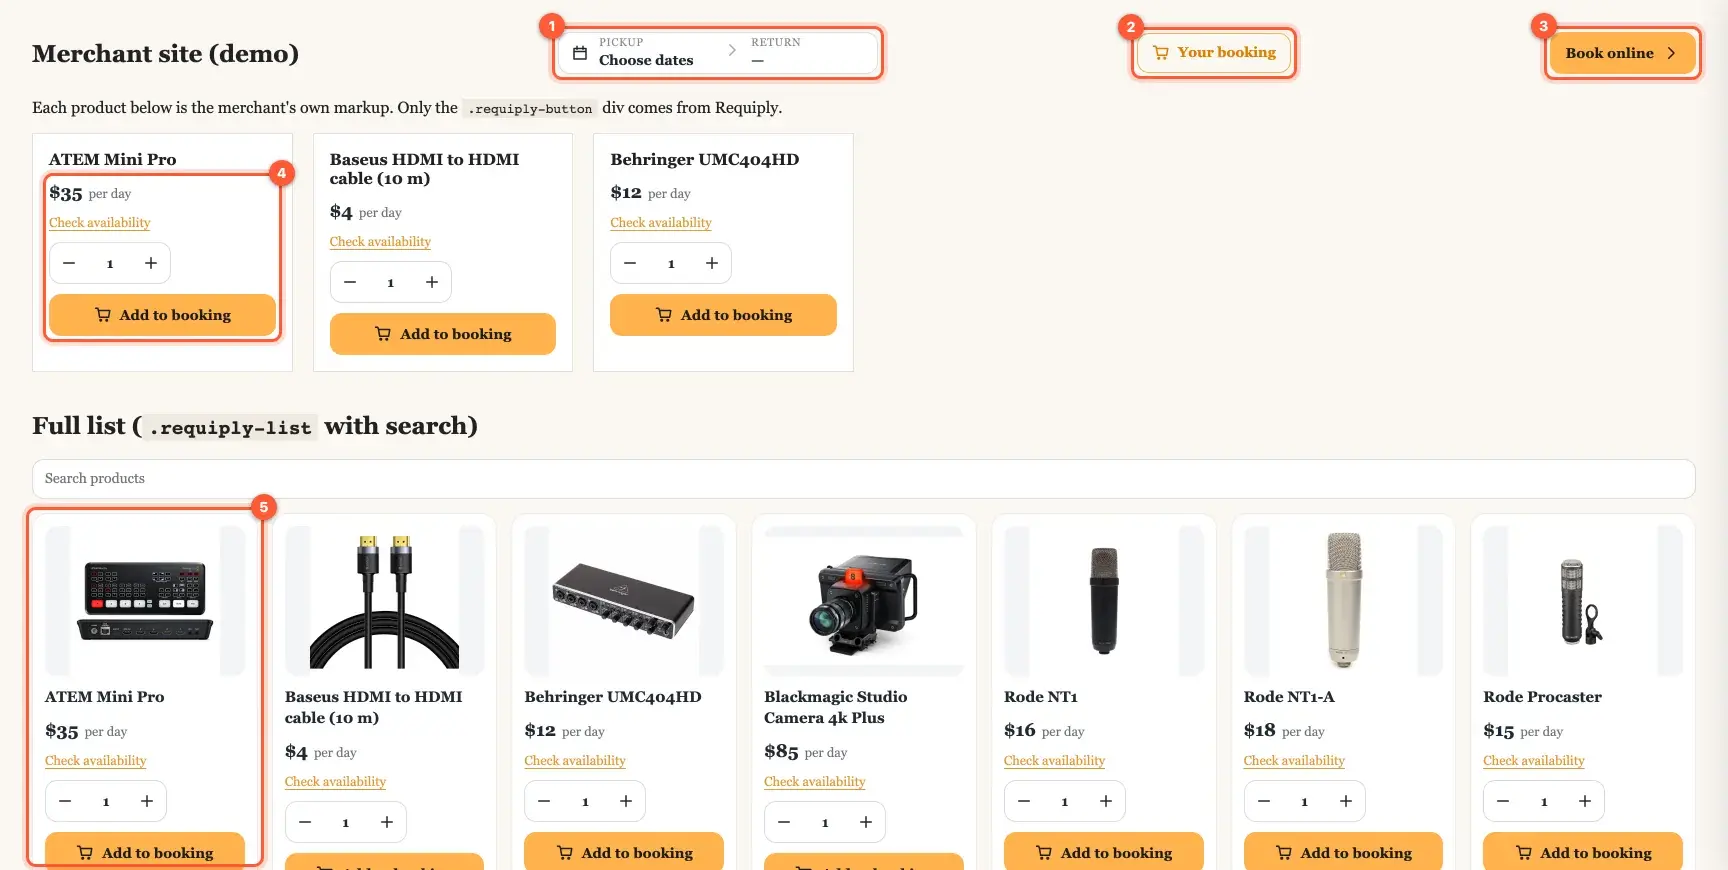
Before dates are set, a product shows "Check availability", which opens the date picker. After that each button says "N available" or "Not available for these dates".
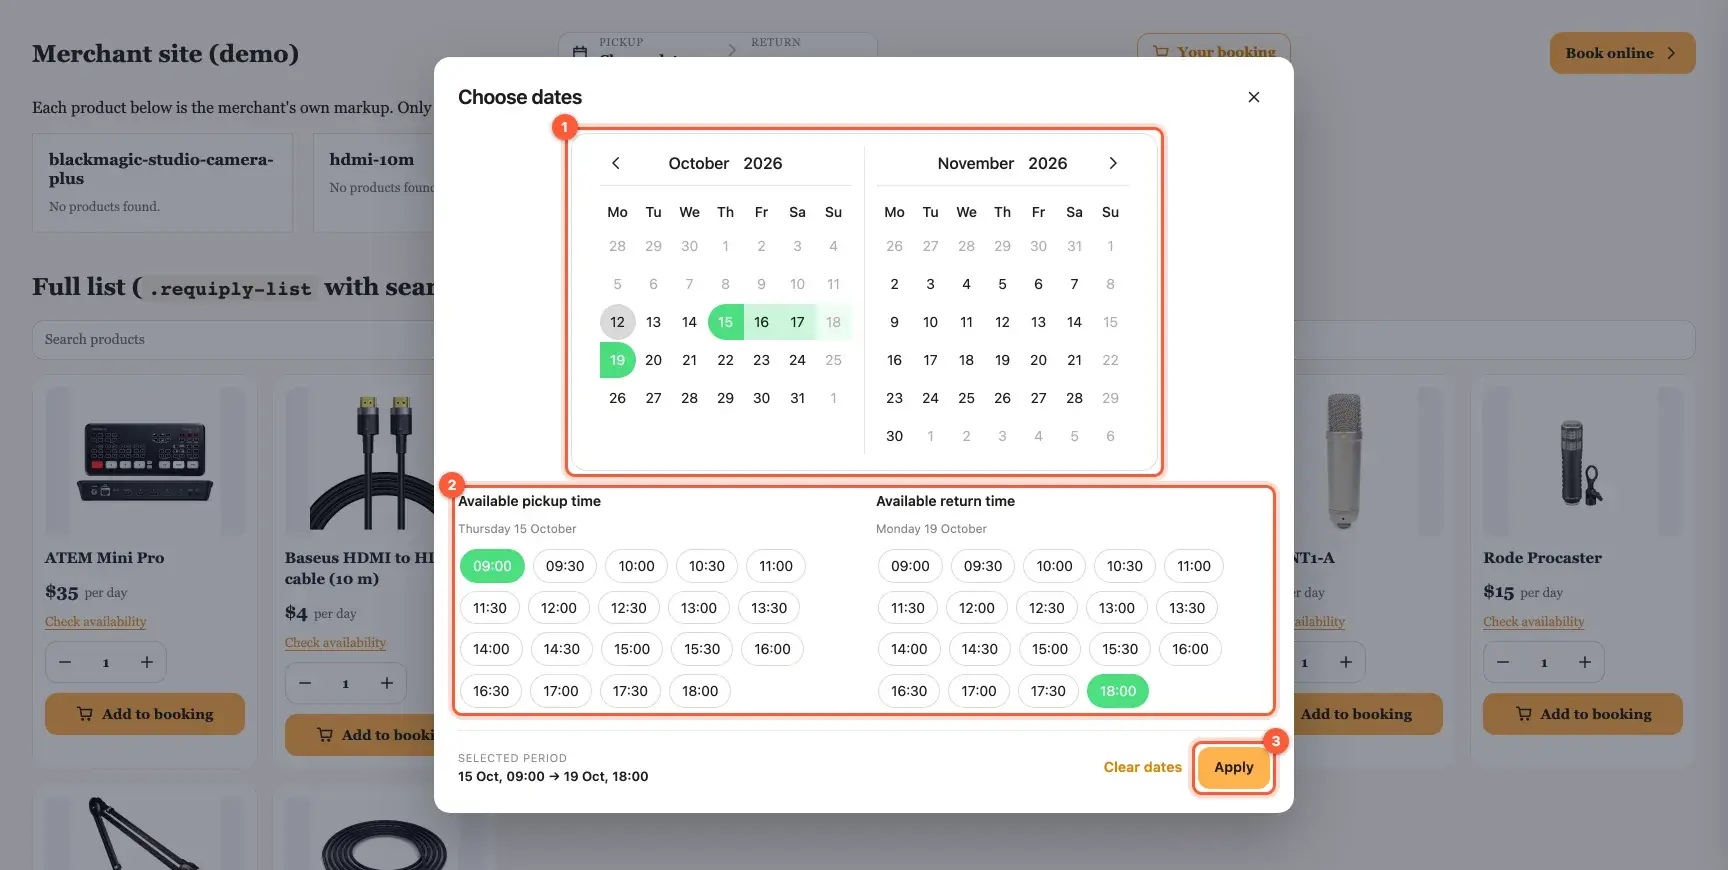
The calendar (1), time pills (2) and Apply (3).
Checkout services you offer, such as delivery, appear in the cart as toggles, and the totals include the deposit and any discount.
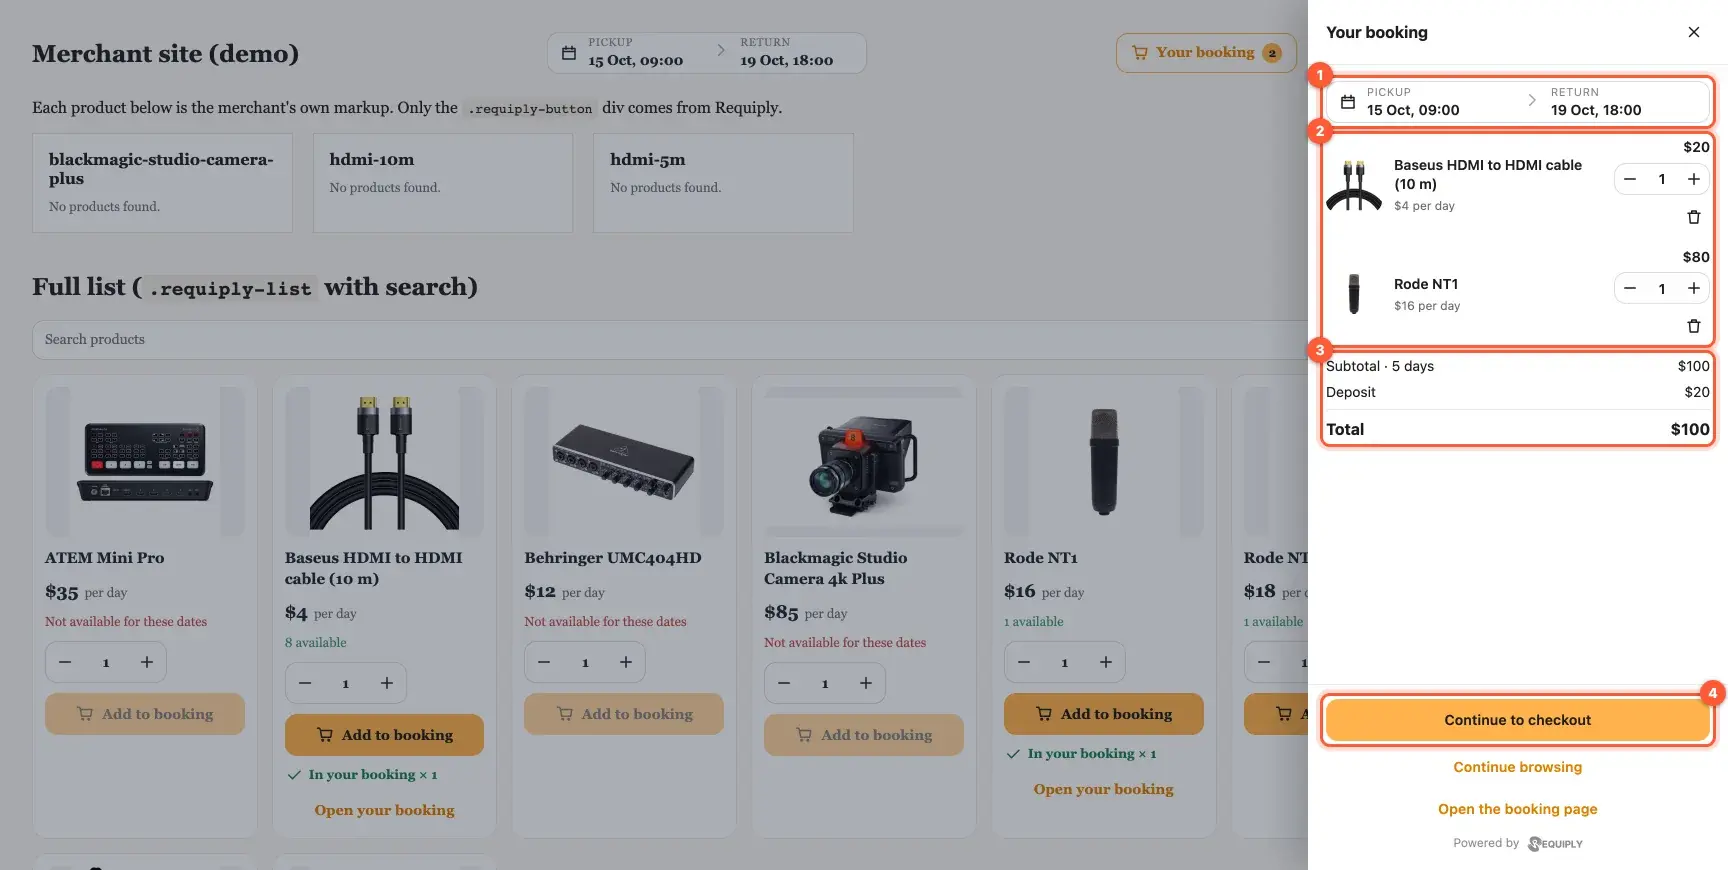
Period (1), lines (2), totals (3) and "Continue to checkout" (4).
On a real site the components sit inside the theme's own layout, like on this camera rental in Ukraine:
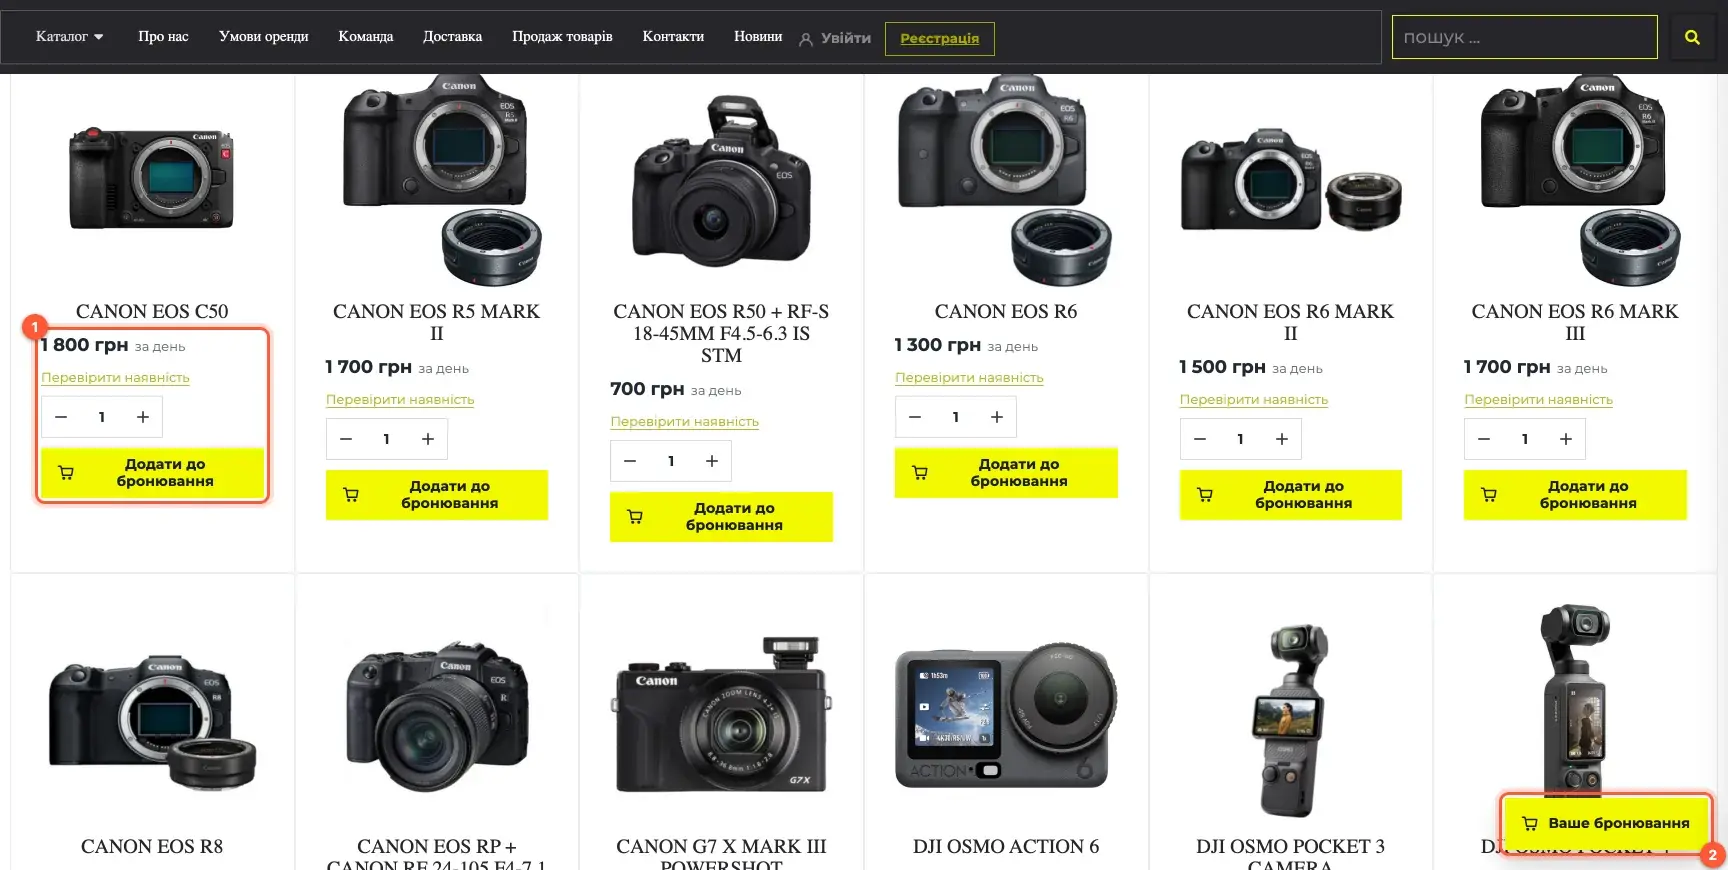
Booking buttons in the theme's grid (1) and the floating cart (2).
For search engines and visitors without JavaScript, the plugin also prints the current price into the page HTML and caches it for 10 minutes.
What your customer sees
"Continue to checkout" opens your Requiply booking page with the same lines. The customer enters contact details or signs in (1), picks a payment method (2), checks the summary and pickup location (3) and confirms (4). An online payment redirects to the provider. Afterwards the success page shows the booking number and a "Back to the website" link to the page they started from.
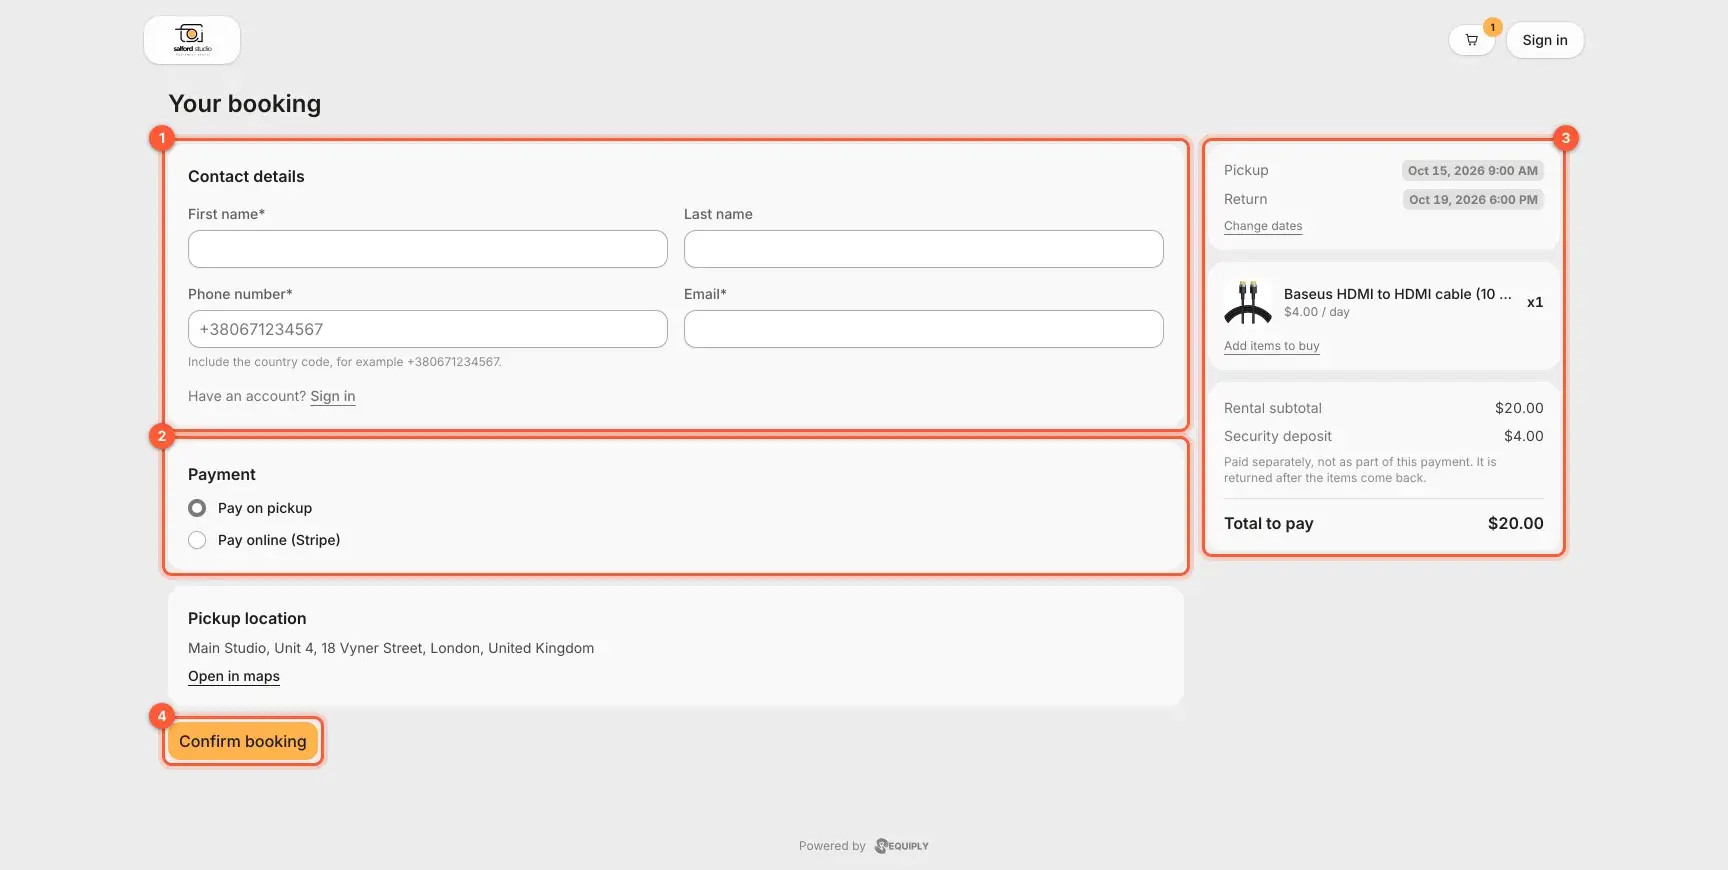
Contact details (1), payment (2), summary (3), confirm (4).
Registered customers get an account on the booking page where they follow their bookings' status, cancel within your policy and edit their profile. The account links put it one click away in your menu:

"Sign in" and "Register" in the menu of a real rental site, in Ukrainian (1).
Moving from Booqable
If your pages still carry Booqable shortcodes, open Settings > Requiply and click Migrate from Booqable. It rewrites [booqable_button id="…"] style shortcodes and Booqable HTML placeholders into Requiply shortcodes. To preview the changes first, run wp requiply migrate-booqable --dry-run in WP-CLI. Comparing the two? Read Booqable vs Requiply.
Running a WooCommerce shop? Read the WooCommerce guide instead: there Requiply can also create and update your product pages for you.
FAQ
Questions about your site? Write to info@requiply.com or book a demo.
- equipment rental software
- rental business
- WordPress booking plugin
- online booking
- rental website
- WordPress rental plugin
- rental booking system
- rental availability calendar
- Elementor
- Booqable alternative
- requiply