


How do I issue a KSeF invoice for a rental booking?
Connect your KSeF token once under Settings → Integrations → E-invoicing, then open a booking and choose Issue invoice in KSeF from its actions menu. Requiply builds the structured FA(3) invoice from the booking, sends it to KSeF and shows the KSeF number on the booking a few seconds later.
This guide walks through the setup, the first invoice and what you can do with it afterwards, on the web and in the Requiply app.
What KSeF Means for a Rental Company
KSeF (Krajowy System e-Faktur) is Poland's National e-Invoicing System. Since 1 February 2026 the largest taxpayers issue their invoices in it, and since 1 April 2026 so does everyone else, including VAT-exempt businesses. Companies whose invoices add up to no more than 10,000 zł a month may keep issuing them outside KSeF until the end of 2026.
For a rental company the change is practical rather than theoretical:
- an invoice is no longer a PDF you email: it is a structured FA(3) XML file that KSeF checks and accepts
- only an invoice with a KSeF number counts as issued
- every rental is a sale of services, so every booking you invoice to a company has to go through KSeF
Typing each booking into a separate invoicing program means copying items, prices, VAT and the client by hand. The Requiply integration takes that step away: the booking already knows all of it.
What the Integration Does
Step 1: Generate a KSeF Token
Log in to the KSeF taxpayer app (Aplikacja Podatnika KSeF) for your company and generate a token with the right to issue invoices. Copy it: KSeF shows it only once.
Start in the Test environment. KSeF runs separate Test and Demo environments where invoices have no legal effect. Generate a token there first, connect it to Requiply and issue a few invoices. Switch to a Production token when you are confident.
Step 2: Connect KSeF in Requiply
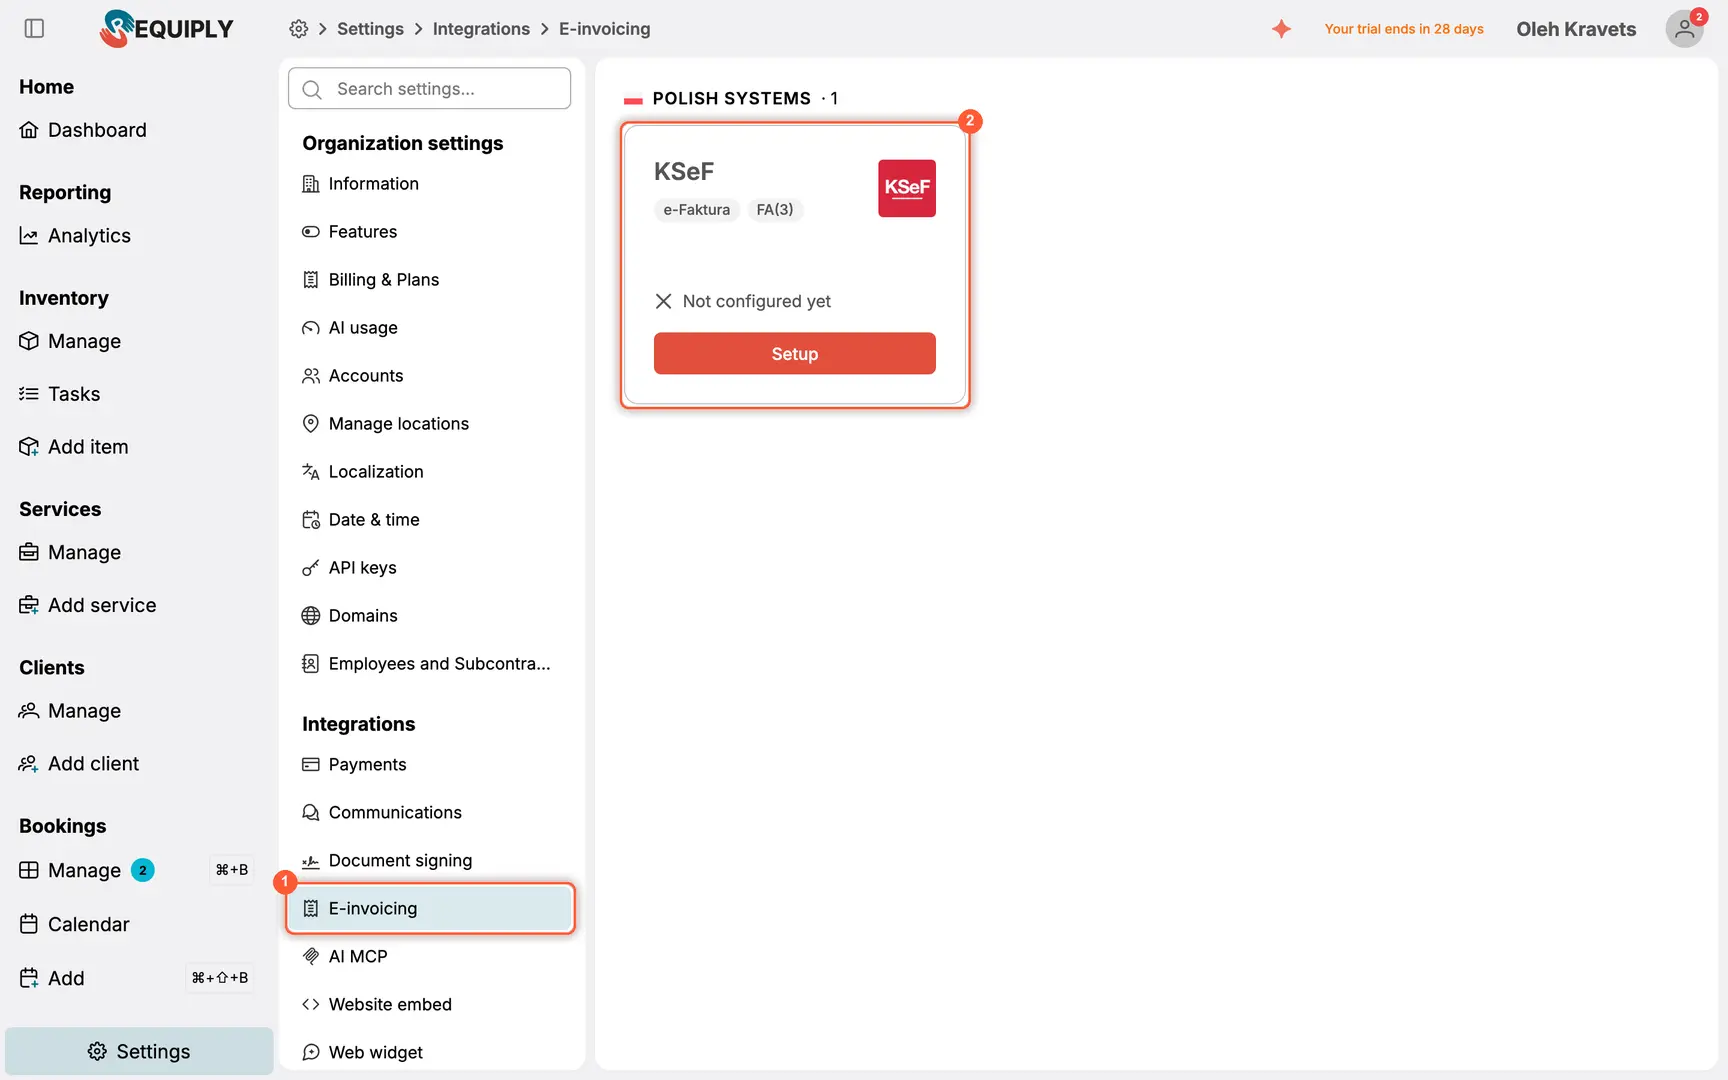
Open Settings → Integrations → E-invoicing and click Setup on the KSeF card.
Paste the token and fill in the seller details that go on every invoice:
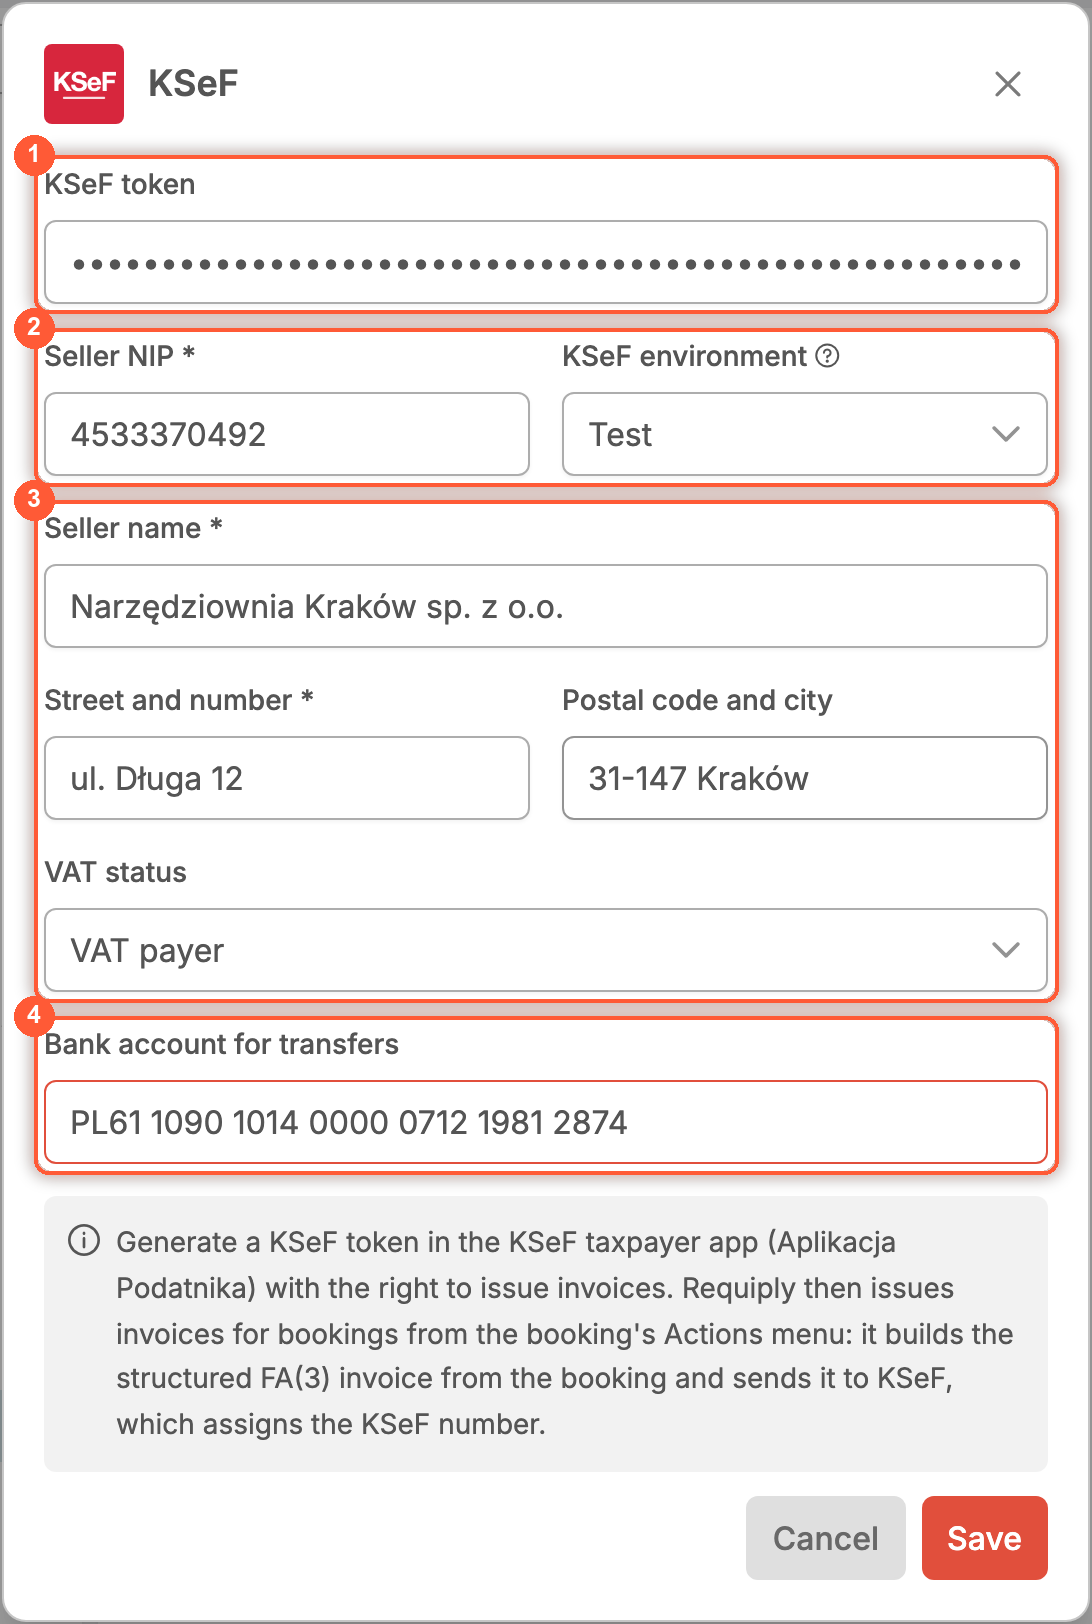
| Field | What to enter |
|---|---|
| KSeF token | The token from the KSeF app |
| Seller NIP | Your NIP, read from the token when possible |
| KSeF environment | Test, Demo or Production, matching the token |
| Seller name and address | As they should appear on invoices |
| VAT status | VAT payer, or VAT-exempt with the legal basis of the exemption |
| Bank account for transfers | Printed on invoices that are still to be paid |
Click Save. Requiply signs in to KSeF with the token before storing it, so a token that does not match your NIP or environment is refused on the spot.
VAT payers: turn VAT on under Settings → Pricing → VAT before you create the bookings you want to invoice. KSeF needs the VAT rate of every line, and bookings keep the VAT they were created with.
Step 3: Issue the Invoice From the Booking
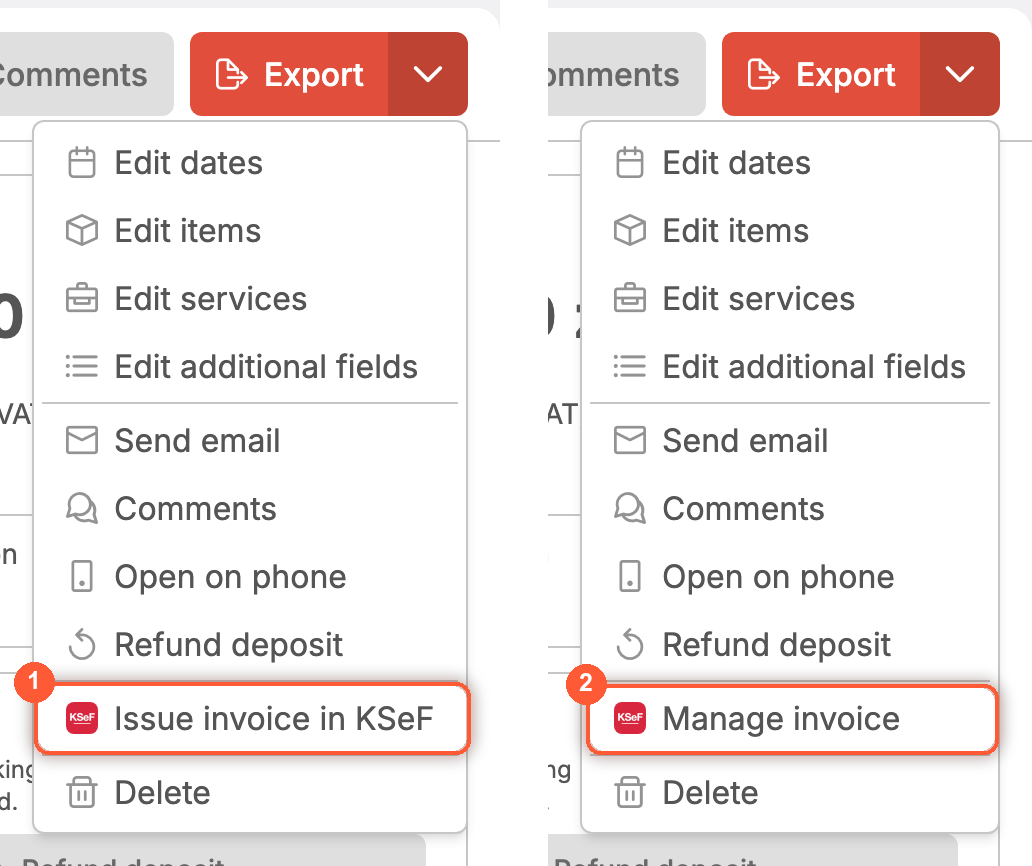
Open a booking and open its actions menu (the arrow next to Export). With KSeF connected, it shows Issue invoice in KSeF.
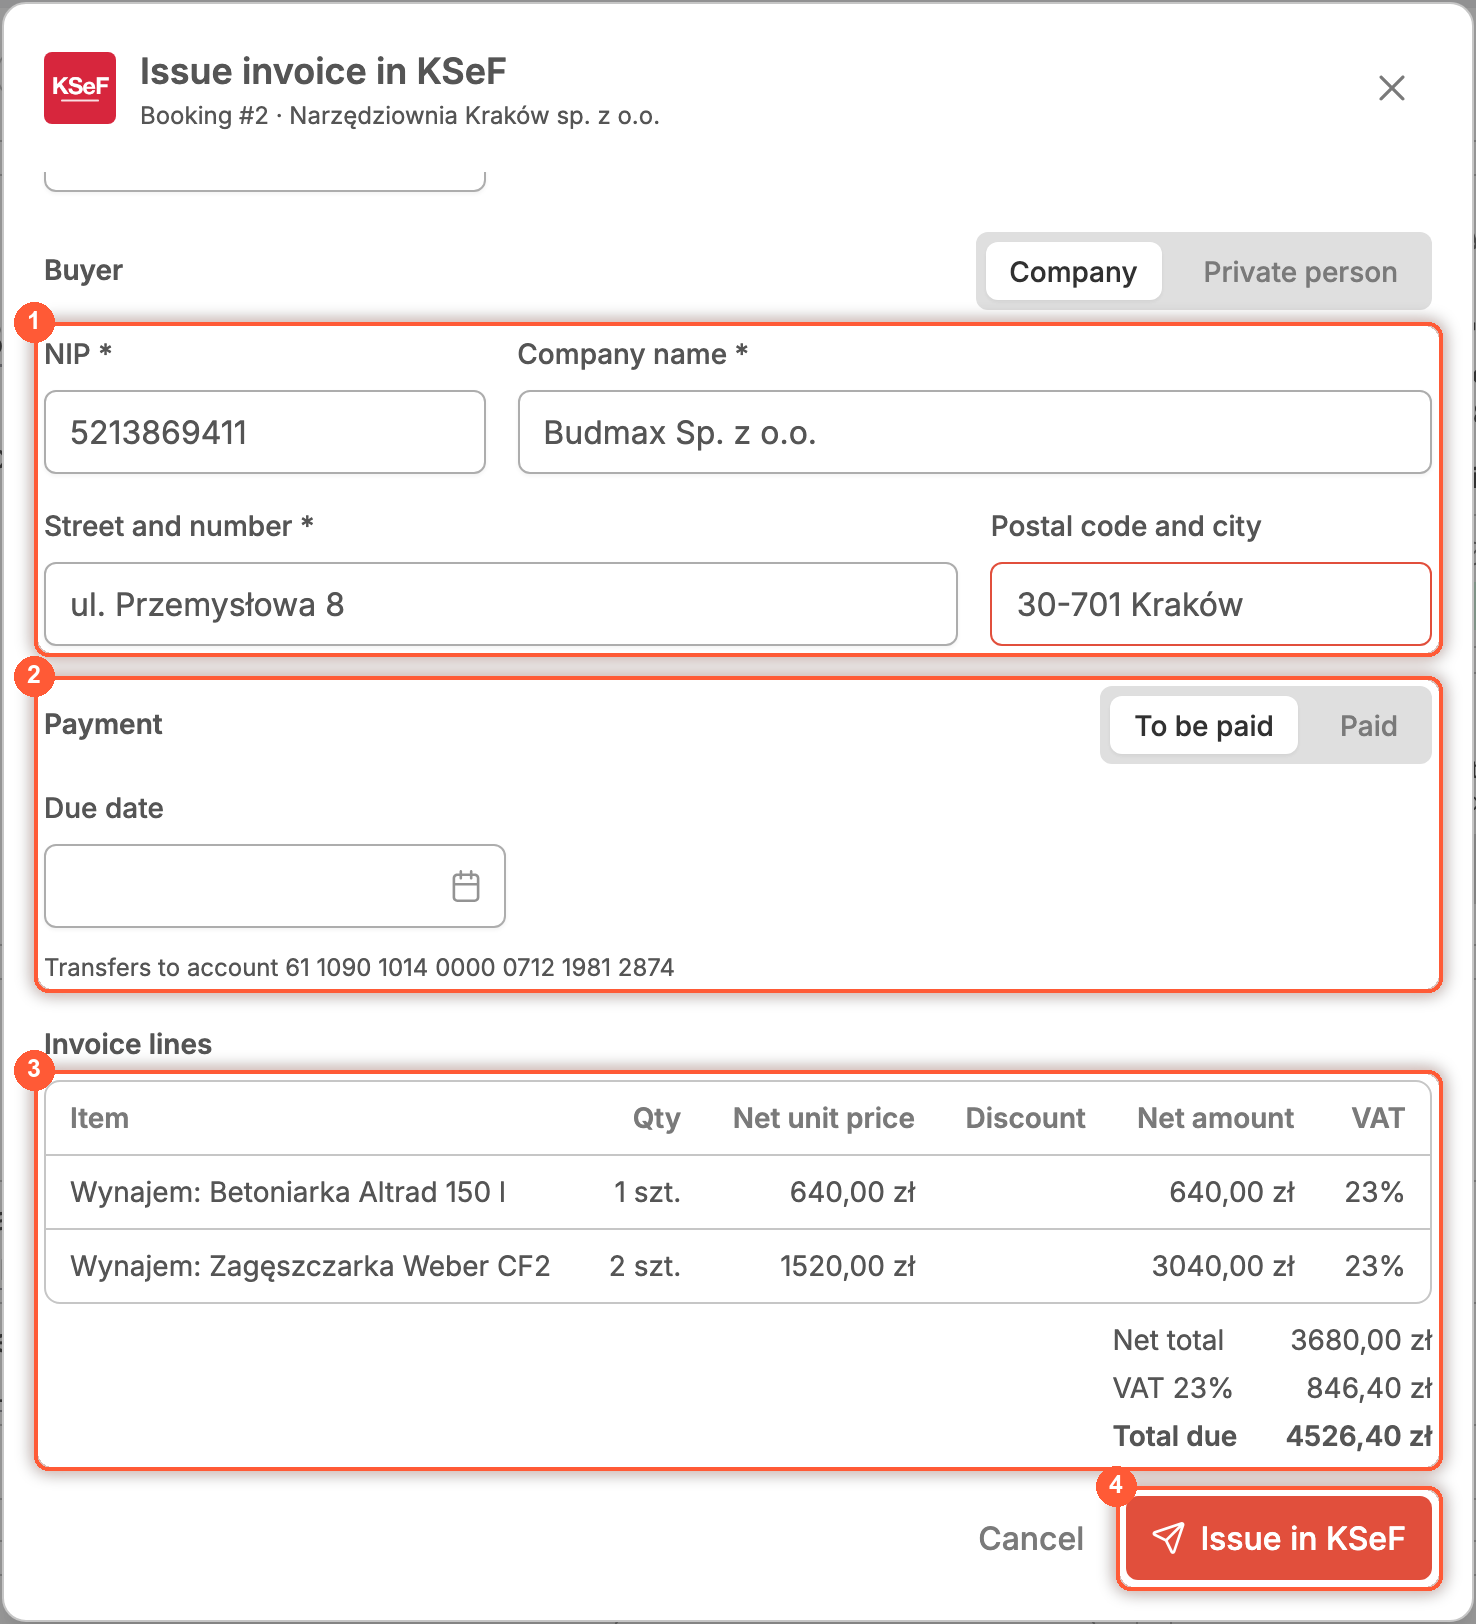
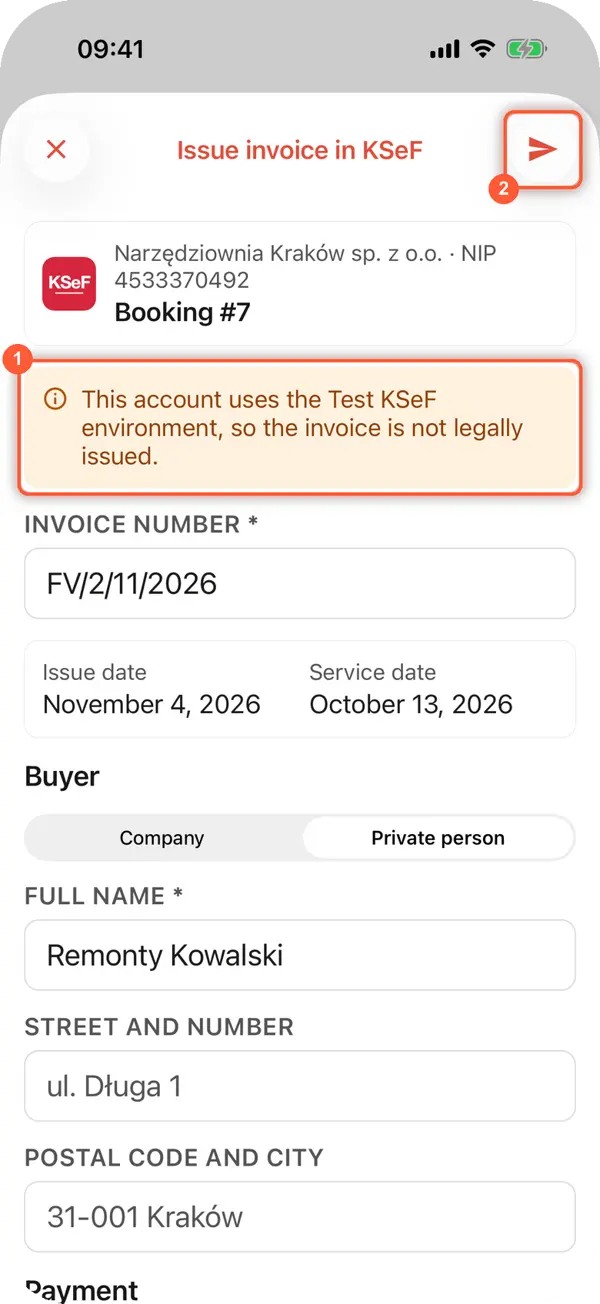
The dialog arrives already filled in:
- Invoice number: the next one after your last KSeF invoice, keeping your pattern (the first is
FV/1/MM/YYYY) - Issue date is today and the Service date is the day the booking ends
- Buyer: a company with its NIP and address, or a private person with just a name, prefilled from the client
- Payment: Paid with the date when the booking is fully paid, otherwise To be paid with an optional due date
- Invoice lines: every item and service on the booking with its price, discount and VAT rate
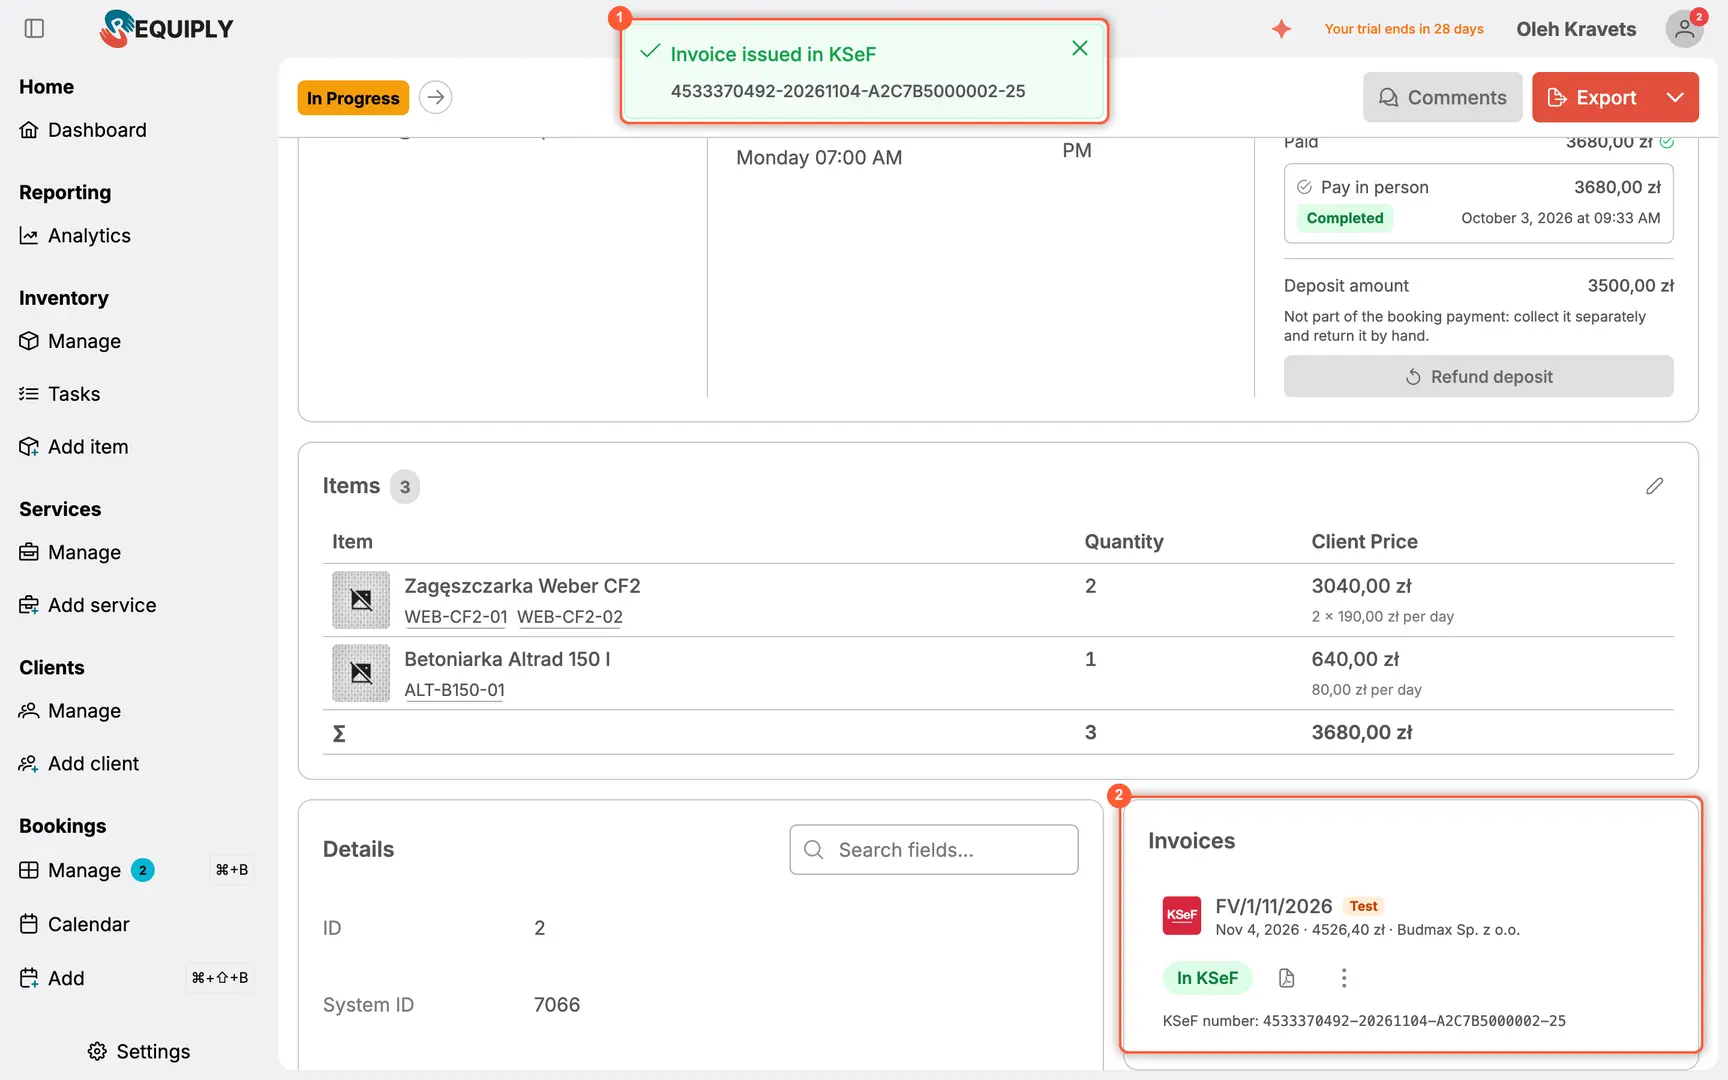
Check the buyer and click Issue in KSeF. A few seconds later Requiply shows Invoice issued in KSeF with the KSeF number.
If something on the booking stops the invoice, the dialog says what before you send anything: for example a booking without VAT on a VAT payer's account, or a VAT rate KSeF does not accept.
Step 4: Manage the Invoice on the Booking
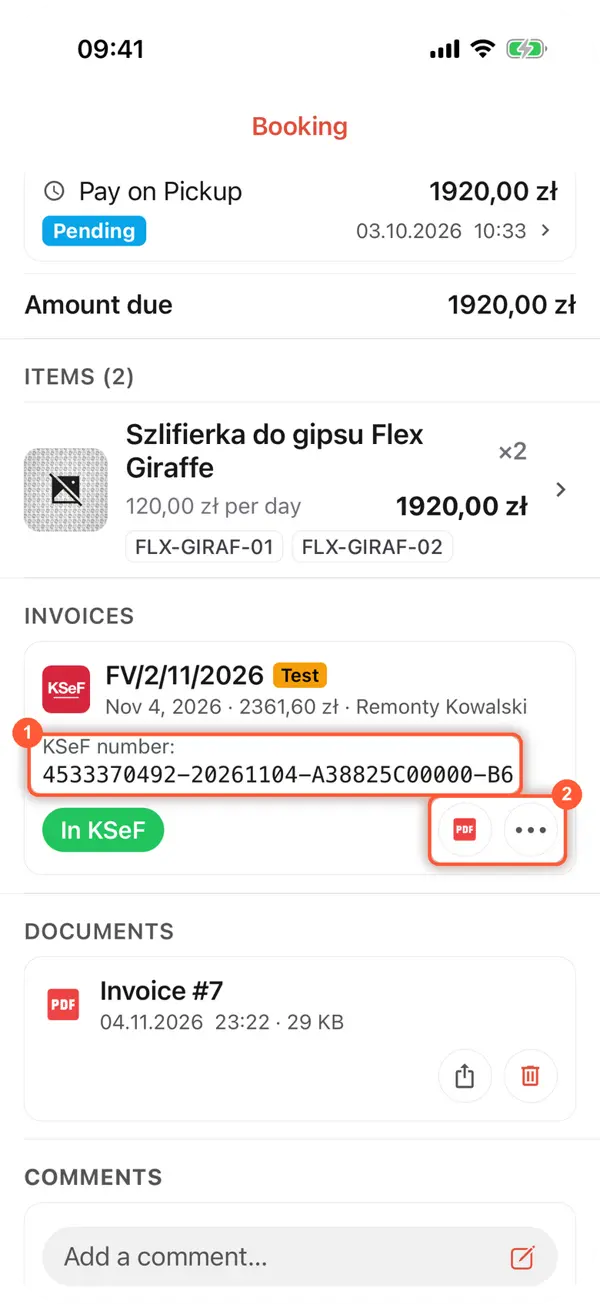
As soon as a booking has an invoice, an Invoices section appears on its page, and the menu item becomes Manage invoice, which takes you straight there. Bookings without invoices don't show the section.
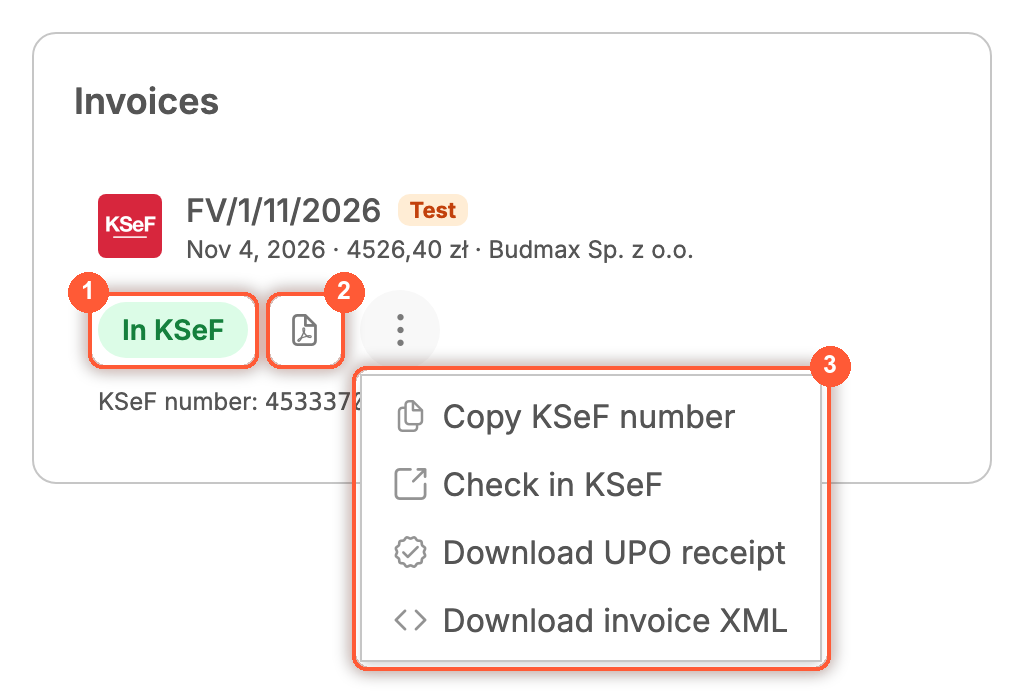
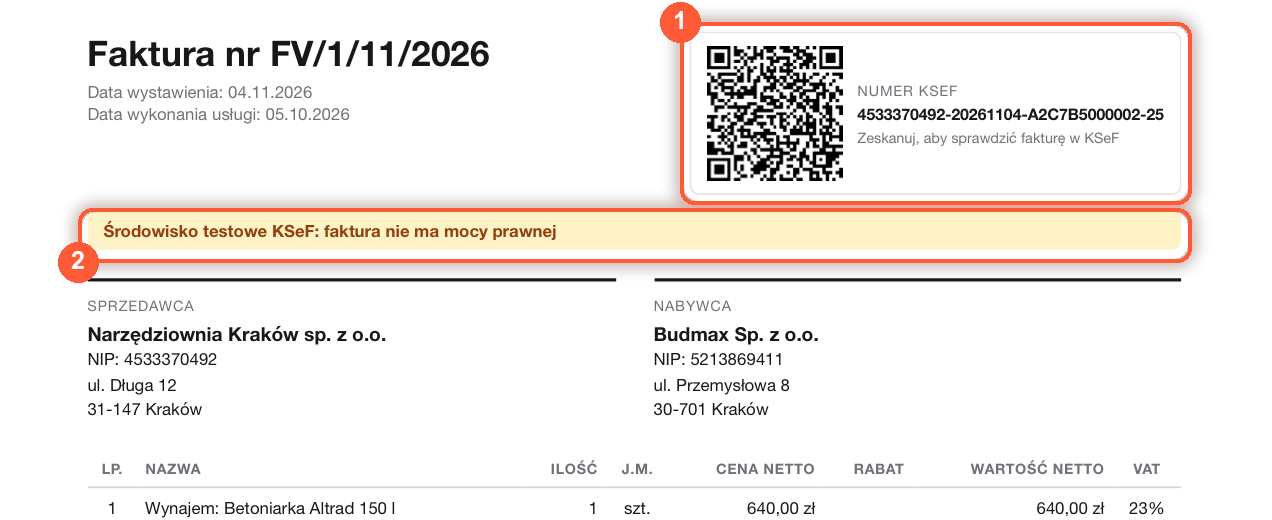
The PDF carries the KSeF number and the KOD I QR code that links to KSeF's verification page, so your client can check the invoice with a phone. Invoices from the Test environment get a banner saying they have no legal effect.
If KSeF rejects an invoice, its reason appears under the invoice with Issue again. The rejected attempt stays in the list.
Step 5: Issue From Your Phone
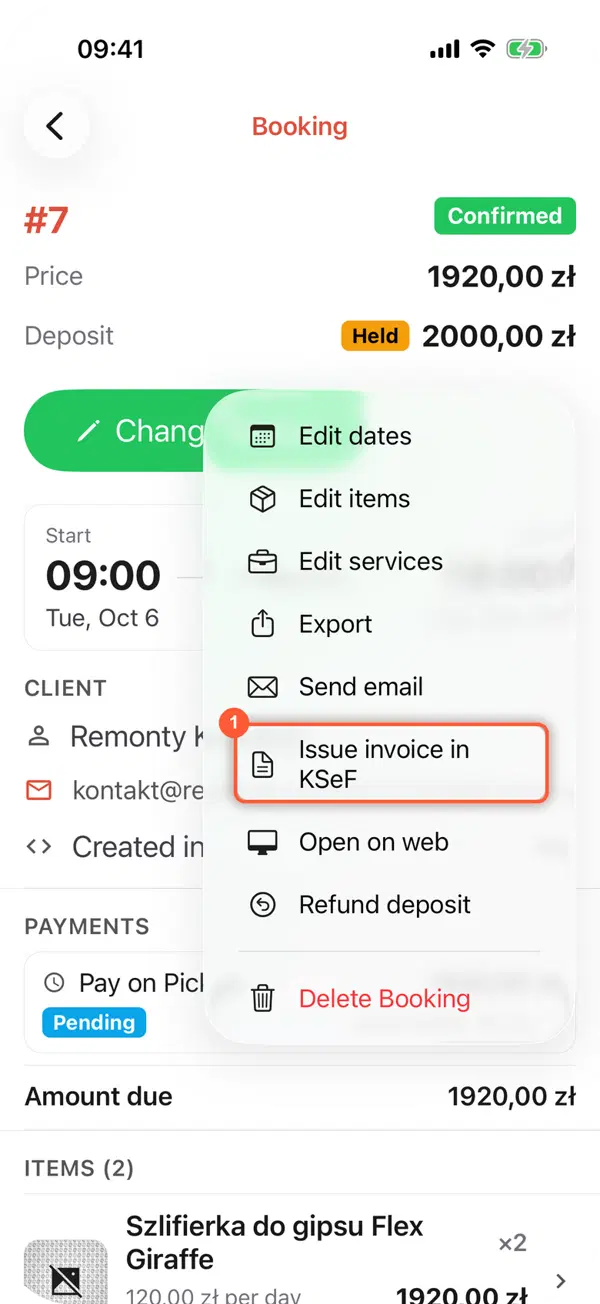
The same flow is in the Requiply app: open a booking, tap Actions → Issue invoice in KSeF, check the invoice and send it from the header. The Invoices section on the booking shares the PDF and opens the UPO, the XML and the verification page.
What It Doesn't Do Yet
Correction invoices (faktura korygująca), advance invoices and invoices in currencies other than złoty are not supported yet, and invoices you receive from suppliers are not imported. Issue those directly in KSeF or in your accounting software. Need one of them? Tell us at info@requiply.com.
Frequently Asked Questions
Additional Information
- Who can set this up: organization admins connect, edit and disconnect KSeF accounts. Anyone allowed to manage bookings can issue invoices.
- Where the token lives: encrypted in Requiply and never shown again. Use Replace in the KSeF dialog when you rotate it.
- Step-by-step reference: the knowledge base covers every field, status and message.
Have questions? Write to us at info@requiply.com or book a demo and we'll set KSeF up with you.
- ksef
- e-invoicing
- poland
- fa(3)
- structured invoice
- equipment rental software
- rental business
- invoicing
- integration
- requiply